The new year 2020 begins anew to go through the twelve-year cycle of Eastern calendar. Therefore, the symbol of the New Year will be a white metal rat. It is she who is the first in the list of symbols in the calendar. As the legend goes, the rat was able to trick all the animals and was the first to come to the Buddha. To please this little rodent you need to make New Year's toys for 2020 with your own hands, and most importantly, make this year’s mascot - a white metal rat. In addition, if you demonstrate the main qualities of a rat, determination, perseverance and perseverance, then throughout the next year these crafts will bring you good luck.
Rat craft made from threads
Even if you have never handled threads, don’t worry, because even a child can make this craft.
For work we will need:
- thick threads for knitting;
- glue moment;
- food foil;
- paints.
Manufacturing process:
- Cut a piece of food foil and crumple it into the shape of a rat's body.
- We make two loops on the threads in a small gap, which will then become the ears of a small rodent.
- Then we glue the made loops to the body with glue and wrap it completely with threads.
- At the end of the body we do not cut off the thread completely, as we need to leave a tail.
- At the end of the work, draw the nose and eyes.


Snowflakes
It is impossible to imagine the New Year without snowflakes, since they are an indispensable element of this celebration. There are many ways to make this craft; they can be crocheted, cut from paper, felt fabric, woven from beads and much more.
To make our snowflake you will need:
- colored paper;
- pencil;
- stapler;
- beads or rhinestones.
Manufacturing process:
- Cut out six medium-sized strips of paper.
- We wind the cut strips onto a pencil and wait five hours.
- We remove the stripes from the pencil and connect them together with a stapler.
- Glue a bead or rhinestone into the middle of the snowflake to make it more beautiful.
Light bulb snowman

A Christmas tree toy can even be made from an ordinary used light bulb. The main thing is that it is in the shape of a pear.
To make this craft you will need:
- white gouache;
- wool fabric;
- glue;
- cardboard;
- foam;
- twig;
- leg-split;
- threads;
- buttons.
Manufacturing process:
- First, paint the light bulb with white gouache. Apply the paint in two layers.
- We cut off a small part from the woolen fabric and make a hat for the snowman from it.
- Then glue it to the metal part of the light bulb.
- We make a pompom from twine and sew it to the hat of our New Year's toy.
- Cut out the nose and eyes for the snowman from cardboard, and then glue them to the light bulb.
- We make hands from a branch, cut out a scarf from woolen fabric and glue these parts to the snowman.
- At the end of the work you need to glue the buttons.

Fabric ball

If you have a child who goes to kindergarten, then you will definitely enroll homework in the form of making a New Year's toy. Of course, children want to do it on their own, but due to their age they are not always able to do this. Although there is no difficulty in making this craft, your help will still be needed, of course. But you can safely entrust some work to a child, since the most dangerous item here is only scissors.
- bright fabric;
- scissors;
- threads;
- spruce branches;
- foam ball;
- tourniquet;
- large satin ribbon;
- tulle;
- artificial or natural dried berries.

Manufacturing process:
- To begin, take a foam ball and apply it to the fabric.
- Cut off the excess part.
- Now we place the foam ball on the fabric, wrapping it with tulle and bright material at the same time.
- We gather the fabric at the base of the foam ball with a rope and tie it beautifully with an inconspicuous rope.
- Now we take berries and spruce branches and tie them with thread.
- We insert the resulting decoration into the base of the ball.
- At the end of the work, we secure our toy with a large satin ribbon.
Paper lantern

There will be a paper lantern wonderful decoration on the New Year's tree 2020, so I recommend starting to make it right now.
For work we will need:
- bright colored paper;
- scissors;
- white thread;
- ruler;
- pencil;
- needle;
- beads.
The work is carried out as follows:
- We measure out equal strips 12 cm long and 1 cm wide on a sheet of bright colored paper. You need to make 18 such strips. We also draw two circles for the base and end of the toy.
- We cut out the drawn elements and assemble them. To do this you need to take double thread white with a needle and put a bead on it first, and then a cut out circle of paper.
- Then we put the strips in half on the thread as well.
- We attach a circle of paper to the end of the craft and decorate it with a bead.
- Now we straighten the paper strips and that’s it, the paper lantern is ready.
New Year's toys for the tree made of walnuts

Walnuts can be used not only for food, but also as Christmas tree decorations. Now we will make a beautiful New Year's toy for 2020 from this nut.
For work we will use:
- walnuts;
- glue;
- ribbon;
- golden spray paint;
- satin bow.
The craft is made as follows:
- Clean the walnuts thoroughly.
- We treat it with golden spray paint.
- Attach a loop.
- We decorate our toy with a small bow at the edge of the rope.
That's it, crafts from walnut ready, now you can safely hang it on the Christmas tree.
Christmas tree made of pasta

Christmas tree made from pasta is original craft, which will delight not only you, but also your guests. In addition, it will beautifully decorate your New Year tree.
To make it you will need:
- pasta;
- glue;
- thread;
- green spray paint;
- beads.
New Year's paper toys are the easiest and most economical way to decorate your home for the holiday. Using one of the simple diagrams or instructions, even a beginner in this type of creativity can make cute decorations.
Template does not mean ugly
One of the most simple ways making paper crafts involves cutting out decorations according to certain patterns or patterns. Even elegant ornaments or silhouettes simply attached to the window will become a real interior decoration, templates for which can be found in the section and printed. Such decor is attached to the window using tape, paste or water - after the holidays are over, there will be no traces left on the glass.

When working with templates with a large number of small parts, the cutting of which will require filigree precision, it is better to use a breadboard knife and place the template itself on a special rigid base that protects the working surface from damage.


In addition to chains, garlands can be made from any images: repeating or united by the same style or color scheme.
Master class on making
To make New Year's toys in the form of corrugated balls, you will have to work hard, but the result will exceed all expectations. Collected in a garland paper balls will decorate any celebration, and balloons made in pink are perfect for... Making such balls is a very labor-intensive and complex process that requires strict adherence to the pattern. For beginners, another step-by-step guide that does not require special training is suitable.
To create a simple garland you will need:
- 1 roll corrugated paper desired color;
- scissors;
- glue.
Work progress:
- You should cut off part of the roll so that the width of the cut part is 3 cm. Do not unroll the roll before doing this.
- From the mini-roll thus obtained, you need to unwind a small amount of paper, while twisting the strip every 3-4 cm. The integrity of the tape should be maintained, preventing it from breaking.
- The paper between the places of twists should be straightened and given a slightly convex shape.
- Repeat the required number of times until the desired length of the future garland is achieved. Glue or fasten the joints of large fragments with glue.


Decorating the doors
The custom of decorating your home is becoming increasingly popular. On sale you can find both jewelry made from real pine needles and various options from artificial materials. Traditionally, the Christmas wreath is attached to the front door, which is associated with some inconveniences, since store-bought wreaths are quite heavy and difficult to attach to a usually metal front door, which cannot be nailed or drilled into. New Year's wreaths made of paper are very light, so they can be secured to the surface of the door even with tape.


How to do it?
You can make and decorate a New Year's wreath yourself. For this you will need:
- a sheet of double-sided green A4 paper;
- pencil and ruler;
- scissors;
- glue;
- decorative elements.
Manufacturing:
- Fold the sheet in half.
- From the fold, draw lines with a pencil so that the distance between them is 1.5 cm, and the lines themselves do not reach 2 cm to the edge opposite the fold.
- Without straightening the sheet, cut each line starting from the fold.
- Unfold the sheet and glue the edges along the long side of the sheet (its uncut parts).
- Connect the ends of the resulting cylinder to each other and glue them.
- Decorate the wreath with beads, sequins, bows. You can also use decorations cut from paper of other colors.

The process of creating a wreath from a cardboard plate will be very easy. You should cut out the bottom of the plate and cover the remaining rim with green paper strips the same or different lengths.

Fabulously beautiful toys for children
A fun pre-New Year activity for children will be creating beautiful fairy-tale figures. One of the many paper toy layouts should be printed, cut out and glued in the places indicated on the template. If the child is still too small to cut out with scissors, then adults should cut out the parts of the toy in advance so that the child can later glue them together.


Paper as a reason for fantasy
The appearance on sale of a large assortment of paper for handicrafts with a wide choice of not only colors, but also textures, allows modern craftsmen not to limit their imagination. A huge number of techniques, as well as the availability of patterns and patterns for products for every taste, paved the way for the almost daily creation of small masterpieces that carry not only the elegance of execution, but also the warmth of their master.


A festive interior decorated with crafts becomes very homely and cozy. Often, handmade New Year's toys become real family heirlooms.
Hello friends! Well, have you already started the New Year's bustle? Yesterday we finally bought an artificial one, but there really isn’t much to decorate it with. Therefore, an interesting idea came to my mind about making Christmas tree decorations with my own hands.
I would like to invite you to do such an exciting thing. So throw laziness aside, call your kids and start creating New Year's!
After all, in any case, you have paper, glue, plastic bottles and other available materials. Well, there is, right? We will need all of them today. From them you can make animal faces, carved ones, as well as the Snow Maiden and Father Frost and a bunch of other wonderful decorations. So don’t think for a long time, but rather start the fun process.
Moreover, there will be more than enough ideas for such an undertaking. As always, I tried and found the most best options making toys for the Christmas tree. And if you are ready, then we begin. 😉
Do not forget that in any business you need to use your own imagination. This is the only way you can get amazing and exclusive souvenirs.
DIY Christmas tree toys from scrap materials for children
First of all, I want to offer you interesting ideas on creating jewelry from different and almost any materials that are in every home.
Be sure to involve your children in creativity, because they are the ones who are looking forward to this more than anything else. magical holiday — New Year. And they will be incredibly pleased to hang toys that they make themselves on the Christmas tree.
I suggest you make an interesting decoration in the form of a small Christmas tree from an egg tray.
"Christmas tree from an egg tray"

You will need:
- gouache;
- super glue;
- paper egg packaging;
- scissors;
- brushes;
- PVA glue;
- thread;
- pencil.

Manufacturing process:
1. Take a paper egg carton and cut out 5-7 cells. Cut out parts from them as shown in the photo. Cut one of the cells in half, this will be the top.

2. Glue the parts together to form a tree. Roll the parts that come out of the halves into a cone and glue them at the top.

3. Take green gouache and paint the workpiece.

4. Cut out decorations from the leftover paper packaging and, if necessary, glue them together. Make small balls from a mixture of small pieces of paper and PVA glue.

5. Color the decorations.

6. Decorate the Christmas tree by gluing all the decor. Don't forget to glue the string by which you will weigh the toy.

7. Cover the product with clear varnish and dry. Everything is ready!

If you are a lover of expensive wine, then after emptying the bottle, do not rush to discard its cork. Collect them. And at the right time they will come in handy. For example, use them for the following purposes.
"Souvenir made from wine corks"

You will need:
- 6 natural wine bottle stoppers;
- natural twine;
- superglue;
- scissors;
- confetti, small beads.

Manufacturing process:
1. Carefully cut each cork into 3 equal parts with a knife.

The knife must be sharp so that the corks do not crumble.
2. You should end up with 18 pieces.

3. Now lay out small triangles from these pieces on a hard surface. One triangle should consist of 6 pieces of corks. There should be 3 triangles in total.

4. Glue each resulting triangle.

5. Cut three 40 cm ropes from twine.

6. Tie each string in the middle, forming a loop.

7. Take a dried triangle, attach a loop knot to the top, coating the place where they touch with glue.

8. Loop the twine around the entire triangle and tie the loose ends tightly in a knot.

9. For a tighter fixation, the thread can also be coated with transparent glue.

10. Make the same thing from the two remaining triangular blanks.


Well, now try to make beautiful snowmen from iron corks.
"Snowmen"

You will need:
- ribbons;
- bottle caps;
- acrylic paints;
- buttons;
- glue.
Manufacturing process:
1. Take three good, non-deformed bottle caps. Wash and dry them. Then paint with white acrylic paint.

2. Once the pieces have dried, glue the lids onto the tape, leaving a loop on top.

4. Cut a small strip from a satin ribbon. This will be a scarf. Tie it over the corks. And glue a button in the middle. Bright decoration in the form of a snowman is completely ready.

You can also use not only corks, but also the bottles themselves. Just not glass, but plastic. For example, by cutting them into halves and then gluing the parts to the required length, you get an excellent blank for any toy. Let your imagination run wild. And then, using paints, bring the plastic blanks to life.
This is how beautiful and bright you can make a penguin. I think everything will be clear to you from the diagram.

Or fill the bottles with any New Year's souvenirs, and decorate the top.

You can also cut strips from plastic and assemble a ball.


Here simple idea making small toys from paper and satin ribbons. Find on the Internet New Year pictures, print them in the shape of a circle, cut them out. Then glue it onto the cardboard. Weave the ribbons together and cover the outline with them. Glue the loop.

And here's another paper assembly for you. Also a very simple product, just for kids. Print the diagram and cut it out. Assemble the craft along the fold lines and glue it together. Decorate with beads, plasticine, etc. Glue a bow loop. That's it!

"Crystal Ball"

You will need:
- half beads made of glass and plastic;
- foam balls;
- trimmings of satin ribbons;
- scissors;
- glue gun
Manufacturing process:
1. Take a foam ball and start covering it in a circle with half-beads. At the same time, you can lay out a specific pattern, or make the craft monochromatic.
Remember that the glue must be applied in a thin layer, otherwise the foam will melt.
2. After you have completely covered the entire ball, all you have to do is embellish it a little more. Simply tie a bow from satin scraps and glue to the item. Don't forget about the loop.

In the same way you can make balls from buttons. Just paint the foam balls first, and then glue on the multi-colored buttons.

And disposable plastic cups are generally a godsend for creativity. They just need to be turned upside down and covered with paper decorations, sequins, adhesive tape or painted with paints. And in the end you may end up with ringing bells and funny snowmen.


For variety, choose a very simple product - sew or assemble a large Christmas tree bow. You can make many small bows.

I also came up with the idea of combining the purchased version with homemade creativity. Buy transparent Christmas tree balls, carefully unscrew the top and add glitter. Screw the product. Or apply glue to the surface of the ball in the form of any pattern and also sprinkle with glitter. The crafts come out very beautiful.

Of course, don’t forget about needlework using thick threads and regular glue.


Moreover, the use of this technology will allow you to make anything you want.

You can learn more about this technique here.

And here are the instructions on how such a miracle can be created.


Interesting products are also made from pasta. Usually they are glued together and thus made into snowflakes.


And a cool idea would be to decorate unnecessary old light bulbs. They are usually painted with acrylic paints and decorated with knitted, rag and other attributes.

You can also make toys from salt dough, plasticine or clay.

Or bake real edible souvenirs.

In fact, there are still a large number of holiday products that you can make with your own hands from improvised materials, it’s impossible to list them all. Therefore, we move on.
Christmas tree toys, crocheted with patterns
Now a selection for those who are interested in knitting. I found the coolest, in my opinion, crocheted souvenirs. I am sending it to you along with the diagrams. Knit for good health!
- "Bell";

- "Herringbone";

- "Angel";

- "Snowflake";

- "Father Frost";

- “Sweetie” and “Sock”;
- "Snowmen";
- "Dog";
- "Mouse";
- "Piggy".
DIY Christmas tree decorations made of felt and fabric (patterns and templates included)
From crocheting we move on to sewing from felt and any other fabric. Guys, this time I won’t explain to you what and how to sew, I’m sure you already know all this. After all, the main thing is to find patterns. This is exactly what I will help with.
I pumped up a wide variety of options. I kindly provide them to you. Save, cut and start sewing.


Master class on making a star for the top of a Christmas tree from paper and cardboard
Well, now let’s start making almost the most important attribute of a green tree - a star.
Of course, you can choose another method of making, but I really liked the following magical transformation.
"Star made of shiny cardboard"

You will need:
- shiny cardboard;
- scissors;
- glue gun
Manufacturing process:
1. Take cardboard and cut strips of equal width and length from it.

If your cardboard is shiny on only one side, then first glue two sheets of cardboard together so that both sides are shiny.

3. Now bring the free ends of the strips together and glue them together as shown in the photo.

4. Connect the side strips together. You should end up with something like this.

5. Repeat steps 1 to 4, that is, glue another exactly the same part.

6. Connect and glue the two blanks together so that you end up with an eight-pointed star. Yours volumetric star ready for the top of the spruce.

I think that such a masterpiece will bring a lot of pleasure, especially when the lights flash on the branches and the star also sparkles with new colors.
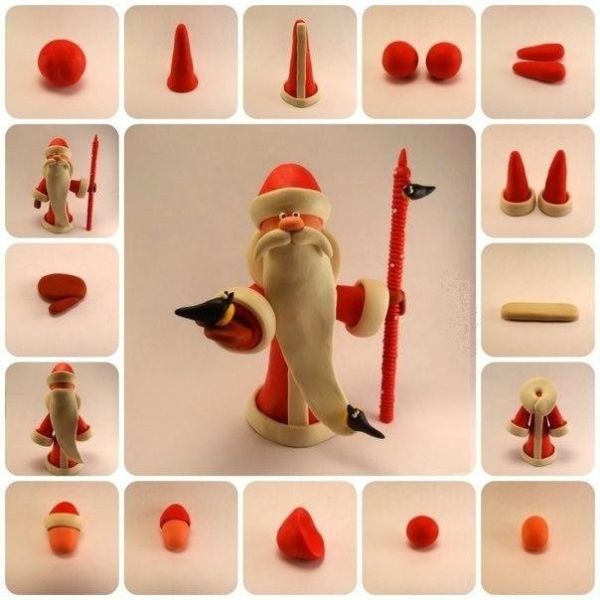
Christmas tree toy 2020 in the form of a symbol of the year of the mouse
Do you remember what year is coming? That's right, the year of the Rat. So don’t forget to appease the Mistress and make a souvenir in the form of a funny mouse.
“Mouse from a Kinder Surprise container”

You can simply plant such a product on a branch or make a hole and secure it with a string.
You will need: one plastic container and several pieces of multi-colored plasticine.
Manufacturing process:


Here is a hero for the Year of the Pig.
"Piglet made of colored paper"

You will need:
- double-sided tape on foam;
- pink and red half cardboard;
- black marker;
- pencils;
- markers;
- glue;
- scissors.

Manufacturing process:
1. Take pink half-cardboard and cut out many strips of it, 1 cm wide and 7 cm long.

2. Now use a pencil or scissors to twist each strip.

3. Apply glue to the top of one of the strips, and place another strip on top. Glue the strips in a circle in this way.

4. In the end you should get something like this.


6. Now cut out a long pink strip 0.5 cm wide.

7. Twist the strip so that you get a curl, like a pig’s tail.

8. Glue the tail to the ball.

9. Cut out two circles of different diameters and ears from half-cardboard. Cut out two small circles from red paper - these are the nostrils.

10. Glue a piece of double-sided tape onto a circle of smaller diameter. Attach it to a large circle. Using glue, glue the “nostrils”.

11. Using a black marker, draw eyes and outline the outline.

12. From red paper, cut out two strips 2 cm wide and 5 cm long. Paint them with the same black marker. This will be a scarf.

13. Glue the scarf to the back of the pig's head. Then glue the head to the body (volumetric ball). And don't forget to cut and glue the ribbon loop.

Agree, this is very easy craft and is available for children's creativity.
Step-by-step instructions on how to make a New Year's toy from cotton wool
And what awaits us ahead detailed master class on creating another Christmas tree decoration in the form of a bright cockerel. We will make it from ordinary cotton wool.
"Cotton Cockerel"

You will need:
- cardboard (thick but cutable);
- cotton wool (from a pharmacy, regular in a roll);
- cotton pads;
- white threads;
- potato starch;
- black half-bead eyes;
- tailor's pin (with a loop at the end);
- paints for painting.
Manufacturing process:
1. Take cardboard and draw the outline of a cockerel on it. Cut it out.

2. Unwind the cotton wool from the roll and tightly wrap it around the cut out outline to the legs.

3. Now wind the thread over the cotton wool. Do the same with the leg.


5. From cotton pads cut out the wings (4 pcs.) and parts for the tail (4 pcs.).

6. Cut out one comb and two parts for a beard from a cotton pad.

7. Make a starch paste and coat our rooster figurine with it. Then wrap thin pieces of dry cotton wool around our product. Apply paste to all uneven surfaces. Next, saturate all other parts with paste and carefully attach them to the cockerel. Form folds, fluff the tail, you can additionally make a thin strip of cotton wool and glue it around the neck. Glue on the eyes.

8. Dry the product upside down (hang it on the thread we left). And then paint it to your liking. Cut the thread and insert a pin, thread an elegant rope.

Use this technology to make other animals, fairy-tale heroes and characters.
Christmas tree toy “Garland” made from plastic bottles
Now we will make a decoration in the form of a garland. Moreover, the garland will not be simple, but from plastic bottles. How do you like this idea? Personally, I'm delighted.
"Flower Garland"

You will need:
- plastic bottles with caps;
- spray paints;
- scissors;
- electric garland;
Manufacturing process:
1. Cut off the tops of the bottles. Make cuts to create a flower.

2. Round the petals and paint the blanks in any color.
3. While the flowers are drying, make cross-shaped cuts in the caps of these bottles. Insert light bulbs from an electric garland into the cuts.

4. When the pieces are dry, screw them to the lids, spread the product over the Christmas tree and turn on the electric garland. Admire the creation!

Well, a simple manufacturing option garlands of icicles.

You will need:

Manufacturing process:

Christmas tree crafts made from polymer clay
I’ll briefly tell you what figures can be made from clay. You can use plasticine as a material.
Here it is important to come up with a character, sculpt the details, then put them together, and then make a loop.
Here are a couple of patterns for sculpting winter characters.
- Father Frost;
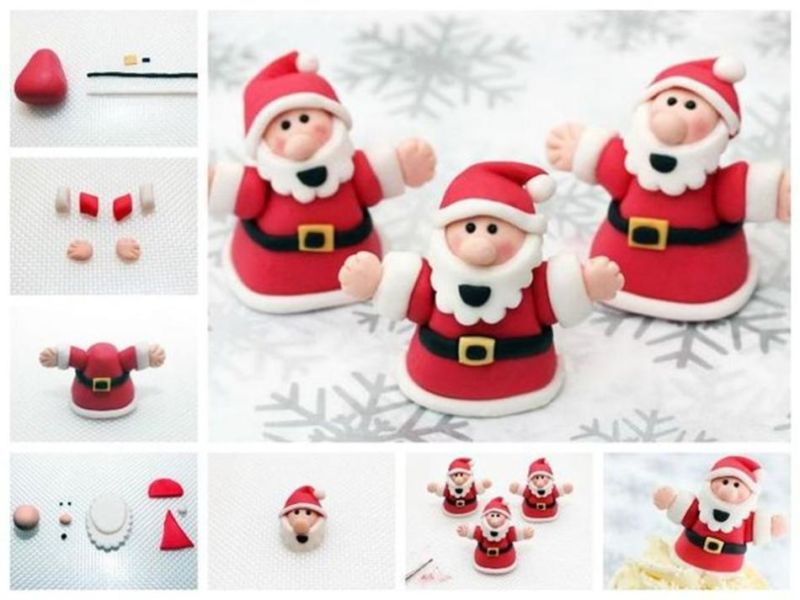
- Monkey;

- Girl;

- Snow Maiden;

- Piggy.

And options for finished work.


Video selection of the best wooden Christmas tree toys
Well, if you are interested in woodworking, then you will be interested in the following story. It contains ideas for creating wooden toys at home. So watch and create. By the way, such souvenirs are perfect as...
And this is where I end today. I look forward to your comments! Was I useful and creative? 😀 I think it’s undeniably yes.
I wish you to make what you like and decorate the Christmas tree together with the kids. homemade toys. With coming!
When before the New Year all family members find time and get together to make decorations for the Christmas tree and the room, it’s wonderful. In the old days when Christmas decorations There were roads, many had no choice but to make Christmas tree decorations with their own hands from scrap materials: pine cones, acorns, rags. Those days are long gone, but the tradition remains. In addition, the choice of materials has expanded significantly, and many interesting ideas based on handicrafts have appeared. different countries, which made the process of making Christmas tree decorations even more fun.
Fold and glue from paper
Paper is an affordable and pliable material from which you can make many different decorations. All its varieties are used to make toys: regular white, which is used for office equipment; colored, familiar to us from handicraft lessons at school, thin cigarette paper, corrugated cardboard, decorative cardboard.
Let's make flat figures of Santa Claus from the most ordinary colored paper.
 |
You will need a square sheet of paper. The example uses a square with sides of 10x10 cm. But the size of the square can be taken as desired. You need a two-color square: red on one side, white on the other. If necessary, you can glue two sheets of paper with double-sided tape. |
 |
Fold the square diagonally. |
 |
Smooth the fold with your finger. Lay it out. The result is a diagonal marking. |
 |
Fold the top corner towards the center point. We bend it. We see that we have a horizontal line. |
 |
Fold the corner back up to the edge. We bend it back. |
 |
We bend a small corner to the formed line. |
 |
Now we can completely wrap the lapel together with the corner. The top part is ready. |
 |
Let's start working with the bottom part. Fold the bottom corner to the opposite edge. |
 |
We make a lapel back to the bottom point. |
 |
We turn the workpiece from left to right and work with the back part. |
 |
We wrap the sides. We make a narrow strip. We wrap the strip on one side, and exactly the same on the other. |
 |
We wrap both sides completely towards the middle line. |
 |
Now we wrap the lower corners, as shown in the photo, along the border of red and white. |
 |
We turn the lower part up, again along the border of white and red. |
 |
We repeat the same on the other side. |
 |
We turn the workpiece over to the other side, draw eyes and a nose. |
For working with children, it is worth recommending something simpler, since a preschooler is unlikely to master folding origami Santa Claus. But even a child can make a paper daisy. Have scissors, glue, thread, and colored paper on hand.
 |
Take 8 strips of paper. The width of the blanks is any, but the thickness of the decoration itself depends on this. |
 |
Fold the strips together and then in half. From the edge, which is the middle of the strips, cut off the corners. |
 |
Lay it out. Tie in the middle with thread. |
 |
Coat the edge of each “petal” with glue and bend it towards the middle without smoothing the fold. |
 |
Decorate each “petal” in this way. |
 |
Thread a thread through one of the “petals” and tie a knot. |
Round decorations are made from colored paper folded like an accordion. To make them, you can take paper of the same color or different colors, then in the second case the circle will consist of 3-4 multi-colored sectors.
 |
Beautiful decorations made from accordion-folded paper. |
 |
Take three or four squares of colored paper. If the square is large, then you will need 3 pieces, if it is small - 4. |
 |
First fold the square in half. Expand. |
 |
Fold the edge to the resulting fold. Expand. |
 |
Then fold the last segment in half. |
 |
You now have a marked side. |
 |
Repeat on the other side. |
 |
Fold the sheet of paper along the folds like an accordion. |
 |
Bend the accordion in half. |
 |
Glue the inner joint. |
 |
Assemble a toy from the “fans”. |
In general, a variety of Christmas tree decorations, such as balls, are assembled from paper or cardboard folded like an accordion. The technology is somewhat reminiscent of what was just described in the previous master class. These Christmas tree decorations are made from rectangular sheets of decorative cardboard. They look very much like balls.

Pseudo-volume is achieved by gluing identical parts, as shown in the photo. These crafts are also easy to make. The thread is glued between the parts.

Chinese paper balls look very decorative. It is not easy to understand the technology of their manufacture from photos, so we are including a detailed video master class.
Video: three-dimensional paper Christmas tree ball
We also offer to make a Christmas tree using the origami technique.
Video: origami tree
Who remembers, candies used to be often hung on the Christmas tree. Why not hang it on the Christmas tree today too? big candies made by yourself? You will need:
- toilet paper tube;
- white paper;
- glue;
- red paint;
- cellophane as for decorating bouquets;
- cotton wool or padding polyester.
By the way, instead of cotton wool or padding polyester, you can put real sweets inside.
 |
We coat the tube with glue and apply white paper. |
 |
Glue the edge. |
 |
We cut the free edges into strips, bend the strips inward. |
 |
Take some not very sticky tape (you will need to remove it) and cover the tube. |
 |
Paint the gaps with red paint. |
 |
Remove the tape after the workpiece has dried. |
 |
Fill the inside of the candy with padding polyester or cotton wool. |
 |
Wrap the workpiece in film. |
 |
Secure the ends with braid or tape. |
Popsicle sticks - let's start "construction"
Everything is clear with paper, but there are materials at hand, which are also used to make New Year’s toys for the Christmas tree. Surprisingly, Popsicle sticks also work for this purpose. Although it is not even this that is impressive, but how original the decorations are. Let's find out how to make a Christmas tree house and decorate it.

To make a house you will need: glue, a napkin, a toothpick for applying glue, paint - white and blue color, tassel, decorations: beads, half-beads, sparkles, lace.
 |
The first thing we need to do is color the sticks blue. |
 |
After we have painted the sticks, we dip a wad of napkin into white paint and draw snow. We paint 8 sticks blue, 4 sticks gray. |
 |
After the sticks have dried, lay them out in the shape of a house and glue them together. We cut one of the gray sticks in half and lay it out in the shape of a fence. |
 |
We glue everything together. We are waiting for the house to dry. |
 |
We make “curtains” from lace, glue them with reverse side house. |
 |
We also glue lace onto the fence and turn the edges back. |
 |
We also glue a loop. |
 |
We decorate the house with half beads and sparkles. |
All the many ideas are difficult to somehow structure. Some craftswomen use combined materials or materials that are not intended for needlework at all.
Let's make a star from beads on a wire.
 |
This is how it will turn out. |
 |
You will need a star drawn on paper, wire, beads, pliers, scissors, thread, a needle, ribbon for a loop and for a bow. |
 |
We string several beads onto the wire. Using pliers, we form the outline of the star. |
 |
We attach the wire with beads to the template and align the base. |
 |
We string a lot of beads onto the wire at once. |
 |
Forming a star. |
 |
Bend the end of the wire into a loop. |
 |
We pass the other end through it and bend it. |
 |
Sew on the loop and bow. |
 |
The star for the Christmas tree is ready. |
Have you ever thought that you can make fun Christmas tree decorations out of light bulbs that are no longer usable and usually go in the trash?
 |
Here they are. |
 |
It’s good if the light bulbs are white; if not, they can be covered with white paint. Use a marker to draw eyes, nose and mouth. |
 |
Use red paint to paint dots on the sides. |
 |
Wrap the base in green colored paper, placing it on double-sided tape. |
 |
Glue a paper bow. |
We hope you found some interesting ideas for yourself. Have fun decorating your Christmas tree. We wish you a creative mood.
Today it is not difficult to buy a Christmas tree decoration for every taste and style. But when you want to get it yourself or give someone something original and sincere, it’s time to think about how to make New Year decorations with your own hands. It turns out it's not so difficult! After all, there are many simple options toys that can be created literally in one evening.
Paper toys
The most convenient material for making Christmas tree decorations is paper, because even a child can handle it. You can make a lot of interesting and beautiful decorations for the New Year tree from paper, but we will look at the most spectacular and simple ones.
Christmas trees

The main symbol of the New Year can be created from colored cardboard circles strung on a toothpick or stick. To leave a small distance between the layers, insert a bead between them. The embossed edge of the circles can be obtained using special scissors, which are sold at a craft and scrapbooking store. There you can also get paper and cardboard with beautiful designs.
You can make a simpler Christmas tree by folding a triangle of thick paper like an accordion and securing it to a toothpick, or by gluing four identical Christmas trees together. To decorate such a toy, a voluminous acrylic outline, glitter (gel with sparkles), ribbons, cords, beads, sequins, pearl appliqués and much more are suitable.
Snowflakes

Who didn’t cut out snowflakes from folded paper as a child? It would be nice to remember this long-forgotten activity. You can experiment with shape and complicate the pattern. For needlewomen familiar with quilling, it will be interesting to try making snowflakes using this technique.
Balls

Surprisingly, from flat paper can be made completely volumetric balls. To do this, you need to cut the paper into circles of the same diameter - old postcards or magazines will do. The blanks need to be folded in half and glued to each other. By varying the gluing options, you can get different-looking balls.

You can make more complex balls from the same paper circles. To do this, you need to draw an equilateral triangle in each element, bend it along these lines and glue it together.

Paper balls made using the quilling technique look completely different. You can create a ball shape by wrapping paper of different widths layer by layer, or use twisted parts just for decoration.
Fabric toys
The use of fabrics gives us no less options for toys.
Felt

You can use a wide variety of subjects for crafts - Christmas trees, snowmen, animals, stars, and hearts.
Figures made from felt in bright colors look impressive. Most often they turn out flat, because this fabric is quite thick and has volume in itself. You can use a wide variety of subjects for crafts - Christmas trees, snowmen, animals, stars, and hearts. Distinctive feature felt products - hand-sewn parts, stitching, multi-layer applique. To decorate such toys, you can use beads, buttons, braid and other decorative elements.
Thin fabric

If you have accumulated a lot of small colorful scraps, it's time to use them to make cute Christmas tree decorations. These can be three-dimensional balls, Christmas trees, snowmen, people or animals. Typically, such toys are filled with holofiber or padding polyester, and ribbons, buttons and other small details are used for decoration.
Socks

In addition to pieces of fabric, you can also use old clothes, for example, socks. If you choose them well in color and texture, you can create cute characters. The technique for working with this material is the same as with fabrics.
Thread jewelry
Volumetric balls

Thread balls always make an impression. But making them is not so difficult! To do this, you need to inflate a small ball, soak the thread with PVA glue and randomly wind it around the ball. It is important not to forget to leave a place to remove the ball - preferably in the area of its tail. After the glue has dried thoroughly, the ball must be burst and carefully removed. The finished decoration can be decorated or painted.
Balloon decorations
It is not at all necessary to build Christmas tree decorations completely from scratch. You can use simple plastic one-color or transparent balls as a base.
Decoration

You can decorate the balls with anything. You can glue multi-colored beads, small beads or buttons over the entire surface. The ball will turn out shiny and sparkling if you cut an old CD into small fragments and secure them with a glue gun or superglue.
You can decorate the balls with anything.
You will get original balls covered with cord in a spiral. Instead of a cord, you can use strips of thin colorful fabric twisted into a rope. It is important to secure each turn properly and not skimp on glue.
painting

Unique balls can be created using painting. To do this, it is convenient to use markers, glass paints, acrylics, volumetric contours, and glitters. The painting can cover the entire surface of the ball or only a part. While working, do not forget that a ball hanging on a branch can rotate, so it is better to apply a design from all sides.
Inner world

You can create a whole world inside the transparent balls. They can be filled with sparkling rain, dried rose petals, large light feathers, and even make a real terrarium by placing some soil, moss, twigs and plants in it.
Toys from scrap materials
To create Christmas tree decorations with your own hands, any materials that you have at hand are suitable - you just have to break away from stereotypes and awaken your imagination.
Cones

The most obvious object is the pine cones. They can be painted gold white colors, fasten directly to spruce branches or hang on strings. But an original solution could be to decorate large cones with small balls of thread or fabric. This way they will look like small Christmas trees.
Plastic bottles

They made a lot of things out of plastic bottles, but they come in handy here too. For example, you can make light, almost transparent balls from cut and decorated plastic rings, and adorable little penguins from the bottoms of bottles.
Light bulbs

Have you ever thought that ordinary incandescent light bulbs are very similar to Christmas balls? If you approach them creatively, paint them with paints or decorate them beautifully, you can get a very original decoration for the New Year tree.
Don’t forget to make your Christmas tree decorations comfortable and attach ribbons and loops to them, which will make it easy to hang them on a branch. Try to ensure that your decorations match both each other and the interior of the room. Make them as safe as possible if you have small children and pets. Enjoy the creative process and the approaching holiday!


