If your flash drive casing is worn out or the cap is lost, you can update it using an easy-to-use case "Owl". You can also bind a new flash drive as the original one. Master class.
Knitted cover for flash drive "Owl"
To work you will need:
- Iris threads, Fuchsia color, Lilac color, yellow, white and black;
- hook No. 1.5;
- loop with carabiner, for keychain, ready-made;
- heat gun with rods.
Description:
Head + body with threads in the color “Lilac”
1st row - cast on 5 chain stitches + 1 chain stitch, then in the first loop, knit two half double crochets, from the second to fifth loops, knit one half double crochet into the corresponding base loop, into the fifth loop, tie three half double crochets. Next we knit on the cast-on chain on the other side, making an oval. Until the end of the row, knit with half double crochets in each loop, including the tenth (aka the first).

2nd row - do not make lifting loops - knit spirally with half double crochets, this will look neater.
After knitting two or three rows, be sure to try it on your flash drive; the knitting should not fall off it.

So knit to the length you need, in in this example this is 13 rows. Finish knitting like this: when you reach the “sidewall” of the flash drive, knit four single crochets and three half-crochet stitches into the corresponding loops of the base, as if smoothing out the spiral.

Knit the head in a similar way, only reducing the number of rows to six, and in the last row, use single crochets to connect the “head” to the “body”. Before you cut the thread, be sure to check that the head can be removed well.

Wings with fuchsia threads:
1st row - cast on a chain of 5 air loops (hereinafter VP) + 2 lifting loops;
2nd row - in the first loop, knit two double crochets, from the second loop to the fourth, knit one double crochet, in the corresponding loop of the base, in the fifth loop, knit seven double crochets. Continue knitting in the same row, making an oval. And so on from the sixth to the eighth loops - knit one double crochet. In the last loop, in which two stitches are already connected, add 4 more double crochets, secure the row with a connecting loop;
3rd row - three air loops, single crochet in each corresponding base loop around the entire circle;
4th row - one single crochet, three chain stitches and secure them with a single crochet under the arch of three chain stitches of the previous row, so knit to the end.

Eyes:
Turn on the hot glue gun to warm up, and in the meantime, thread white cast on a chain of six air loops, close it in a ring, hide the “tails” and cut the thread. Using black thread, make a chain of three air loops, also close it into a ring, but leave long ends. Insert the black part into the white “donut” and, holding everything by the long ends, coat everything with hot hot glue. Now you can trim the long ends of the black threads.
Make two eyes this way.
Beak yellow threads:
Cast on a chain of three air loops, two lifting loops and knit unfinished double crochets from all loops, ending them with one loop.

Tassels Fuchsia threads:
Take the connected body and head, cut about 10 cm of fuchsia thread, fold it in half and pull it through the loops of the head with a crochet hook, secure with a knot and trim evenly. Make two tassels.
Now it's time to attach all the parts. You can sew them on, but a heat gun can handle this faster and easier. First glue the beak, then “crawling” onto it a little, glue the eyes.

Now turn the owl back and apply glue to the center of the wings and glue them to the body.

Turn the owl “face”, add wings to the front, hook it with a keychain holder and that’s it.

The owl flash drive is ready!


Now the flash drive has taken on a completely different look. In addition, according to Feng Shui, it is a symbol of wisdom and knowledge, helps to succeed in studies, and helps those who do not study to manage their lives wisely. So now you also have a good talisman.
More interesting:
See also:
DIY bonbonniere
I'm glad to introduce you to another one step-by-step master class Antonina Mazur - how to make a box - bonbon...
Potholder "Chicken", crocheted
Every housewife should have an oven mitt in the kitchen. After all, it is she who saves her hands from burns during...
DIY curtain tiebacks
Magnetic tieback for curtains made from ribbons will help make simple window curtains more interesting...
DIY knitted case for a flash drive. The most unique gift for any occasion is what you can give to a loved one with your own hands. This master class will tell you how to knit a case for an electronic flash drive or, in other words, a flash drive.
Having received such a gift, a person will feel the warmth and tenderness of your hands that made this surprise. Moreover, this useful thing will be useful to him to protect the flash drive in case of an accidental fall or exposure to harmful external influences.
To make an original case for a flash drive we will need: a flash drive, a hook and a ball of thread.
This model uses Iris threads, however, if desired, it is possible to use any other threads.
First, we knit a chain of 23 chain stitches (this is two centimeters longer than the length of the flash drive).

1st row - knit in single crochets, and in the last air loop We knit 3 single crochets.

We continue to knit single crochets into a chain of air loops in a circle.

In the last loop we knit 3 single crochets.
2 – 12 row – 48 single crochets.

The height of the tied bag should be such that the flash drive fits freely and can be completely hidden inside.


We do not knit the common connecting row of single crochets to the end by about 2-2.5 cm, so that the flash drive can be freely placed in the case. Pull the thread through the loop and tighten, hook it inside out, fasten and trim the end.

For convenience and mobility, you can attach a flash drive to the case. This way you don’t have to worry about losing the case and can comfortably wear it around your neck.
First you need to tie the lace. It's better if you do this in two threads. We knit a chain of air loops of the required length.

When the lace is ready, we thread it with a hook into a special hole on the flash drive.

Turn the cover inside out and thread the lace through the bottom of the cover using a hook.

We straighten the lace and tie its ends together.
Turn the case right side out and tighten the lace so that the knot is inside and not visible.

At the same time, pull the cord out of the side loop at the bottom of the case and place the flash drive in the case.

Our surprise DIY craft is ready! You can donate!
It is also possible to decorate it with appliqué, embroider it with beads, or decorate it with a knitted flower.

The case for the flash drive, made by yourself, is ready!!!
The master class was prepared by hand-made master E. Khorolskaya
You can give it to both a guy and a girl, it all depends on the style in which you decorate it. Take a closer look at this craft; it is based on very simple idea, using this template you can sew a cover made of leather, fleece, denim. It is absolutely not necessary to decorate it with embroidery - decorate the gift to your taste, using the technique in which you like to craft.
By the way, when my husband saw this craft, he said that it looked like a small sleeping bag. Indeed, there are certain similarities. He came up with another idea - to sew the same keychain for a lighter; in his opinion, it would be much more convenient to keep it on your keys than to search through your pockets.
In today's master class I will show you how to make a case for a flash drive with embroidery. For it we will need scraps of not too dense canvas, floss different colors, loop and ring for a keychain. I came up with the drawing myself, it’s very simple, you can use it or come up with your own.

We cut out the details of the cover from canvas. Let's start from the back. We take measurements from the flash drive and do not forget to make the necessary allowances, taking into account the volume and hemming of the edges, and cut them out. Using it we cut out the front part, which will consist of two parts: the main part and the valve. At their junction, add 0.5 cm to the hem on each side. You should end up with something like this.

We sew the edges. The canvas should not crumble if you grab two squares (see photo). When finished, lay a straight seam (like a backstitch) around the perimeter, we will need it for sewing the parts together.

Observant people will probably have noticed that the valves in these two photographs are slightly different. The fact is that at first I wanted to tightly overcast the open edge, but then I abandoned this idea, because... it turned out to be too thick and stuck out unattractively on the finished case. It’s easier to make a flap with a hem; it’s easy to sew in, and the joint is almost invisible, so I recommend this option.

For me, embroidery is the most enjoyable stage of needlework. Having finished with it, we move on to assembling the parts of the keychain. Sew them from the front side, grabbing the backstitch tracks with a needle and fastening them with thread.

When you sew the area where the keychain flap meets the main part, make a slight overlap - one square will be enough. Don't forget to sew a loop on top.
Well, here's the first fitting.

In principle, it was possible to finish it, but I decided not to leave open areas of the canvas and work a little more on this flash drive case. By the way, I specially made such indentations - parts completely covered with embroidery are much more difficult to sew together. In these photos you can see the final result.


Today I told you how to make a simple and useful gift for a guy or a girl – a flash drive case in the form of a keychain, decorated with embroidery. I hope that with my instructions you can easily cope with it and please your loved ones with a stylish souvenir made by yourself.
Host of the Domovitto.ru blog: Lina Skripka.
An elegant leather case for a flash drive that you can make yourself.
Basic materials:
soft leather belt approximately 30 cm, carabiner, magnetic lock and thick threads and needles, glue. 
awl, ruler, wooden washer, scissors.
Actions
The first step will be to prepare the appropriate storage medium, you will need to remove the metal cover and prepare the flash drive. 
On the middle strip of leather, you should cut a hole in a rectangular blade slightly smaller than the USB connector, so that the connector fits in quite tightly (the leather stretches quite easily). The color of the leather is arbitrary, I chose red because the wallet and key case are also in this color.  Skin preparation.
At this stage of work, you need to install one more part - a magnet for magnetic locking.
Assembly is very simple: all you have to do is put on the washer and lay out the plates.  Installing a lock.
  You need to add a place to attach a carabiner. In my case, the distance between the parts of the castle was 13 cm.

Now you can glue the leather together with glue - this will prevent the whole from moving while sewing. When sticking, gently pull the skin around - the skin is elastic so that it folds well.  We start stitching by starting and ending the seam on the usb plug to make the task easier and the final effect more satisfactory. Carefully draw the lines after which the seams will work.
  The effectiveness of the activity will largely depend on the final effect. The seams also serve decorative functions.
  Now, using sharp scissors, the excess skin should be trimmed away - cuts should be made approximately 2mm from the stitches. You can use a sharp knife for cutting.
 In the end you will still have to transfer the skin and cross stitch it. To easily locate the carbine, close the magnetic lock and pull the rifle, the leather must be properly modified.
 The final result.
  While working, I thought I would do the same for myself only in black. I think this is a very good and functional gadget, you can give it to your loved one.
Quickly and from scrap materials.
Let's not argue about the benefits of order and trust the wisdom and experience of people of different eras and generations:
It is necessary to restore order while there is still no turmoil. – Lao Tzu
Order saves time. – Johann Goethe
Order frees thought. – S.P. Korolev
It is impossible to put everything in order, let's start with ourselves. Many of us spend most of the day at our desk with a bunch of necessary and unnecessary junk. We are literally entangled in wires, chargers, adapters and other electronics. Why not organize it all?
To solve the problem, I suggest making a simple organizer. Each of the available means can do it. You may have to buy something extra, but spending a penny is not comparable to the benefits that our product will bring.
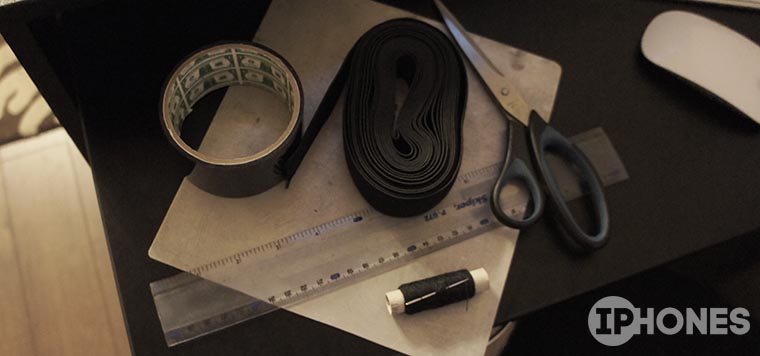
What do we need

- base for the organizer (any flat object of suitable size);
- elastic band for clothes (we will calculate the length below);
- threads, needle, scissors, tape (optional);
- up to an hour.
Warp
1. First you need to decide on the size of the future organizer. I recommend making it so that it fits easily in a drawer or on a specific shelf.
We are looking for a place for the future organizer, measuring the length and width of the space.
2. Now we need a base that will fit into the allotted space without any problems. As a frame, you can use a board, a very thick piece of cardboard, chipboard/kragis/plywood. A metal plate or plexiglass will do; you can use a DVD box or an old vinyl record (cutting a square out of it) as a base.
There is only one condition for the base - it must ensure the rigidity of the structure and not bend. For example, I found a suitable piece of galvanized steel in the pantry.
3. To make the finished product look beautiful, I covered it with black tape (to match the color of the rubber bands used). Those who do not strive for aesthetic appearance organizer may skip this step.
Rubber

4.
Most likely, you won’t have the required amount of elastic at home; you’ll have to go to a fabric store to get it. There you can choose a ribbon of any color and width.
- divide the length of the base by the width of the tape - we get the number of vertical stripes (we take into account only whole stripes);
- multiply the number of stripes by the width of the base and multiply the resulting length by two (the stripes will encircle the frame on both sides);
- Now we similarly divide the width of the base by the width of the tape - we get the number of horizontal stripes (we take into account only whole stripes);
- multiply the number of stripes by the length of the base and multiply the resulting length by two (the stripes will encircle the frame on both sides);
- we add the two numbers that were obtained in the second and fourth steps and get the required length of the tape.
5.
Now the elastic band needs to be cut into strips (vertical and horizontal). We have already counted the number of stripes, the length of the vertical ones is equal to twice the width of the base, and the length of the horizontal ones is twice the length of the base. In other words, each strip should encircle the frame without overlapping. 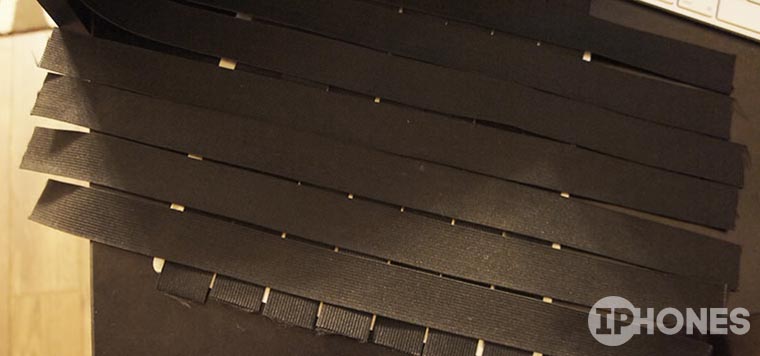
6.
The most painstaking process is sewing rings from strips. Pre-singe the edges of the tape on the fire and you can start making rings. 
We make a small overlap of 3-4 mm. and sew the ribbon together with a ring. You can ask your wife for help, especially if she has the skills to operate a sewing machine.
Weaving
7.
When all the elastic rings are ready, we begin to put them on the base. First we put on all the vertical stripes.
8.
Now we begin to put on the horizontal ones one by one. They need to not just be put on top, but threaded through one vertical one. 
Each subsequent strip is threaded in a checkerboard pattern. 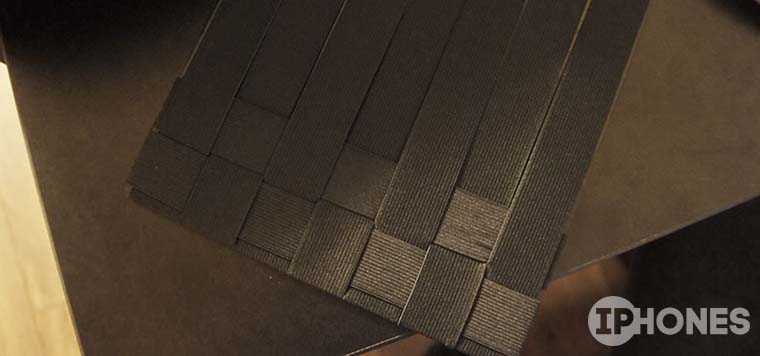
9.
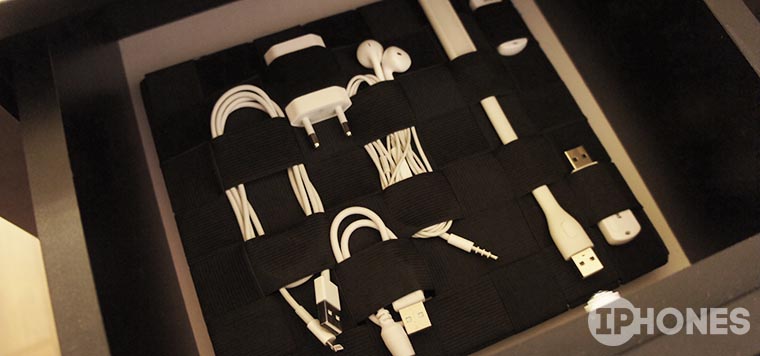
The result is a beautiful checkered organizer. 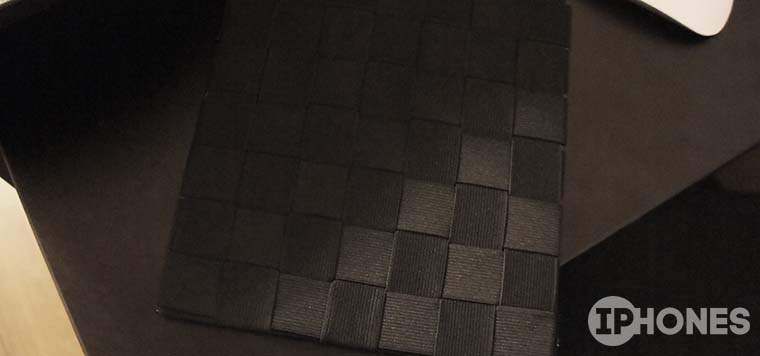
Fill in
This product can be filled with any small items stored in the table. Place wires, adapters, batteries, memory cards and flash drives, chargers and headphones in the organizer. 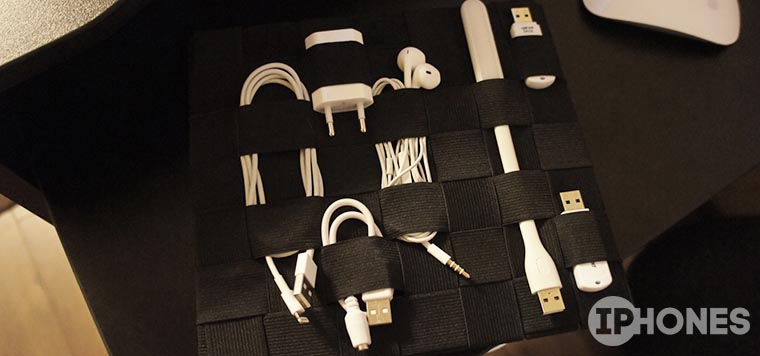
All the elastic bands stay in place quite confidently, but you can additionally stitch them around the perimeter. This process is quite painstaking; I would not recommend starting it right away. 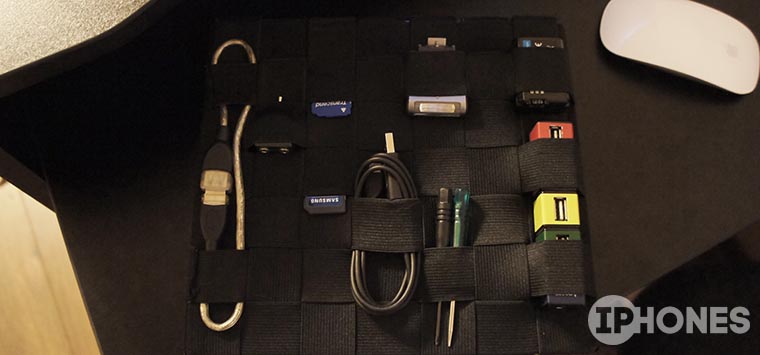
While the elastic bands are not sewn on, you can try to change the shape of the organizer so that not only small objects, but also large ones fit into it. 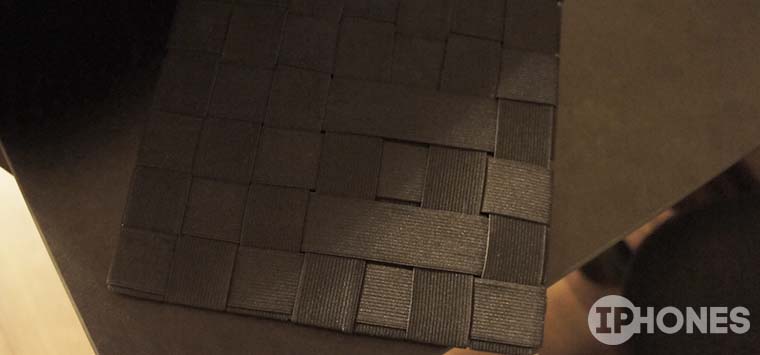
To do this, in a certain place when weaving the elastic, we skip the required number of intersecting rings. The size of such loops is determined by the dimensions of the device that we will carry in the organizer. 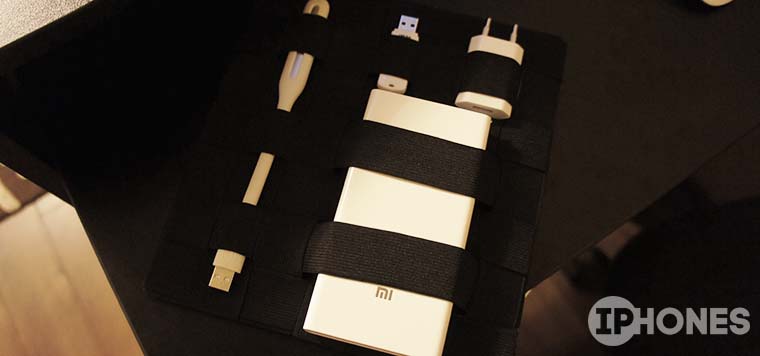
A few days later, when the final weaving pattern is approved, you can sew elastic bands around the perimeter or glue them with Moment glue. If the organizer will not be used in the most active way, you do not need to stitch or glue the elastic bands.
Bonus

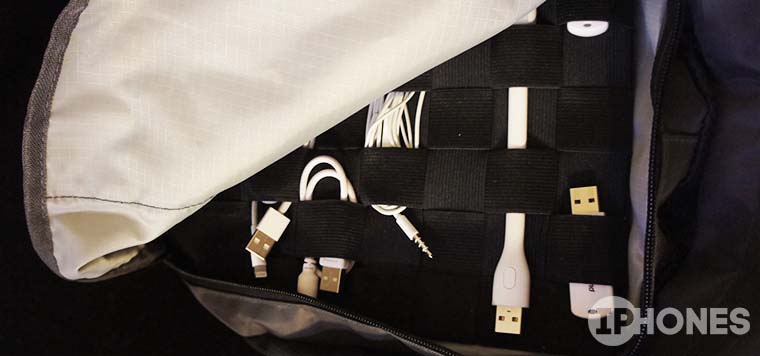
Our organizer can be stored not only in a desk drawer, it will perfectly cope with its functions on the road or travel. Determine the size of the product in advance so that it can then be placed in a bag or backpack.


