Greetings, dear readers! Today, as promised, I will tell you how to sew for a girl. To be honest, I first made a backpack for a girl, and then I found out that it corresponds to the latest trends in the children's fashion section. Yes, sometimes it happens like that. True, in my version there were also applications in the form of two owls. After all, I still have a little girl and I chose these characters for decoration, I think they are very cute. I made the backpack from what I had at home, I didn’t buy anything special. I took measurements from an old backpack that was left over from my son. Read below how to create it all!
For comparison, I used a backpack from.


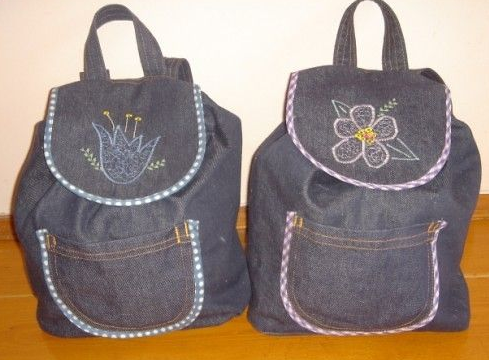
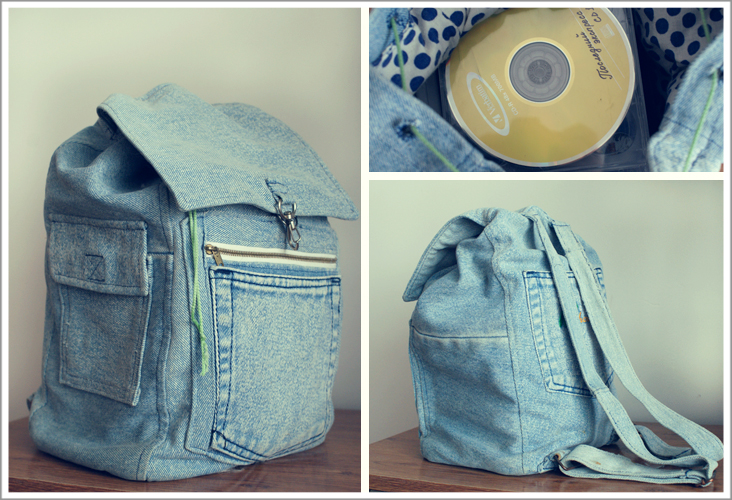
As you can see: floral design, zipper lock, quite roomy size. We needed a backpack for swimming training, there was a lot of stuff, so roominess and convenience were the deciding factors.
In order for the backpack to keep its shape, I quilted all the details. The only thing I didn’t take into account was that these parts turned out to be very thick and the machine had great difficulty coping with the places where the straps were attached. Therefore, if you are similar to mine, then take this point into account and stock up on special straps for shoulder straps, as in the photo of the backpack above. It really makes more sense. And so let's get started!
Materials, necessary to do it yourself :
- fabric for the top of the backpack (about 1 m);
- lining fabric;
- padding polyester for stitching 100 g/m2 thickness;
- webbing straps;
- zipper 50 cm;
- bright pieces of fabric for applique;
- applique pattern;
- adhesive fabric;
- underwear elastic for the outer pocket;
- threads, scissors, needles, sewing machine, decorations.
My fabric is linen with a floral pattern. It is too thin for a backpack and needs to be either reinforced or quilted with padding polyester. But, as you already understood from previous articles ( and ), I really love quilting. Therefore, I quilted parts with padding polyester with a density of 200 g/m2, but this turned out to be too much, 100 g/m2 is enough.

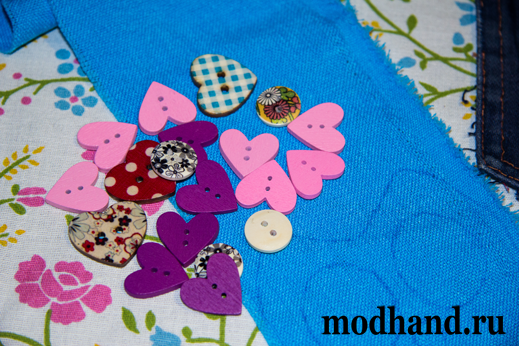
For appliqués, I chose pieces that were monochromatic, but bright, so that they could be clearly seen on the floral ornament.

The jeans pocket is a godsend for such things, very convenient.
I also had wooden buttons in the shape of hearts and round ones. The round ones were perfect for the pupils of the owls, and the hearts fit the theme, since the owls seem to cast loving glances at each other.
And a backpack pattern will appear soon! Don't miss it! Subscribe to blog updates and have fun creating!
It's fashionable to save - it's easy!
See you soon, Yulia Morozova.
Take it away backpack pattern to the piggy bank.
A backpack is a great way to carry things. It combines a lot of advantages, which include: spaciousness, reliability, as well as high functionality.
The very concept of “backpack” came to us from the army. For the military, in order to be able to quickly transfer things that could be assembled in the best possible way, it was necessary to develop a new bag. The backpack became her embodiment. The combination of many compartments that facilitate proper distribution of things in the space of the backpack allows it to bear the proud title of “the most comfortable bag.”
Advantages of a backpack.
The main advantages include the possibility of high-quality weight transfer on the back. This solution makes it relatively easy to carry fairly heavy loads without damaging the muscles or causing discomfort. The backpack is secured with wide straps that correctly distribute the necessary load. In order to make the use of this item as convenient as possible, the straps are subject to correction, depending on the required length, they can be adjusted.
Today I want to tell you how to sew a beautiful backpack from fabric that you have lying around at home. The reason for the huge accumulated number of fabrics is that I carefully collected them for a friend, however, she did not need them. In order to ensure that the fabric did not lie idle, it was decided to use it for its intended purpose.
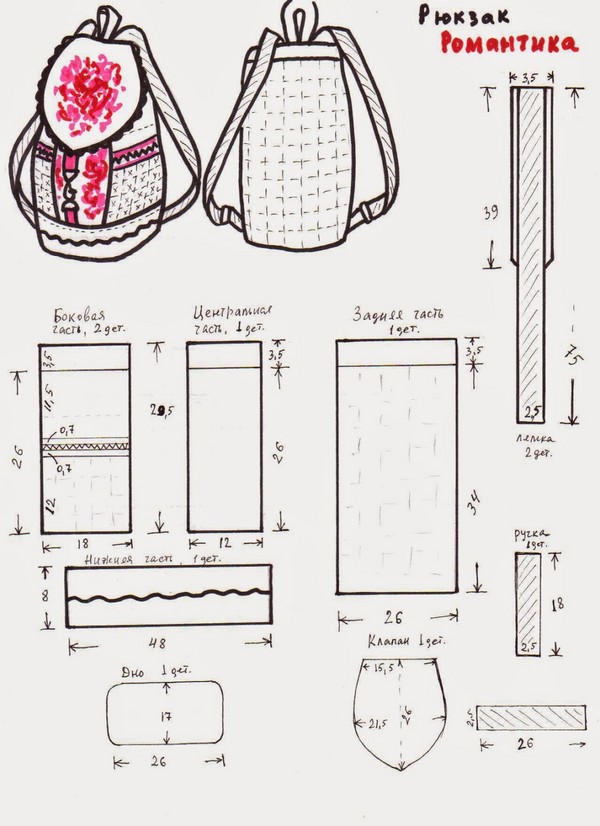
Backpack patterns.
The required parts are
- rectangular cut out of fabric, format 73 cm by 37
- oval bottom, format 23 by 17
- two straps, the length and width of which can be modified. I decided to make the length 100 cm and the width 11 cm.
- flap
In order to make all the patterns, you should identify old jeans that you wouldn’t mind putting under the knife, a few centimeters of fabric (possibly a combination of different scraps), buttons, lining, threads, as well as future fastenings - I use them as rings.
Interesting moment!!! Scraps of fabric can be attached to non-woven fabric - I simply overlapped them one on top of the other and I got a pretty good picture.

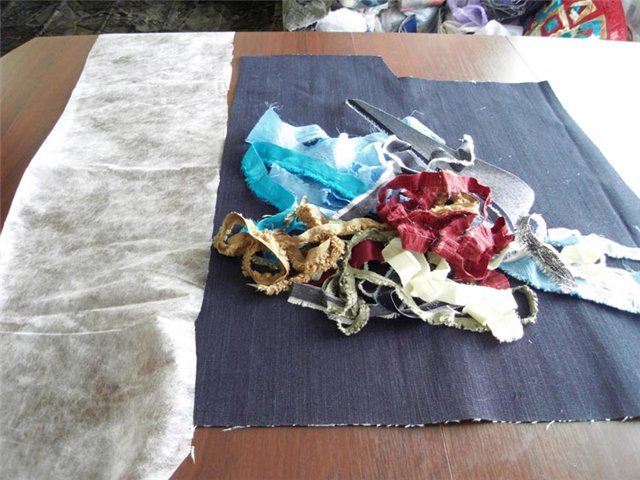
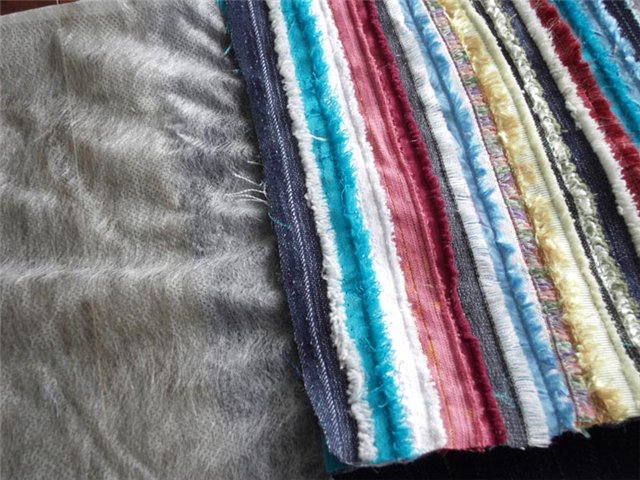
It is necessary to use this technology in order for us to obtain the required number of parts, namely three parts.
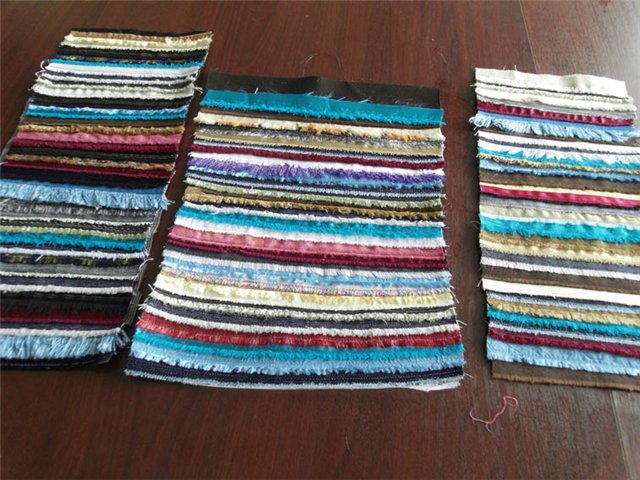
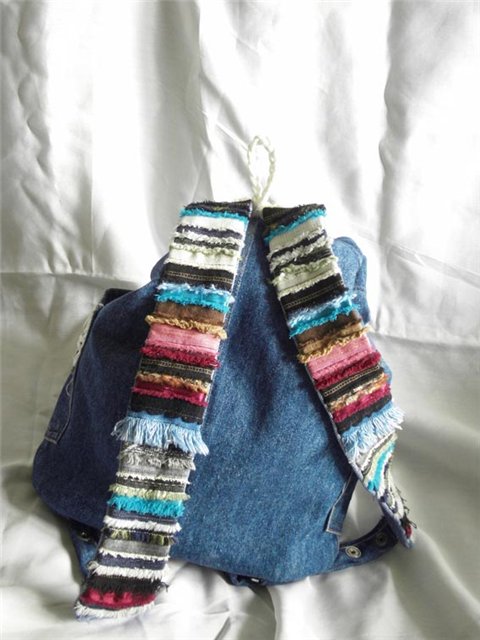
One of the future parts will be needed to serve as a “closure”. The other part will be divided into two parts so that with its help the straps of the future backpack will be decorated. This technique is necessary to create maximum symmetry. Of course, within the framework of creating straps, you can use various color solutions, however, I decided that my backpack should look classic - that is, I tried to avoid any asymmetry.
In the meantime, we need to take the old jeans we put aside in advance and mercilessly draw the future boundaries of our backpack on them. You need to make 2 parts. If you do not have relevant experience, try to avoid cutting by eye. In order for all the parts to be the correct size, you need to use a ruler or a centimeter, as well as chalk, which will help make the correct markings, based on which we will subsequently cut out the base of the backpack. To begin with, you can cut out one part, and then outline it, thereby creating the silhouette of the second.

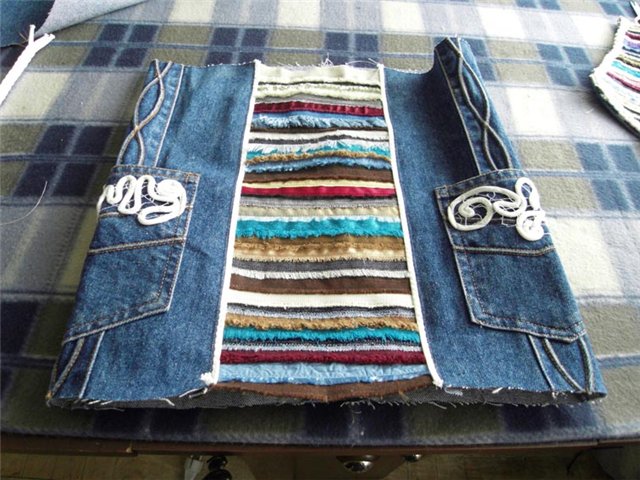
In order to give my backpack an unusual look, I decided to experiment. I ended up with jeans pockets on the sides - this didn’t really suit me, from an aesthetic point of view. In order to make my backpack more attractive, I took an ordinary ribbon and, using a machine, sewed it along the contour. An important step here will be choosing the right design, since failure to match the motifs can dramatically worsen the visual component of our work of art.
The next step will be stitching. In order to sew the bottom properly, you need to turn the product inside out. The bottom must be sewn, stitching at a distance of approximately 2 cm - this is necessary to be able, upon completion of work, to trim the seam so that its excessive protrusions do not interfere with the operation of the backpack. Also pay attention to the thread tension. It is not permissible to create hooks, since their presence may call into question the correct use of the backpack - the ties will significantly distort the geometry, thereby exposing the backpack to deformation and further destruction.
The next step will be sewing on the straps. They need to be sewn under the “opener” in such a way that their origins are not visible - that is, they need to be sewn with the fold inward. In order to make the seam less noticeable, you should tuck the straps and sew a stitch only along the tucked part with inside. The same manipulation must be performed with the lower part. When sewing on the straps, it is necessary to constantly check the symmetry - as we remember, we made the straps from one piece of fabric onto which we had previously sewn the fabric. Uniform sewing will help maintain the integrity of the design and everything appearance the backpack as a whole.
Important!! In order to be able to adjust the length of the straps, you must take care in advance of purchasing special fasteners. If you don’t have them, ordinary knots can act as a length corrector. Of course, their use will not add a pleasant appearance to the backpack, but this technique will help give some freedom of style.
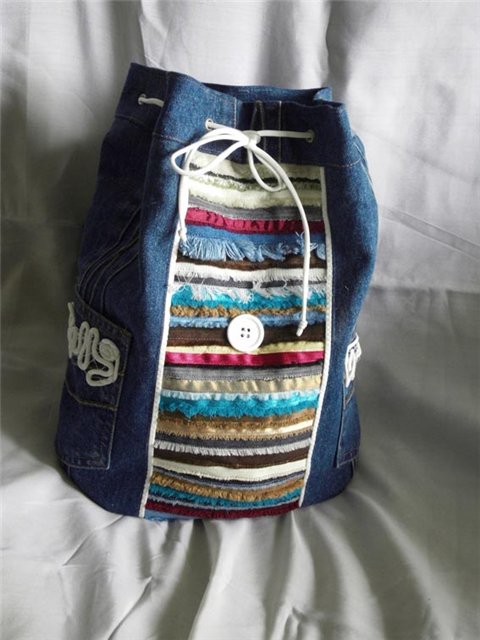
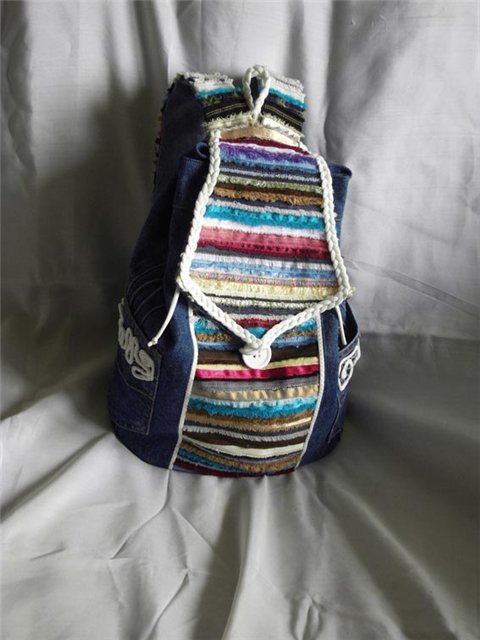
Thus, we got this backpack.
The final stage is sewing on the top lining, as well as installing the lining. The upper part is sewn on as standard - by folding it along inside seam. As for the lining, it is necessary to take measurements according to the parameters that were used to create the patterns of the backpack itself. An important point there will be a need to establish additional boundaries of 2 cm. These boundaries will be necessary in order to soften the boundaries of sewing the lining.
As for the fastening, it is sewn last. Completely different elements can act as fastenings. You can use Velcro and hooks, however, in my experience, the best fastening is rings. As you can see, I used an ordinary button, which served as the basis for fastening
This is how I got a beautiful, roomy backpack. If you have the opportunity and desire, you can, using these patterns, create backpacks that are larger than this one in size.
Today, a backpack is a stylish and fashionable accessory. In stores, all the backpacks are the same, but sometimes you just want something new and unusual. If you don’t know how to sew a backpack with your own hands, then patterns and step-by-step instructions from our website will help you!
If this is the first time in your life that you have come across such needlework as sewing, then you will do an excellent job sewing an accessory. There is nothing complicated in this matter, the most important thing is to follow the step-by-step instructions with photos and videos that we will provide below.
Instructions for sewing a fashionable backpack
Let's decide on the basic tools and materials:
- Various pieces of leather;
Main fabric 145 cm*160 cm;
The cord is 115 cm long and approximately no more than 1 cm thick;
Ribbon made of keeper fabric, size 150 cm * 4 cm;
Belt adjustment devices;
Large carabiner for fastening - one piece;
Blocks with an internal diameter of 0.7 cm - 8 pieces;
Buckles with a peg should not exceed 3 cm in length;
Half rings with a diameter of 4 cm - 2 pieces.
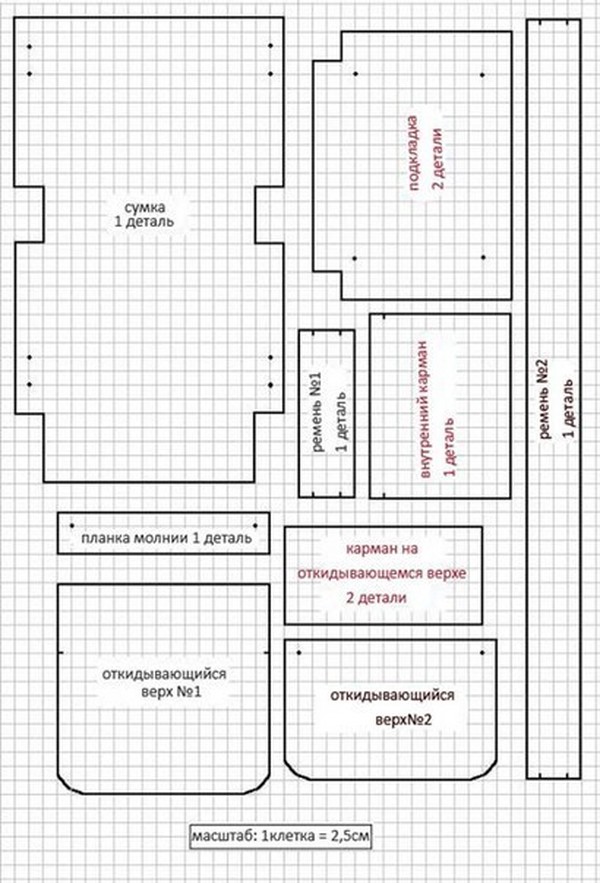
First of all, we start by studying the pattern. You can find it on the Internet, or draw it yourself.
Backpack patterns: photos
(photos enlarge by click)
The pattern should have a pocket, the main part of the product and, of course, a valve.
 DIY backpack
 We decide on the dimensions ourselves, how you want your backpack to look, and we make it that way. In a similar way, you can sew a briefcase, as well as a backpack, using patterns and step by step instructions, and with your own hands.
Also, do not forget that there should still be a little indentation for processing the seams. For such a case, it is enough to leave about one centimeter.
To build pockets, you need to leave 2 cm, and for the main part up to six centimeters.
Now ready-made pattern apply it to the fabric and begin tracing with fabric chalk. Then we cut out all the necessary parts.
The parts from the main fabric should be as follows:
- Flaps for pockets - 2 pieces;
The backpack itself (base).
We make the following parts from leather, which will mainly be used only for edging the product itself:
- The strip for the backpack flap is one and a half centimeters wide and 60 centimeters long.
2. For the flap of the pockets, you will also need a strip, one and a half centimeters wide and 40 cm long.
3. Belt belts 6x8x3 cm - 2 pcs (the size is indicated in the finished state).
4. Belt loops for half rings 8x10x4 cm (the size is indicated in the finished state).
5. Patas in duplicate.
Additional space for processing seams from leather product not required. We cut out the details in the same size as has already been written.
If there is no skin, then in in this case You can use almost any material, but preferably very dense.
After all the details have been prepared, we proceed to the sewing itself. First of all, you need to make the base. To do this, take the cut out main part and fold it in half. Machine stitching. Then we move on to processing the slices. To do this, we fold the upper additional places several times and stitch them.
Now you need to build a pocket according to the pattern, using your own hands using step-by-step instructions, in order to answer the question of how to sew a children's backpack:
- The specially left space must be turned to the outside and tucked in with gentle movements.
Arm yourself with a needle and thread and stitch by hand.
Use a hot iron on the side and bottom edges.
Place the finished product in your pocket.
We place the folded lines on the ironed edges, and only then iron the folds on the sides and bottom.
We make seams in the corners of the product.
Iron it.
Now we move on to making special loops for the backpack (made with our own hands using patterns and step-by-step instructions), thanks to which the straps will be held on the backpack. With the wrong side, we fold the small loops inwards from the beginning, having previously tucked in additional space along the cut.

We sew along the edges of the product, cutting off the excess fabric.
In one of these loops you need to make a small hole into which the buckle will be inserted. And the remaining space should have been approximately 2 centimeters. Then we thread one end into the buckle. We wrap the other side so that the length remains about four centimeters.
We sew the finished loop to the pocket so that the buckle faces up.
We do the same with the second loop. When ready, sew it to the front side of the bag - backpack.
The prepared pocket must be machine stitched to the main product.
The next step when making a backpack according to step-by-step instructions is the formation of valves.
Sew the prepared cut parts together and edge them with specially prepared fabric. Once this part is ready, you need to sew it to the main product and iron it. We do the same with the pocket itself, now it becomes more or less clear how to sew a backpack with your own hands, using patterns and step-by-step instructions.
 DIY backpack
 Patches must be sewn onto the above-sewn blanks. The part itself should slightly overlap the valve by about two centimeters.
We do the same on the pocket. The seam should be used in the form of a square with a cross inside.
The final stage of the backpack with your own hands is to make the straps. To do this, fold the braid in the form English letter V. We do this carefully, not forgetting to thread the braid into a special regulator. After that, you need to fasten a carabiner clasp to one end of the straps, and the other through the prepared half rings.
Then you need to tighten the top of the backpack; to do this, you need to make blocks at an equal distance, so that there are about four centimeters from the top edge of the place. In this way, we do it around the entire perimeter of the floor of the finished product. We thread a string through them, making a large knot at each end.
That's all we've looked at, how to sew a backpack for children with your own hands, according to the most simple patterns and using step-by-step instructions. However, such fashion backpack Suitable for young stylish girls too!
Video tutorials on sewing a backpack with your own hands:
HOW TO SEW A VERY SIMPLE BACKPACK WITH YOUR OWN HANDS.

Handmade leather - how to sew a backpack with your own hands
Choosing a backpack is always not an easy task. It is important to take into account a lot of points - fit, stress on the spine during exercise, design, presence of pockets, adjustability and comfort of straps, etc. I've owned many backpacks and none of them met ALL my needs.
As a result, I came to the idea that I should sew it myself and, in addition, I paint on the skin with acrylic, which means I can paint it. I have been looking for a normal description and pattern for a long time - I present the search results to you in the form of a selection of material on how to sew a leather backpack with your own hands.

Job Description
Let's start with a general guide to making leather bags and backpacks for the novice craftsman. Mark the approximate shape of the bag on the fabric. By the way, you can take a piece for sewing from an old leather jacket, for example.
Then place the prepared pieces of leather on it, after lubricating the fabric with a thin layer of glue. Apply the pieces so that each next covers the previous one by 5 mm. This will give you a surface slightly larger than the bag.
Sew the pieces using a regular seam or a zigzag stitch. Cut out the exact shape of the bag according to the pattern and glue the lining with rubber cement. Connect the sides with a seam from the inside, and if the fabric is thick, from the outside using an edging. For edging, a strip of leatherette, regular braid or thick film fabric is suitable.
The bag can be closed with a zipper, button or Velcro. A long strap, like short handles, can be made from an old belt, attached to the top of the bag or sewn into the side seams.
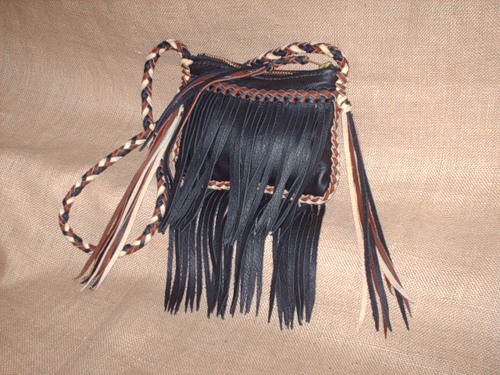
In this way, you can make a cosmetic bag, a casual or theatrical handbag, a fashionable stylish backpack, or a sports bucket bag that is in no way inferior to branded products. Appliques, embroidery, decorative buttons, fringe, braid, etc. are suitable for decoration.
How to sew a leather backpack
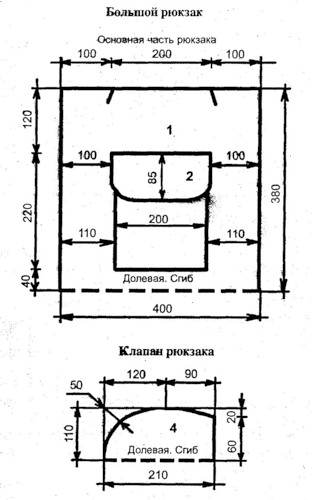
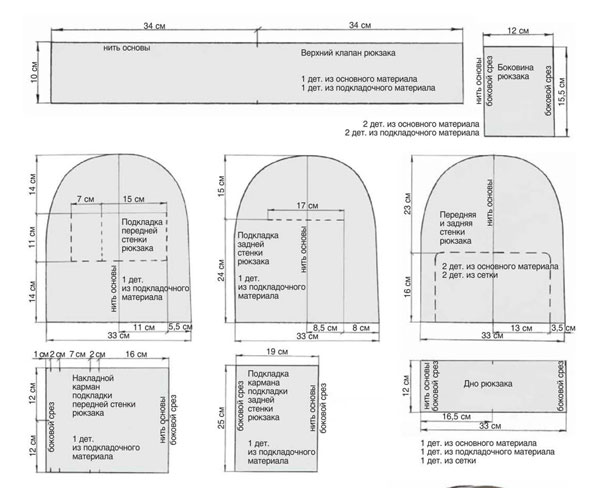
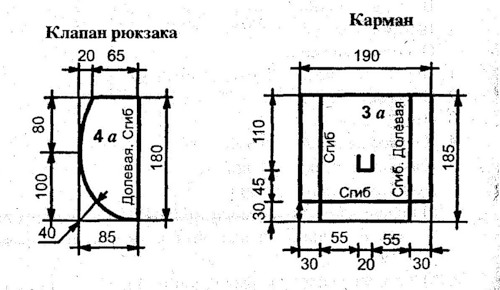
The first diagram shows a pattern for a large backpack with dimensions. The diagram below shows a smaller backpack.

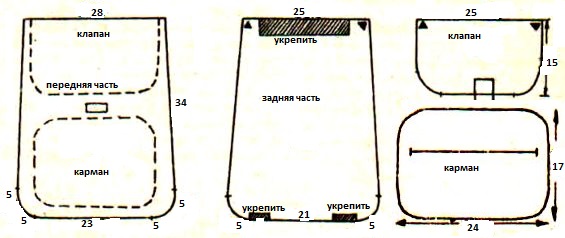
Main details
1 and 1, a. The main part of the backpack is 1 child. with fold
2 and 2, a. Pocket flap - 2 parts.
3 and 3, e. Pocket -1 child.
4 and 4, a. Backpack valve - 2 children. with a fold.
Additional leather details:
The strip for edging the backpack flap is 60 (50) cm long and 1.5 cm wide, cut without allowances;
The strip for edging the pocket flap is 40 (30) cm long and 1.5 cm wide, cut without allowances;
2 belt loops 8 cm long and 6 cm wide, in finished form 3 cm (6 cm long and 4 cm wide, finished 2 cm);
2 patches 12 cm long and 6 cm wide, 3 cm in finished form (10 cm long and 4 cm wide, 2 cm in finished form);
2 belt loops for half rings, 10 cm long and 8 cm wide, 4 cm in finished form (7 cm long and 6 cm wide, 3 cm in finished form).
Another description with a pattern
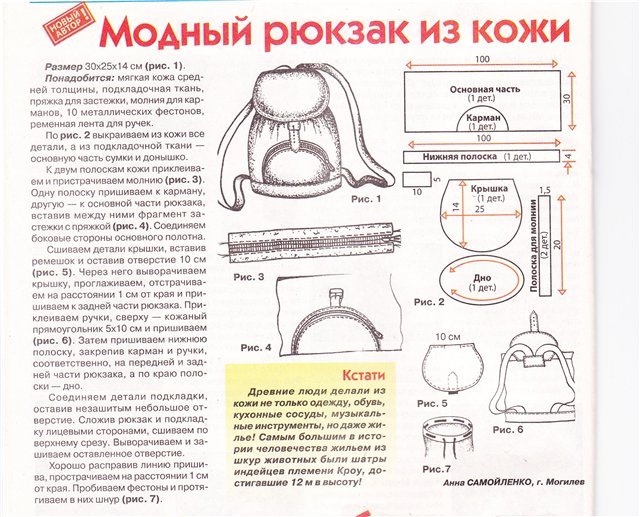
In conclusion, I offer a clipping from a magazine with a description and patterns women's backpack made of leather from Anna Samoilenko from the city of Mogilev. Everything is described in great detail.
Men's leather shoulder bag - commander's belt
Here's more interesting option male leather bag- belts over the shoulder. Very comfortable and durable.
Video master class
This video shows the process of creating a backpack from artificial leather. You can clearly see how everything is done in every detail.
Well, the second video is longer, more detailed, more thorough. The process of creating a backpack from Crazy Horse leather from Igor Sozdashev is shown.
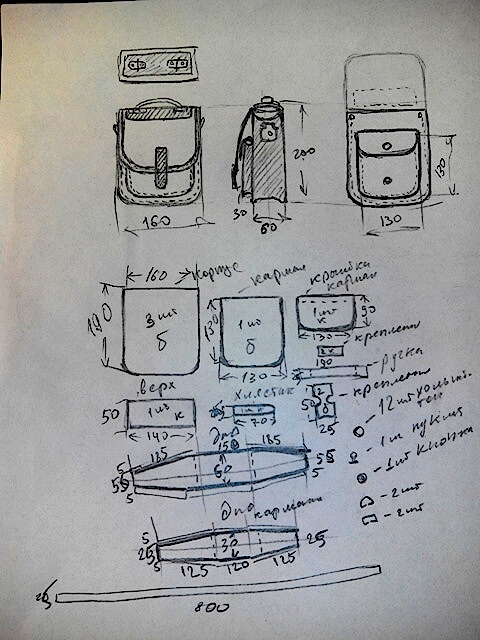
It is not difficult to make a pattern on your own, without turning to professional cutters. To do this, on thick cardboard or special paper, draw the details of the future item, according to the intended dimensions. Required parts: front, back, flap, straps, or cord or braid that holds the denim backpack together.
You can foresee and draw front and side pockets, the height of the back and its width in advance. Remember: the front will be a mirror image of the back.
Parts in the form of wedges are needed if you plan to make a bottom, and the longest side should be equal to the width of the back and front of the product.
Have you come up with a pattern? Transfer it to the fabric, remembering to leave seam allowances (approximately 3 cm).
Beads, rhinestones, rivets, satin or chintz inserts will turn your wardrobe item into a real hand-made masterpiece. It’s easy to tailor an item even by eye: the big advantage of sewing any items from denim is that they do not require precise fitting and allow for liberties.
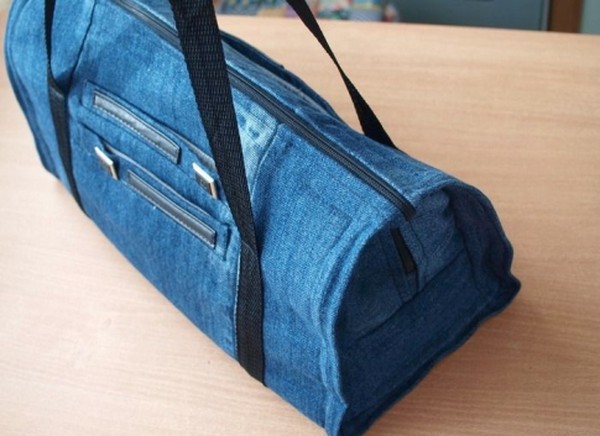
How to sew a backpack with your own hands: step-by-step instructions

We will need: denim, a little synthetic padding, a zipper, scraps of multi-colored fabric, velvet, lace, according to your taste.
- We cut out the parts, the size of which you choose yourself, focusing on the size of the future product. Don't forget about the straps, the bottom of the product and its sides. Prepare the lining.
- Now you need to line each part, cut it out and stitch it with padding polyester. This way the denim backpack will keep its shape better.
- Sew the parts together and stitch the straps. Now you need to sew two strips to the lock, bending it inward for the facing and sew on the sides.
- Sew on a zipper, straps and a handle to carry the product, holding it from above.
- A similar scheme can be used for half the treasure, connecting it to the main part.
- Decorate the finished product with your own hands at your discretion with a random pattern in the patchwork style, or come up with an interesting plot.

Fashion advice!When working with denim, there is a pleasant nuance: any deformation of the fabric, be it abrasion or a hole, can be played out and hidden behind accessories. Jeans is a very beneficial material that looks great with many fabrics: corduroy, pieces of leather or velvet are always appropriate and stylish in combination with jeans.
DIY duffel bag
A bag-shaped handbag is a very nice wardrobe item. A universal bucket bag without a specific shape is very easy to sew from pants, old frayed shorts, or a boring skirt. In this case, even a teenager can cope with the work: a pattern is not required at all, and imagination can run wild.
For a small handbag you will need only one pant leg, but for a large one, stitch two in random order and get a wider fabric. All that remains is to sew a hole at the top for an elastic band or lace and pull the finished product together. After that, decorate the duffel bag to your liking.
Let's play with styles!A bag can completely replace even a fashionable evening clutch. Embroider it with multi-colored sequins, decorate it with multi-colored beads, and sew on lace or leather inserts. You can sew several bags of different sizes to add a fresh accessory to your outfit every day.
Children's backpack pattern

Many craftswomen make a children's duffel bag or satchel from denim, using denim scraps of different colors. In this case, pre-sewn patches combined from different fabrics are better suited. The pattern in this case can be conditional: you just need to provide the details of the front and back walls, straps and valve. Think through the decoration according to your own tastes and preferences.
According to reviews from everyone who has sewn things from denim, this material is dense, so you will need sharp scissors and thread thicker than standard (numbers 100 and 120). Used carabiners, leather straps, buttons and rivets can be used as accessories.
When planning a children's backpack, do not forget that for a boy they should be more strict. Thermal applications will help to dilute the “severe cut”. However, it all depends solely on the wishes of the child and skillful hands craftswomen.


