Decoupage of toys is a good way to transform an old toy, as well as make a new one that you will like.
However, it is quite possible to make a Christmas ball yourself, and then decorate it using the decoupage technique.
Now it has become fashionable to do everything yourself.
This is valued much more by your loved ones and friends, because you put part of your soul into what you create yourself.
In addition, decoupage of Christmas tree decorations can give you a sea of unforgettable emotions and make you even more attractive and festive.
DIY decoupage of Christmas tree decorations

To decoupage a toy with your own hands, you need to remove all unnecessary objects from it so that only the ball remains.

If there are glitter or other irregularities on the toy, they will have to be removed, otherwise the decoupage will not succeed.

Actions must be performed in the following sequence:
- first we clean the toy, then sand it (if you don’t have a special tool, take regular sandpaper or another rough, rough object).
- Now you need to color the ball. To do this, take acrylic paints and a small diameter brush. Applying the paint will probably be inconvenient, and to prevent your hands from getting dirty, you need to pick up a thin long stick that will be inserted into the hole of the ball.

Hint: the chopstick can be a very ordinary one - if you love sushi, you will probably still have one suitable for this occasion.

In this sense, it’s easier to do than Christmas decorations - there’s more space, and it’s easier to paint the surface, because it’s not round, but stands on the floor.
Once you have found the stick, insert it into the hole of the ball, and then put it into a small container, inserting it with the other end.
To properly decoupage Christmas tree decorations, you must first apply one layer of acrylic paint, and then another one when the first one has dried.
Apply carefully to ensure minimal lumps are formed.
If there are lumps, you need to think about the quality of the paint; you may have to dilute it a little.
The second layer is done so that there are no streaks or streaks, which are quite acceptable on the surface of the first layer.
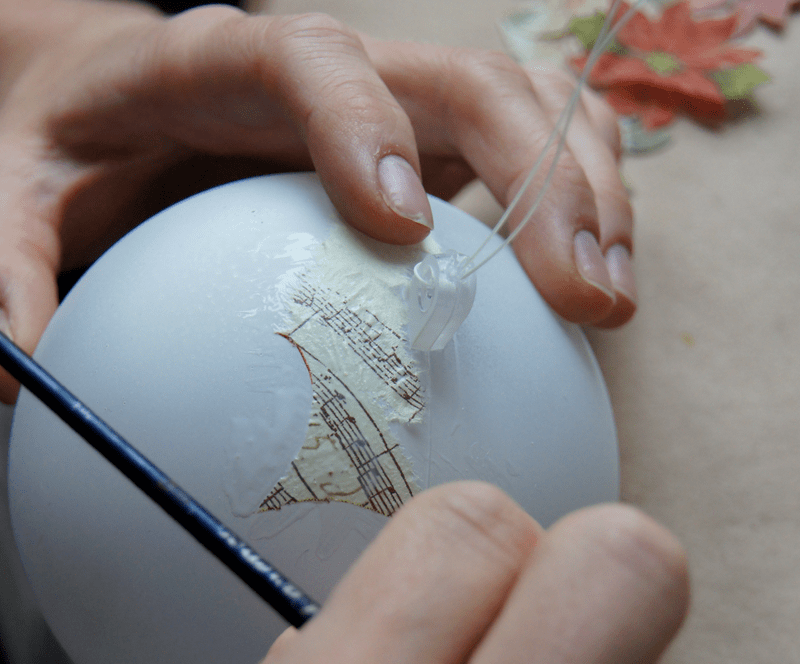
We choose napkins for decoupage of New Year's toys with our own hands. These could be angels, snow maidens, Santa Claus, snowflakes, snowmen - anything.

Check to see if the paint is dry and continue:
- Take a napkin and separate the layer with the pattern from it. As a rule, napkins are multi-layered, so decoupling Christmas tree decorations using them is not difficult.
- We smear the back layer of the layer with the pattern with glue, and then apply it to the toy.
- The surface for decoupage must be coated with paint of the desired color. It is better to choose a warm shade. You can, however, mix several if you want to experiment.
- and on other materials from which balls can be made, applied with a washcloth. It is not necessary to use the entire washcloth; you can cut a piece from it. It would be better if there was a small square with a place to hold on to. Use your index finger to apply pressure on top of the washcloth so that the paint lays down in a more even and dense layer.
- The places where you glued the images must be left untouched, but in some cases the borders of the picture are still covered with a small layer of translucent paint.
- If you have the opportunity to find golden glitter, or some other, outline the contours of the image with it to add volume.

Important: do not forget to make sure that when decoupaging Christmas tree decorations there are no folds, otherwise the product will not look beautiful and neat.

If wrinkles do appear, and this is difficult to avoid, take sandpaper or another similar object for rubbing. Just remember - you only need to grout a dry surface.

We also make toys using glitter, depicting the contours of snowflakes, curls and other attributes with dots or straight lines.


Decoupage of Christmas tree toy-light bulb
If you have an old light bulb, you can decorate it beautifully and originally using painting or decoupage techniques. However, it is quite possible to combine these two directions to get a more attractive result.
We work according to the same scheme as when decoupaging an old toy, but you no longer need to rub the surface - you just need to clean it well.

It is better to secure the cleaning by degreasing - treating the surface with an alcohol solution, for example. It is necessary to apply a primer, because the napkin adheres better to it.

When all the work on decoupaging the Christmas tree decoration with your own hands has been completed, and the top coating has dried well, you can start decorating.

Lamps unusual shapes can be decorated with various interesting charms, such as beads. By the way, in haberdashery stores you can find accessories ideal for decoration.
If the lamp has a white color and a pattern of a neutral, delicate shade, white pearl-colored beads can be attached to it with glue, which will be cut into two parts.

No need to cut - everything is already sold in finished form, and the beads come in different sizes.
Decoupage cardboard Christmas tree toy

This decoupage is easy to do with your own hands. We don't need a Christmas tree toy here.
We will make it from cardboard. To do this, you need to cut out a ball or any other toy shape (Christmas trees, angels, etc.) from cardboard.

Make a hole in the cardboard Christmas tree decoration for the ribbon.
Then take a napkin for decoupage. We apply it to the toy and outline its contours.

We cut it out carefully, since the napkin is very fragile.
We paint the toy for decoupage with acrylic paint. It can replace primer.

Peel off the second layer from the cut out napkin and apply it to the cardboard blank.
We coat it not with glue, but with plain water from the center to the edges.

Then we take water-based glue for decoupage of Christmas tree decorations and also apply it to a napkin from the center.

You can create an element of aging the toy using a sponge and silver acrylic paint, but this is at your discretion.

Beautiful and unusual Christmas decorations using the decoupage technique will be an excellent decoration for the Christmas tree. They are able to delight you and your guests with their uniqueness and unsurpassed quality!
Since this is the first decoupage master class in the group, I will write a little about this technique. It appeared in the 15th century. The essence of decoupage is cutting and pasting. Initially, not only paper was used for gluing, but also leather, wood, and fabrics. Any surface was taken as a basis - wood, glass, fabric.
21st century - a new birth of decoupage. It has become fashionable again, and in stores in almost all major cities you can easily find materials for different techniques this type of creativity.
Today I suggest you decorate a Christmas ball using decoupage technique. For these purposes, not only a special blank is suitable, but also the now popular plastic balls. In addition, this is a great chance to give a second life to old glass balls.
For work we will need:
1. Ball (the larger it is, the more convenient it will be to decorate it)
2. Sponge (I use a sponge for washing dishes. It will be enough to cut a piece of it about 1x2 cm)
3. Acrylic white paint.
4. Acrylic colored paints.
5. 3-layer napkin with beautiful pattern(preferably with not very large elements)
6. PVA glue
7. Wide soft brush (squirrel brush)
8. Acrylic varnish (untinted)
9. Elements for additional decoration (I used tinsel and semolina)
10. Scissors
Step 1
Don't forget to put newspaper or oilcloth on the table!
We cover our balls with white paint using a sponge. I have a light ball, so I apply a thin layer of paint, there are small gaps here and there. If your ball is dark, you will have to paint it on a second layer, after thoroughly drying the first one. 
It is better to hold the painted ball by the “handle”. After coloring, tie a thread to the eyelet and hang it to dry. I stuck pencils under the microwave and hung them on them. Drying takes 1-2 hours. It's better not to rush. The paint may not dry and may smear. 
Step 2
While our balls are drying, we cut out the motifs from the napkins, having previously separated 2 white ones from the colored layer, which we will not need. Don't be lazy - the less background left, the neater the work will look. But you shouldn’t deprive the background of very fine details either - they will simply come off.
It is better to separate the motifs from the elements - it will be easier to glue them. 
Step 3
Now let's arm ourselves with a brush and glue!
It is better to dilute the glue with water 1:1.
Carefully glue the motif from the middle. Avoid folds! And don’t be too zealous with the brush so as not to tear the design. 

And again we hang our balls to “rest” for an hour. In the meantime, wash the brush yourself - if it dries, then you can’t wash it. 
Step 4
Now let's start tinting. For tinting, in addition to paints, you can use pastels. Those who are already familiar with this can try working with it. Those who decided to try their hand at decoupage for the first time - wait for another MK - I will definitely tell you.
Now let's work with the paint.
Mix the color we need - it’s better to stick to the color of the napkin, then you won’t have to paint the background between the parts.
We paint along the motifs especially carefully so as not to get into the drawing. The paint will not wash off the paper.
After painting, we return our balls to dry. 


Step 5
We proceed to additional decoration with semolina. It gives a very interesting "frozen" effect.
The steps are simple - apply a pattern with glue (preferably not diluted) and sprinkle with semolina!
Then let it dry again. 


To ensure that a little semolina sticks, sprinkle it on the area nearby, and let it roll onto the glue on its own. 
When the glue dries, paint the semolina. It’s better to try not to touch the background, but if this happens, don’t despair, continue drawing with a thin line. Paint carefully - the semolina may crumble. Do not skimp on water - the thinner the paint, the better it will penetrate between the grains. You can quickly pass thick paint over the surface of the semolina - then only the upper part will be painted. This gives an interesting effect, but is only suitable for yellow-brown images - unpainted semolina turns yellow.
Well, then dry it again! 

For a snowy effect we use white paint. but you can paint it with other colors. 
Step 6
In fact, this is the last step of decoupage.
At this stage we have to coat our ball with varnish to give it shine, fix the paint and the napkin.
We take the sponge in our hands again and carefully apply it to the surface of the ball.
Don't forget to dry! 

Step 7
After drying, our balls can be considered ready 
But there is one BUT: as a rule, the place around the cutting does not look neat. Perhaps the transition from the ball to the handle will be poorly painted, or the handle itself will get dirty. But that's technical. But in fact, we want to give the ball some completeness. I used tinsel to decorate the cuttings. You can use ribbons, beads, small cones - whatever your imagination pleases.
I tied the stem with tinsel, like a bow. I simply wrapped the other ball in tinsel with wire inside and twisted its ends. To fix the tinsel on the handle, you can drop a drop of glue (it is better to use super glue) or the varnish that was used to cover the ball onto the joint. 
Now our balls can take their rightful place on the Christmas tree! 
Adviсe:
If you suddenly decide to use gouache instead of acrylic paints, add PVA glue to it - then it will smear less during subsequent work.
Don't skimp on drying time. It is better to stretch out the work over several days than to get an unsatisfactory result.
Don't forget to wash your tools after each stage of work. Paint and glue can render them unusable if they dry on them. The same applies to work surfaces.
Today everyone knows about the decoupage technique. With its help, simple objects turn into original crafts. This craft is quite easy and accessible for beginners. Try decoupaging champagne bottles or candles. Original items will decorate your holiday table. Most often, decoupage lovers use it to transform Christmas balls and other New Year's toys.
The master class will help you step by step understand all the intricacies of this process.
 You are invited to consider how decoupage changes the appearance of the ball. You need to start working with the following materials and tools:
- PVA glue;
- a simple ball without a pattern;
- acrylic varnish and glossy;
- decoupage glue;
- light acrylic paint;
- brushes;
- napkins and dish sponge.
Remove grease with alcohol or detergent.
 Then make a craquelure without applying a special solution. Apply PVA glue diluted with water to the ball.
 Let the workpiece dry, then apply paint with a sponge. During the painting process, make multiple point touches to the ball, and do them slowly. As you work, you will see how cracks form on the sphere.


Use a hairdryer and dry the New Year's ball. After this, the cracks will become more noticeable. At the end of the process you get a ball, as in the photo. Leave it hanging until completely dry.
Cover the dried blank with primer, then begin gluing the selected napkin motifs.
 After this, apply several layers of glossy varnish. Remember that each layer must dry thoroughly. Using your imagination, add fairy-tale motifs with paint. You get a New Year's ball, as in the photo.


Sketches and pictures using the decoupage technique are chosen at your discretion, in different colors and directions. These are Christmas, children's themes, and even characters you made up.
Video: New Year's ball
Decorating candles with your own hands
Beautiful candles made using the decoupage technique will be a welcome gift for family and friends. The work is done using a napkin on which suitable motifs are depicted.
Decoupage occurs using warm air heated by a hairdryer. It will also be required thin paper, pictures and napkins.
Prepare the cutouts using a template paper hearts.


Attach them to the candle and press with transparent paper. Take baking paper, which works great.
 Wear gloves and heat the candle with parchment with a hairdryer. This version of decoupage is useful in creating wedding candles.


You are offered a master class on decoupage of candles, which is suitable for beginner needlewomen.
You will need candles, beautiful napkins, a kitchen sponge and glue.


A specialty store sells matte glue and decoupage paper. If you don't have one, use napkins with original motifs. Remove the top layer of the napkin and attach the picture to the candle to cut it to size.


Apply glue to the candle using a sponge.

Fix the napkin on the candle.


Leave the craft until completely dry. After this, apply the glue a second time with a sponge. The quality of work depends on the number of layers.
The work is finished, look at the photo to see how beautiful it can turn out.

Decorating a bottle of champagne
To make decoupage with winter motifs, you will need the following materials:
- champagne bottle;
- primer;
- PVA glue;
- brush;
- acrylic paints;
- acrylic varnish;
- dark outline;
- sponge for washing dishes;
- scissors;
- holiday napkins;
- decorative material.
Take a bottle of champagne and remove the stickers by soaking it in water.
 Degrease it with alcohol, and apply a layer of special primer with a sponge, which is sold in the store.
Once dry, add acrylic paint white. If it's runny, do three or four layers.
When there are irregularities on the glass, they are removed with sandpaper.
From New Year's napkins cut out the desired motifs using scissors.
Glue the cut out pieces onto the bottle. Place the Christmas tree on one side and the clock on the other.
If desired, print out the words of congratulations using a printer and glue them on top with PVA glue.


Outline the inscriptions with a black outline and leave until completely dry.
Using a sponge, apply golden paint onto the white background, distributing the layers evenly. Using gentle movements, paint over the entire surface and inscriptions.
Re-shape the letters using a black outline to give them a convex shape. Draw a clock.


Take glitter and put dots around the inscription. Cover the image of the Christmas tree with a special paste that imitates snow. Apply it also along the edges of the gold foil.


The toys on the Christmas tree will replace colored confetti, which are glued to acrylic varnish. Let the bottle dry again.
Apply glitter and sparkles to the black lettering, then cover the entire craft with glossy acrylic varnish.

The product will take its rightful place on festive table or will be a gift under the Christmas tree for relatives.

New Year's snowflake
To make snowflake decoupage, you will need the following tools:

Paint the workpiece with light paint on one side using a sponge.
Leave the toy to dry for an hour. Then apply a second coat and leave it until completely dry.
About popularity Decoupage Christmas balls This may be evidenced by the fact that not a single article about manufacturing is complete without this quick and effective method of decoration. In fact, although such a craft has become fashionable in our country relatively recently, decoupage has a glorious and long history, so you will get not only bright and fashionable Christmas tree decorations, but also ones that could have hung on the Christmas trees of our great-grandmothers and great-grandfathers. So in our article today we will separately touch upon not only master classes on making such crafts, but also tips on creating a vintage style of balloons.
Decoupage of Christmas balls with your own hands
The technique itself decoupage New Year's balls with your own hands, if you are hearing about it for the first time, consists of applying a thin layer of paper to the surface of the workpiece. When liquid glue impregnates a thin napkin or special paper, after drying it already forms a single whole with the surface, as if a skillful design had magically appeared on the ball. Technology gives us the opportunity to create highly artistic works even if we do not possess any painting talents.
To make it easier to understand right away, let’s look at a small implementation decoupage of New Year's balls master-class, paying attention to the photos of the main stages located above.
It must be said that you are practically unlimited in choosing a base, but you need to be extremely picky with the selection of the design or paper on which it is applied. Ideal, of course, are special motifs for decoupage, which can be bought in specialized stores and hobby centers, where they usually buy everything to complete.
But, firstly, they are not very cheap for the first tests of the pen, and secondly, you cannot always choose from their assortment the design that you like and is suitable for work. Therefore, high-quality multi-layer napkins are often used for table setting.
The desired part of the design is pulled out of them, only the thin top layer on which the image is located is carefully separated, and this fragment is applied to the workpiece.
The workpiece is subject to mandatory primary preparation. When the paper is glued to the surface, there can be no paint on top of it; you cannot sand or sand it. So first we paint and prepare the base, glue the design, and on top of it you can apply a transparent varnish for fixation or a special craquelure varnish, apply glitter, textured stripes, patterns using special stained glass contours.
It’s worth talking about blanks in more detail, since their quality will depend appearance toys, and the task can either become more complicated or easier. Wood is considered the ideal surface for decoupage; these are the balls that are most easily painted, the glue dries quickly on them, they do not deteriorate for a long time, do not break, and can serve your children faithfully. Glass looks very elegant, but to process it you will not need any paints, but special, stained glass ones, which makes the craft more expensive, and gluing paper can be more difficult than with wood.
Foam balls are a fairly cheap material, but if their surface is very grainy, the paper will not stick evenly. That is why the foam surface must be covered with an even layer of paint, and maybe even more than one, and only then a paper motif is applied.
Decoupage of New Year's balls master class
Let's look at a simple option decoupage of New Year's balls, master class which is located below. You shouldn’t be surprised that classes in this technique are included in almost any children’s club program. early development, children from the age of 3-4 not only learn to make decoupage balls, but also successfully master this science.
The best choice for a children's craft would, of course, be an image cartoon character, funny animals, birds. So choosing napkins with cats for this lesson is more than justified. We tear off a piece from the napkin on which there is an image of a cat and remove the upper part.
The question may arise why it is advised not to cut, but to tear - the fact is simply that the torn edge has a finer structure, when the glue saturates it, the transition from paper to base will be imperceptible either to the eye or to the touch, like on real ones. painted on canvas.
Whereas, if you cut the edge of the paper, it will remain the same density and form a fairly noticeable border of the design, which will not benefit the entire product as a whole.

The wooden ball, as we said above, is covered with a layer of paint of the base color, in our case it is yellow. Place a piece of paper on a dry, flat surface and carefully paint directly on top of it with a brush well soaked in glue. Regular PVA is not suitable for the job; it is too thick and forms a dense film.
So it’s better to either take a special glue for decoupage, or dilute PVA according to proportions that are easy to find on the Internet. The most popular proportions without third-party additives are 1:1 or 2:1 (twice as much glue). The adhesive composition should be prepared at a time, not stored, since after the water has evaporated, it will lose its properties.

Once all the motifs have been glued on and the glue has dried, you can cover the ball with a clear topcoat. As with drawings, you need to understand that the protective properties of the adhesive film are not very high; if there is a mechanical impact on the surface, it will be scratched or peel off.
Therefore, it is better to protect it with a transparent varnish or a special fixative. If you want to add details such as sparkles, glitter, textured stripes, then it is better to do it all in stages and leave the varnish for last.

A few more ideas for you and your kids, what beautiful crafts you can make using technology decoupage of Christmas balls, video with classes on which you can even film yourself and post it for review.
Christmas balls in decoupage style
We have already mentioned to you several times the use in working with Christmas balls in decoupage style special stained glass contour to create relief patterns. This material differs from ordinary stained glass paint in its thicker consistency and quick drying, thanks to which you can work even on an inclined surface, and the curls and stripes do not flow down or become deformed. Plus, such a contour is usually packaged in small tubes or pencils, so it is convenient to apply and draw quite subtle patterns with it.

In the photo you can see another small master class, which shows, in addition to the main stages of decoupage, the application of relief patterns. This is an excellent solution for a retro style, since vintage toys most often have such a surface.

There are two types of contour application - these are golden curls on the main background, as well as emphasizing the lines of the drawing itself using a black outline. With this technique, the lines will become more expressive, the drawing will gain volume, and the whole toy will look elegant and quite expensive, it can successfully decorate any Christmas tree, even.

The decoupage technique is quite similar to the papier-mâché technique, the only difference is that there are more layers of paper impregnated with glue and because of this, a base is not required at all. The following ones are inspired by the theme of papier-mâché, because they are decorated with sheets of paper, be it newspapers, napkins with ornaments or notes.
The technique will be slightly different in that the surface is completely covered with paper, even with a reserve, and it is better not to immediately glue the material with a brush, but to thoroughly soak it in glue in a separate container so that it becomes softer and fits better on the ball.
Decoupage of Christmas balls in vintage style
The difference is decoupage of Christmas balls in vintage style from the usual ones lies in the choice of the main pattern, design, and in the design, which has its own canons, and in the use of decoration techniques, also characteristic of crafts 100 years ago. Such work requires an average level of skill and some investment in materials and tools. But in the end, you will get the perfect Christmas tree decorations, which you will be pleased to present as a gift to loved ones or keep as a family heirloom.

In the photo in this section you can clearly see how retro toys differ from modern ones. In this case, napkins will not suit you, since it is very rare to find similar motifs on them. Rather, you should go to a store or to an online store page and choose from the options presented there. Pay attention to images of old photographs, postcards, Provençal-style flowers, and so on.

Also pay attention to the design, as already mentioned - this is an important part of the image of the entire retro toy. The fastening loop must be elegantly designed; it can be a small bow made of lace, organza, silk, complemented by appliquéd beads, sparkling stones and the like.
The main surface can also be decorated - often an applique of a row of beads is placed on the side parts of the ball, leaving the design only in the center, or they are used to decorate a kind of window on the front of the craft. Also, to apply patterns, we arm ourselves with our favorite contour material; only curls and patterns are best made not in contrasting shades, but in a color close to the background shade. This will give you the desired antique, muted, pastel effect.

The approach of the New Year can be felt long before last numbers December. And it is quite reasonable to start preparing for the holiday in advance - decorations for the home, gifts, decor. Of course, it’s good when new New Year’s balls appear on the Christmas tree every year. And if they are made with your own hands, at least they are decorated independently.
There is nothing stopping you from taking an ordinary Christmas ball and transforming it by making your own sketch. This is the simplest option, although not everyone likes it. Some people think that it is much more interesting to make your New Year's ball from scratch. Sometimes they use, one might say, the old-fashioned papier-mâché method. And this is not the worst option.

In specialized stores you can buy a whole batch of blank balls at once. Most often these are plastic monochromatic balls in quantities of 4,6,10 pieces. So, taking advantage of all the advantages of the decoupage technique, you can make a whole collection of balls.
Beautiful New Year's ball: decoupage
Before decorating the surface New Year's ball, you need to prepare it. Remove the wire fastening from the ball, and for convenience, firmly attach it to the rod. Then, using fine sandpaper, you clean the glitter from the ball (we are talking about simple Christmas ball). The paint is washed off with nail polish remover. Then rinse the ball with water, and then sand it again.

- The base for the pictures is a primer. Add PVA glue to 30 ml of acrylic paint. This composition is applied to the workpiece with a sponge, then you leave it to dry. Then the workpiece is primed again.
- Next, proceed directly to decoupage. Select the necessary pictures, cut out the motif and try it on the surface. In most cases, napkins are used.
- Make cuts on the cut out or torn picture - this will allow the picture to take the shape of a ball and avoid the formation of folds.
- For gluing, you can use PVA glue, which is diluted in equal proportions with water.
- You can glue a picture like this: attach the image and brush it on top with a soft-bristle brush. Or glue is applied to the surface of the ball, and the New Year's motif is already glued to it.
- After the ball has completely dried, it needs to be coated with acrylic paint again to carefully align the edge of the background and the glued picture.
After the glue dries, it may leave rough traces. They can be corrected a little with sandpaper. Well, the finishing decor will depend only on your imagination. You can add sparkles, highlight the contours of the image with paint, or use glass beads.
MK: DIY Christmas balls, decoupage
There is a well-known method of decoupaging balls, which is not very complicated; semolina will be used in this work. If you are still completely new to decoupage, you can safely use the proposed method, it is interesting and quite accessible. At the same time, you will practice.

What materials do you need:
- The Christmas balls themselves;
- Three-layer napkins with New Year's motifs;
- PVA glue;
- Acrylic paints;
- Brushes;
- Sponge;
- Glossy varnish;
- Outlines;
- Semolina.
Prepare the ball as described in the previous paragraph. It should be smooth and clean. Apply paint mixed with semolina with a sponge, do it in a dotted manner - you will get a snowy effect. While the balls are drying, you need to prepare napkins. Separate the top bright layer, and the pattern should be torn off along the contour. Glue it on, carefully smoothing the pattern from the center to the edges.
Continuation of the master class on decoupage of Christmas balls
When the napkin is dry, the real artist in you should turn on. The edges of the glued pattern need to be sanded, and the untouched part should be painted, choosing a paint tone that is consistent with the tone of the image. To give the image volume, you can use structural paste.

Repeated coating of the ball with a layer of acrylic varnish is not always necessary. Perhaps you specifically want to make textured, rough balls. Or cover the ball thickly with glitter.
Contour painting will also be interesting. And the most original way is probably reverse decoupage. All manipulations are performed inside the ball, which is divided into two halves. Each part can be processed in turn. The picture will be pasted to inside half-ball.
Nuances of a master class on decoupage of New Year's balls
All MKs are similar to each other, unless you take on particularly complex work. But in each case there are some defining nuances that determine the highlight of the work. Or simply details that a beginner, out of ignorance, may not pay attention to.
Nuances in decoupage of balls:
- Always prepare the ball thoroughly for decoration - remove fat from the ball using alcohol or dishwashing liquid;
- You can dry the New Year's ball with a hairdryer, and if you make craquelure (cracks), they will be more expressive;
- Each layer of varnish must dry before you apply the next one - hurry up and ruin the whole job;
- All additional methods of decoration can be used - eye shadow, glitter, pastels, even pencil shavings.
On Christmas balls You can take photos of family members. Just stylize them in retro or, for example, ethno style. Then it will be a truly memorable toy.
Snow decoupage of New Year's foam balls
You need to work very carefully with breakable balls. But with foam balls there will be no such problems. You can cut out a foam ball that you can decorate in any way you like. Tie it with threads, wrap it in beautiful fabric, wrap it in designer paper, and of course, paste it over.

Or you can decoupage a snow ball. To get artificial snow, you need to take semolina, glue and white paint. Mix everything together and the snow is ready. The resulting mass covers the balls completely or partially. And after the ball has dried, you can stick on the pictures.
Decoupage of New Year's balls (video)
Decoupage of Christmas balls is another opportunity to decorate something using creative appliqué. As a result, you get a completely new thing, without any defects, beautiful, unique. And most importantly, all this was done with your own hands!
Beautiful results!


