To get a manicure regular varnish must be mastered at home correct technique applying the material and learn some important life hacks that will help you create a neat manicure.
What you need for a home manicure
Make it simple and beautiful manicure You can use regular varnish if you have a number of tools and materials:
- nail polish remover;
- brushes;
- one or more varnishes;
- greasy hand cream, oil or wax;
- cotton pads.
Every girl can create a beautiful manicure with her own hands; for this there is no need to resort to the services of salon specialists.
Preparatory stage
To do even the simplest manicure, you need to prepare your nails for painting:
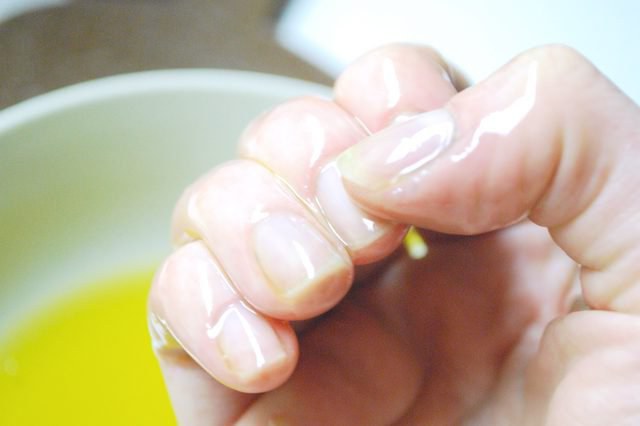
Tip for beginners: apply a base first. This step is optional, but it helps to level the plate and prevent it from yellowing and preventing paint pigment from penetrating into it. Also, in order for the polish to always lie flat on the plate, it is necessary to moisten it regularly using wax, oils and special moisturizing nail pencils.
Step by step instructions
Before you begin the process of applying varnish, you should consider that the girl has 40 minutes of free time, eliminate or minimize distractions, and also think through the design. In addition, you need to check the shape of the brush; it should not be narrow and dense. Instructions for creating the perfect manicure:
- Apply wax or oil to the periungual area without touching the plate. This will help you subsequently easily remove excess material from the cuticle and rollers.
- It is recommended to apply a coat of base to facilitate subsequent application of colored varnish.

- Take a brush of colored varnish and wipe it on the edge of the bottle so that very little varnish remains on it, literally on the tip. This way it won't bleed onto the skin.

- We paint our nails with regular polish, starting with the little finger. You should place a drop in the center of the plate, then carefully “adjust” the varnish with a brush to the base.

- Then, with slow movements, holding the brush confidently, you need to apply the varnish to the side surfaces of the plate. Thus, the varnish does not flow onto the cuticle.

- You need to complete the manipulations with a brush at the end of the nail. Thanks to this, the varnish will last longer.

- Apply another coat of varnish to deepen the color.
- When performing movements, the elbow should rest on the table and the hand on which we are applying the varnish should also lie on the table; you should not apply the varnish while holding your hand suspended.
- Apply a quick-drying top coat. This item is optional, but it will extend the wear time of the coating and make the manicure perfectly glossy.

On the left is a top coat applied to the nail, on the right is a nail without a top coat.

Ready-made manicure with regular polish
What to do if varnish gets on the cuticle
It often happens that varnish gets on the cuticle and ruins the entire manicure, but don’t be upset, now we will show you how to fix such a manicure.

To do this we need a lint-free cloth, a flat brush and nail polish remover or acetone.
We wet the brush in nail polish remover and move it over the area where the nail polish needs to be removed. We wiped off the polish, wiped the brush on a napkin, soaked the brush in nail polish remover, repeated, and so on until it was clean.


Result of work: before the varnish flows and after
Tips to help you paint your nails perfectly
The following tips on how to paint your nails correctly and beautifully will help you achieve a flawless manicure:
- Before you start applying colored varnish, you can practice using transparent varnish. Daily coating of the plates with treatment bases will help you get used to proper operation with a brush.
- To ensure a dense and beautiful coating, the varnish should be applied in two layers.
- If the coating is damaged during drying, you can smooth it out with a damp fingertip. It is necessary to smooth the coating carefully in a circular motion.
- It is better to apply “loose” varnish on a layer of white. Thanks to this, the coating will be more saturated.
- To ensure a perfectly even coating, the varnish should be applied to the base.
- To make a hole on the plate, you can use strips cut from regular tape.
- If you only have clear varnish left at home, you can make it colored by adding blush particles and two beads that will help the materials mix.
- PVA glue will help prevent the area around the plate from getting varnished; it should first be applied using cotton swab onto the rollers and skin at the base of the nail, without touching the plate itself. When the glue dries and the nails are already painted, the film needs to be removed.
- If the product does not dry for a long time, you can resort to using ice water and dipping your hands in it; the coating will dry much faster.
- To wipe off the polish from one nail and not ruin the manicure on other nails, by taking a cotton pad soaked in acetone, you can use the following life hack: you need to place the sponge in a glass jar, pour acetone into it and immerse one finger in it. Thus, the manicure on other nails will remain the same. The jar should be tightly closed.
- A thick layer of cream will help prevent streaks in the area around the plate after erasing the varnish.
- If you bring your nails painted with glossy varnish to a pan of boiling water, the coating will become matte.
Nail care after coloring
Caring for your nails after painting involves following several important rules:
- Wear rubber gloves when working with household chemicals.
- Apply moisturizer to your hands twice a day.
- In the cold season, wear gloves made from natural materials.
- Renew your manicure at the first sign of chipping.
Interesting ideas for manicure with regular polish
Newspaper manicure
 When performing such a manicure, first you need to apply a transparent varnish to the plates, then white, after which you can also distribute holographic varnish, it will add shine to the nails. When the layers have dried, apply small newspaper clippings soaked in alcohol (10 seconds) to the nail. The paper must be pressed tightly, and then apply a clear varnish or topcoat to the nail.
Lace manicure
 For this you will need an orange stick, a brush, nail polish remover and varnishes. Apply two layers of the product to the plates and wait 7-10 minutes. Then use an orange stick to create drawings; this is especially easy to do with glitter. You need to draw designs on glossy varnish with a regular brush dipped in nail polish remover and an orange stick. Then the nails are covered with top. This way you get a beautiful nail design with regular polish.
Manicure with a pattern
 It will require a thin needle and varnishes of different colors.
The first option: you need to apply three red vertical stripes on a layer of white varnish, after which you need to make a pattern with a needle using gentle movements, moving it from one side roller to the other, gradually moving towards the free edge of the nail.
Second option: on the nail, covered dark varnish it is necessary to apply three white drops so that they are located on the same line, then draw a needle along this line from the edge of the plate to the base.
Third option: place a few drops of pink on a white polish, and a smaller drop of white on them, then use a needle to connect the circles in a chaotic manner.
Volume manicure
 Manicure on short nails may be voluminous. After waiting for the varnish layer to dry completely, you can begin creating a knitted manicure. It is necessary to mix white varnish and the one that was already used to cover the plate, and use a brush to create a pattern as in the image.
Manicure with dots
 To create an unusual manicure you will need a toothpick and two polishes. After waiting for the layer of one varnish to dry, you should use a toothpick to create several dots on the nail, moving from the free edge of the nail to the base, there should be fewer and fewer of them.
Ombre
 To create it you will need a sponge and three varnishes. You need to apply white varnish to the plate, and a strip of white, blue, for example, and blue to the sponge. Then you should cover the area around the nail with PVA glue. Then, using patting movements, transfer the material from the sponge to the nail, cover it with topcoat and remove the glue film.
Thus, to create the perfect manicure at home, you will need a little time and skill.
Matte nail polish has been breaking all popularity records lately! Technologists love it because with a matte finish you can implement very interesting design solutions. And we love matte nails because such a manicure perfectly hides all scratches and roughness.
First way
The most convenient way to make nail polish matte is to treat your nails with steam from boiling water. If you try, you can get a matte effect comparable to a professional manicure with matte nails. The main thing about this method is that you don’t need any additional costs, and it’s easy to make gel polish matte even at home.
To create a matte manicure, you don't have to buy matte nail polish. Grab your favorite glossy nail polish. the desired shade, fill a saucepan with water, prepare a nail file, cotton pads and nail polish remover.
- First, remove any remaining polish from the surface of your nails and clean your nails completely.
- Will need to be nailed beautiful shape and remove the cuticle.
- Using glossy nail polish, carefully paint the nails to your liking on one hand.
- Turn on the stove and heat a pan of water.
- While the varnish is still wet, place your hand over the bowl, palm up, and hold it over the steam for about two minutes.
You need to hold your hand over the pan very carefully! Otherwise, you may get burned from the hot steam. Manicure - matte nails will be obtained if you move your fingers over the steam so that it completely envelops each nail, and the matte coating appears on each nail.
Repeat the procedure with the other hand. This way you will quickly and easily get a manicure with matte nails and can enjoy it without going to a beauty salon. As you can see, making matte varnish at home is quite simple and convenient.

Second way
Another way to make gel polish matte at home without harming your nails is to purchase a special fixing agent for manicure. It is the matte finish coat that will give a velvety feel to matte nails in a manicure, consolidate the result and help the nail polish to adhere well. With the help of a matte finish, you can make a matte shade of varnish from absolutely any manufacturer.
But keep in mind that a matte manicure, although it hides all scratches, perfectly emphasizes the slightest irregularities and defects nail plate. That is why you will first have to thoroughly polish your nails, and only then apply glossy and matte coatings.
How to make a lunar manicure and matte polish at home?
- Paint your nails with regular glossy polish and wait until it dries completely.
- Seal the tips of your nails with special strips to create a French manicure. If you don’t have such strips for a lunar manicure, you can use tape.
- Paint over the exposed part of the nail with a matte finish and wait until it dries completely.
- Remove the stripes to create a French manicure and you will get a manicure with matte nails with glossy tips.

Nail industry professionals advise choosing dark shades nail polish, since they look most impressive in a velvety design, when the task is to make the polish matte at home.
Advice: Matte nail polish and its matte finish last longer on the nails than glossy ones, but they eat into the nail plate more. If you don't want yours natural nails Instead of a natural shade, you are painted with a dark pigment of the varnish, then be sure to apply matte nails before the manicure - a base coat for the varnish.
Expert opinion
Matte nail polish goes very well with gloss. You can alternate glossy and matte topcoats on different nails or combine both on one nail. In order to achieve a matte manicure, you need to use a special matte top coat. Many people want to make the varnish matte at home by adding regular starch, flour or baby powder to it. But it is not recommended to do this, because... You might just ruin your nail polish. “Homemade” components were not initially provided by the manufacturer to make the varnish matte. Most often this leads to thickening of the top coat. But even if this does not happen, then when applied to the nails, the color of the varnish will change and not for the better.
A healthy lifestyle, naturalness and naturalness are increasingly becoming fashionable. This applies not only to food, but also to everything else that surrounds us every day. Today healthy lifestyle has also reached cosmetics. Now ladies make their own beauty products from natural materials. How to do it at home? Let's find out the recipe!
Why not buy nail polish at the store?
Indeed, why today are ladies increasingly looking for information on how to make nail polish at home? It turns out that not so long ago bottles with mysterious inscription 3Free. Inquisitive fans of the perfect manicure immediately found out that eco-varnishes, which do not add harmful toluene, formaldehyde and camphor, have this label. These substances can provoke many diseases in the female body, and are completely contraindicated during pregnancy.
As a result, some ladies refused to trust any varnish manufacturers, even those with eco-labels. But not everyone knows how to make varnish themselves. We will give some instructions.
Olive oil varnish
The basis of the first recipe for natural varnish is olive oil. As you know, it has a beneficial effect on the condition of nails and cuticles and gives the hands a healthy, fresh look.
How to make nail polish based on olive oil? To do this, it must be mixed with white clay in a 2:1 ratio. Instead of clay, you can use henna or other natural dye similar consistency. Cover your nails with the resulting mixture and let them dry. After 20-25 minutes, wipe off the mixture with a damp cotton pad.
Varnish with alkane root and beeswax
Alkana is a miraculous plant, the root of which is actively used in the manufacture cosmetics. Beeswax is a universal remedy that is added to creams and is also used in folk medicine. These two ingredients can only bring benefits to your nails: they will improve the overall condition of the nail plate and cuticle. How to make varnish from alkane and
You need to take a quarter teaspoon of wax, half a teaspoon of alkan, three tablespoons of olive oil. Experts advise adding a couple of drops of course useful vitamin E, but without it, natural varnish will also work.
To prepare the varnish, you need to heat the olive oil along with the root in a water bath. Then you need to remove the product from the heat and cool for 5 minutes, then rub the infusion through a sieve. Then you need to return it to the water bath and add beeswax to the resulting mixture. When the wax melts, the mass must be stirred and allowed to cool. Ready!
Colored varnish from colorless
How to make a varnish of an unusual shade from a medicinal colorless one sold in a pharmacy? Very simple! You need to add homemade dye into a bottle of clear varnish. It can be made from food coloring or eye shadow. Of course, the choice of the latter should be approached responsibly, because they should also be as harmless as possible.
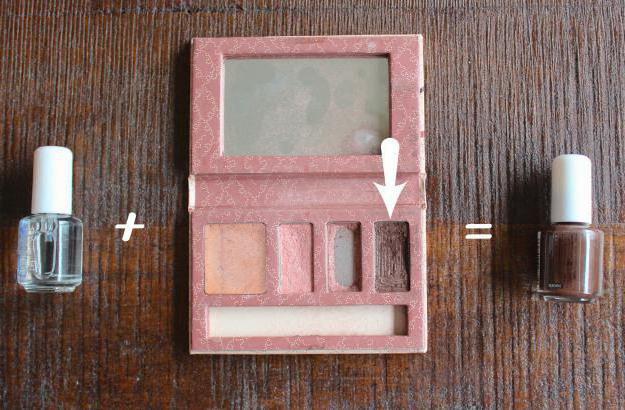
You must first pour a small amount of varnish from the bottle, otherwise it will be difficult to add dye to it, or there will be difficulties with mixing. It is more convenient to add shadows or other paint through a funnel made from a paper circle. You can mix the new varnish with a toothpick.
How to make nail polish at home in other ways? Share your recipes!
If you are not satisfied with the shade of varnish you have, add ink of any color to it.
Nancy Wave live/youtube.com
You can buy them specially at a stationery store, but ink from a gel or regular ballpoint pen will also work. The main thing is not to overdo it and be careful.
2. Matte varnish
Using starch
Cornstarch can not only transform an ordinary glossy varnish into an elegant matte finish, but also make it lighter. Mix 4-5 drops of varnish with a small amount of starch. Apply this mixture on your nails. After drying, the varnish will become matte.
Using powder or matte eyeshadow
You can make the polish matte by adding loose powder or matte eyeshadow to the bottle. To make sure you don’t spill anything, roll up a small funnel out of paper. Along with powder or eye shadow, add a couple of small steel balls to the bottle to better mix the contents.
Mix light loose powder with clear polish to create a white matte polish.
3. Sparkling or pearlescent varnish
If you want it, add glitter to the polish or sprinkle it on your nails that are not yet dry. To add originality to your manicure, sprinkle glitter only on the tips of your nails.
 thegluegungirl.blogspot.ru
 You can achieve a pearlescent effect on your nails using ordinary eye shadow. Grind the shadows first. Crush them in any container with a hard object and turn them into powder. This will ensure an even coating. Then carefully add directly to the polish.
 3.bp.blogspot.com
 To get the exact color of the eyeshadow, mix it with a clear polish. If you apply the same shadow on your eyelids, you will get the perfect color combination.
 herbsofgrace.com
 If you hate to crush the shadows, apply them with an applicator to slightly damp nails. The same can be done with loose mineral shadows. Then simply blow off the excess and cover your nails with a sealer or clear polish.
 www.thebeautycontext.com
 4. New varnish from several old ones
Choose two or more matching polishes and pour them into one bottle, adding a little nail polish remover if necessary. You can also place one bottle on top of another and go about your business while the contents flow. Shake the resulting mixture thoroughly. The new varnish is ready.
 wikihow.com
 By the way, if you gradually darken the resulting mixture, you can get an ombre effect - smooth transitions of colors into each other.
5. Glowing polish
Using acrylic paint
If you mix polish and fluorescent acrylic paint, your nails will glow in the dark. Fluorescent ink from gel pens is also suitable for this purpose. All this can be found in art stores and in regular stationery stores.
 picmia.com
 A clear varnish base gives the best shine. If desired, it can be applied over colored varnish. With white varnish, also feel free to use fluorescent paint of any color.
Using glow sticks
For this method you will need a half-empty bottle of nail polish and one glow-in-the-dark stick. If you are using colored polish, make sure the shade matches the color of the stick.
Knead the glow stick well, especially if it is in the form of a thin bracelet or necklace. Using sharp scissors, cut one end of the stick. Dip the cut tip into the bottle and carefully squeeze out the glowing liquid. Cap the full bottle and shake well. After this, apply nail polish.
 wikihow.com
 Remember that when using sticks, the glow effect will only last a few hours. Don't forget to seal your masterpiece with clear varnish to make it last longer.
If you are making your own furniture or want to somewhat restore old furniture, at some point you will need to coat it with a good varnish.
The market today is full of different varnishes. However, this remedy can be created with your own efforts and at home. You can create different varnishes at home. The following are recipes for the most popular types.
Five minute
Designed for wood. Acetone is poured into a container (preferably 100 ml) (approximately 30% of the container volume). Then foam is added to it. It is better to take it from the electronics packaging. It should be finely chopped before adding. Its approximate proportion is 0.3 cubic dm. The end result will be a jelly-like mixture. It needs to sit for a while. Its color is transparent. After 2-3 hours you get a good moisture-resistant varnish. It is also characterized by decent ability to withstand impacts.
Oil types
In production, they are prepared from drying oils and expensive resins. Turpentine is also added to them. Typically, these types dry quickly, but are weak in terms of strength and service life. You can create a copal oil look at home. Take high-quality flaxseed oil (100 doses by weight) and cook it in a saucepan or kettle. Heating should be gradual. The task is to wait for bubbles to appear and maintain an even flame. The oil should simmer slightly. At the same time, it is necessary to melt the East Indian copal (15 doses by weight) in a water bath and also bring this element to a boil until bubbles appear. At this moment, you need to immediately add hot linseed oil to it (it is also boiled in a saucepan at this time). You need to pour it in doses and constantly stir this mixture. Then pour this mixture into the oil that is being cooked.
The next element needed here is manganese borate (1 weight proportion). It also goes into this large container. The required cooking time is approximately 2 hours. If foam appears during this process, it must be eliminated. The varnish should be thick and smoothly come out in transparent threads with a golden tint. The fire can then be reduced. The created composition should slowly cool down to +60 C. This is not the end of the matter. Turpentine (70 doses by weight) is introduced into the mixture. It is poured in parts. After the next addition, you need to check whether the cooled drop has the required viscosity. If it is weak, then no more turpentine is needed. The varnish is ready. Signs of high-quality varnish: golden tone, smooth placement on the work surface, drying after 6-8 hours.

Dammar view
It is great for light-colored furniture. Components to create it:
- dammar resin (4 doses);
- turpentine (5 doses);
- white linseed oil (1/4 part).
This composition should be boiled until completely dissolved, then filtered. For straining, it is better to use a thin sieve made of metal. After which the mixture settles for 2-3 hours. After this time, the varnish can be used.
copal species
Required ingredients:
- soft, light-colored copal (1 dose);
- turpentine (2 doses);
- camphor (3%).
The third element is needed to give the varnish good elasticity. This composition is placed in three quarters of the bottle. The bottle is thoroughly corked and kept in a warm place, for example, near a radiator. The bottle needs to be shaken periodically. You should get a high-quality solution from all components. It settles and filters. Cotton wool serves as a filter here. If the resulting varnish is not transparent enough, then concentrate the bottle in a water bath for 10-20 minutes.

Mastic look
Required elements:
- pure mastic (12 parts);
- Venetian turpentine (1.5 doses);
- powdered camphor (0.5 dose);
- carefully crushed glass (5 doses);
- thoroughly purified turpentine (30 doses).
The composition is placed in a water bath. Afterwards it settles. After a day, it is drained and filtered. Cotton wool is used for the filter.
Castro species
If castor oil is distilled dry, a residue similar to rubber is formed. If you dissolve it in gasoline or alcohol, you get a varnish with excellent resistance to moisture and ultraviolet radiation.
Asphalt view

Required components:
- asphalt (1 part);
- turpentine (2 parts).
The first element is melted, cooled and crushed. A second element is added to it.
Japanese view
Elements:
- turpentine (45 doses);
- dehydrated lavender oil (60 doses),
The first two components are mixed. The liquid part is separated from the sediment and then heated. While this process is going on, you need to add camphor (1 part) and copal resin (15 parts) to the mixture. After 20-30 minutes, the composition can be filtered.
These are the basic recipes for homemade varnishes. Surely every master has a dozen more interesting recipes.


