On March 8, on a birthday or an anniversary, I would like to congratulate my beloved mother sincerely, from the bottom of my heart.
Buying a ready-made postcard in any design is not a problem nowadays.
But how many emotions will your mother receive if you give her a handmade card?
Handmade postcard– this is not just a small bonus to the main gift, but a real testimony of love and gratitude to dear mother. Such a souvenir will be kept in a visible place by mom for many years.
Such a postcard is always very beautiful, elegant, original, easy to make and does not require much time or material investment. Be sure to find a suitable option for yourself and create a postcard yourself - make your loved one happy!

You can take a soft cherry shade of cardboard as a basis and cut out a rectangle from it. Next, we take checkered cardboard and cut out a shape from it in any shape up to half of our cherry base, glue it, and decorate the gluing area with exquisite white lace. We decorate the card with bows, beads and buttons, add good sincere congratulations and our surprise for our beloved mother is ready!

The basis of the postcard will be the same cardboard. We glue two strips of fabric of different widths onto the base. On the top wide strip you can paste the words “mom” in letters cut out of different cardboard. We leave the bottom strip for decoration and warm words congratulations. The decor can be ribbons, beads, pieces of lace, various flowers, in general, everything that your imagination tells you.

The base of the postcard will be white or other light cardboard. On top of the cardboard we glue flowers, leaves, hearts in the form of an applique, ladybugs, cute birds, etc. colors must be selected very wisely - no more than 3 shades so that your card looks harmonious. For volume, you can add beads, laces, and buttons.
DIY birthday card for mom made of paper step by step.
For this we need:

To work, you will also need to print it on a printer. vase template.

Do you like such a miracle made on your own?
Unusual and voluminous
If you have a desire to make a complex and unusual postcard, there are many such options.
Which one is right for your mother personally is up to you to decide. Each of them is original, beautiful and easy to perform in its own way.

Magnificent and original
If you really want to give your mother something more complex, give her something that will truly surprise and give positive emotions.
Take some of your precious time and create a 3D postcard, or a postcard from unusual materials. This is not at all difficult to achieve, but it will require a little more time, as well as patience and perseverance, attention and hard work. But such a masterpiece will be truly appreciated and will cause a flurry of positive emotions!

Master class “How to make an endless postcard?” watch in our video:

You can add your own twist, change colors or materials, add what you think are missing decorative elements, etc. but most importantly - kind, warm and sincere words for your beloved mother!

Beautiful card for your beloved mother's birthday
In order to create such an unusually beautiful card you will need:
- double-sided cardboard coated white;
- paper with poems, maybe with notes, with an aging effect;
- - artificial leaves and flowers;
- — two round stickers with congratulatory inscriptions;
- - blue ribbon;
- - colored sequins;
- — a sticker or pre-printed inscription “Congratulations!”;
- - pencil, scissors, ruler, double-sided tape, glue.
Let's get to work.

In conclusion, I would like to note that in your postcard made with my own hands For your beloved mother, the most important thing is not the paper, ribbons or rhinestones, and not even the wishes that you write on the spread of the card. The most important thing is your sincere desire to please your mother, to show care and attention!
Views: 6,258
A DIY card is the perfect birthday gift. A ready-made postcard is no different from store-bought ones, but such a beautiful and original surprise will be appreciated. To make them, you can use whatever your heart desires - cardboard, colored paper, lace, beads, buttons and much more that you have on hand. We will show you interesting and modern DIY postcard ideas.
DIY voluminous birthday card for a woman
We present a beautiful card to your mother, grandmother, friend or sister. For a woman, nothing could be nicer as a gift than a basket of flowers. How can this be connected with the postcard, you ask. It's simple, we suggest making you a paper basket, only in a smaller version. Believe me, you will be delighted with it, as if it were real.
You will need:
- thin cardboard of different tones;
- hole punch with flower shape;
- for the basket a couple of strips of paper;
- PVA glue;
- double-sided tape;
- scissors;
- wooden skewer;
- small sponge;
- ribbon;
- artificial flowers according to your taste;
- bending rope or twig.
Let's get started:
- Fold your cardboard in half and cut out a rectangular window on one side. From the same cardboard, cut a 10x6 rectangle. From colored, beautiful paper, cut out 4 strips – 2/2×14 and 2/2×5 cm. Bend the previously cut rectangle lengthwise in three places – initially in half and 1 cm on each edge. Glue a rectangle to the bottom of the card. Glue the cut strips onto double-sided tape - two long on the sides, the remaining two short on the top and bottom.
- Cut out flowers using a hole punch. Form voluminous flowers on a damp sponge and use a wooden skewer to press them inward in the center. Crush a few flowers with your hand; they will be useful for buds. When the flowers are dry, you can peck them together. This way you will get beautiful voluminous flowers.
- Use skewers to twist strips of paper. You need to twist 5 strips, glue the new one to the end of the twisted one, and the end of the last one to the resulting circle. Now you need to form a basket; to do this, carefully squeeze out the twisted strips in the center. Fill the resulting basket with glue inside. To make a handle, glue a rope or twig on both sides of the basket. Now glue the flowers inside the basket. Make a small loop from the ribbon and hang the basket on it and glue it with inside window. For a complete and complete composition, glue a satin bow at the bottom of the basket, you can also make an inscription.
- The postcard is ready.


DIY birthday card for a man
Try to surprise a man with such a postcard-shirt using the origami technique. You can use it as an envelope for money or write a congratulation on it. Everything is done simply, spend no more than 15 minutes on the work.
You will need:
- colored cardboard;
- bright ribbon.
Procedure:
- Place the paper face down, with the vertical edges folded toward the middle.
- Fold the edges back, then fold the top corners inward along the fold line.
- Fold the same corners in half inward.
- Continue folding the top of the paper down along the fold line. The resulting triangles will be the arms of the postcard-shirt.
- Turn the paper over with the sleeves down, fold the strip down along the width of the ribbon you took from the top.
- Turn the paper over to the other side and make a collar by folding the top corners towards the middle.
- Unfold the resulting collar, insert the ribbon at the fold, and fold it back.
- Fold the bottom of the paper up under the collar and tie a tie.
- A postcard for a man for his birthday or any other holiday is ready!


An anniversary in the life of every person is not just the date of the next birthday, but it is a round number, for example, 20, 30, 40, 50 years and so on. It doesn’t matter what the date is, and what the number is, but the main thing is that a person feels somehow important and noble on this special day, since his closest, dearest and dearest people came to congratulate him on this day. important people in this person's life. So you are going to go to someone’s anniversary, either a relative or an acquaintance, and you simply cannot do without a greeting card for the anniversary. And in order not to be a banal congratulator, you need to surprise the hero of the day with something and congratulate him especially, in a new way and with taste. So, a scrapbooking master class will help us very well with this, which will help us make not just a greeting card, but a complex fold-out anniversary card.
For the master class we take:
- Pink pastel paper A3 format;
- Paper for scrapbooking in pink shades, berm two sheets 30*30 cm;
- Pictures: orchid flowers, roses, inscription;
- Cutting: pink napkin, white mother-of-pearl and lettuce leaves, butterflies, hearts;
- Knitted flowers are white, pink and crimson;
- Pink lace;
- White ribbon with small pompoms;
- Raspberry satin ribbon with white polka dots;
- Pearl half beads;
- Chiffon roses on a ribbon;
- Happy Anniversary stamp and black ink;
- Burgundy ink for tinting;
- White cardboard;
- Glue stick, double-sided tape, ruler, scissors and pencil;
- Border hole punch.

Take a sheet of large pastel paper and cut a 17*32 cm rectangle from it. Cut it and divide it into three parts.


We divide along the side that is larger into parts 8 cm * 16 mm * 8 cm. We divide and draw bend lines. Fold the base as in the photo.

We measure 9.5 cm from the bottom and draw lines to the corner along which we make oblique cuts. This way we get a half-open base for the postcard.


We glue a piece of ribbon on the back so that we can tie a bow at the front.


Now let's take scrap paper. From it we need to measure two quadrangles 15.5 cm * 16.5 cm.


And also four irregularly shaped rectangles of the same size. Now we decorate the scrap paper with cuttings and pictures, including gluing a cardboard rectangle for the inscription.


We sew on all the elements that were glued to the scrap paper. Now all parts of the scrap paper need to be glued to the base using double-sided tape. Now all sides of the card from the front side need to be sewn on a typewriter.
Target Audience: educators and school teachers, teachers additional education, parents.
Master class structure: The master class consists of two stages: theoretical and practical.
Stage 1 (theoretical)
Target: transfer of personal professional experience in the field of creative and teaching activities. Improving the professional skills of teachers in the process of mastering the experience of making greeting cards.
Tasks:
◆ formation of an idea of postcard making as a modern form applied creativity;
◆ instilling interest in creating postcards self made;
◆ acquaintance with the history of the creation of greeting cards;
◆ demonstration of the master’s work, tools and materials for work;
◆ creating a need to create aesthetic, creative and unique things.
Form: lecture-conversation.
Type of master class: demonstration of work.
Duration: 10 minutes.
Stage 2 (practical)
Target: demonstration of methods and techniques for creating handmade cards.
Tasks:
Development of creative imagination through practical tasks;
Formation of the need to create an individual gift - a postcard, as a means of self-expression;
Generalization of experience in various techniques of applied creativity.
Form: practical lesson.
Type of master class: joint work of the teacher-master with the audience.
Duration: 30 min.
Stage 1.
Arts and crafts - diverse and interesting view activities promoting development fine motor skills children's hands and their personal qualities.
One of the development methods creativity students is making greeting cards.
The art of creating postcards is quite young, however, people have been making handmade postcards for a long time. More in ancient China on New Year It was customary to give each other cards, and the Egyptians did the same. In Europe greeting cards appeared in the XIII-XIV centuries. Of course, this was an extremely expensive pleasure, which was available only to wealthy people. This slowed down the development of creating postcards, both with your own hands and with the help of craftsmen.
Only from the middle of the 19th century, with the development of printing and industry, greeting cards became available to mere mortals. In the 30s of the 20th century, postcards were put on a conveyor belt and their mass production began.
In our country, the “lull” passed with the advent of the 21st century. Over the past 5-10 years there has been a trend of increasing popularity various types handicrafts, including postcard making. Postcards and other handmade products are again in price. Each such work contains a piece of the soul of its author, a unique style. Just as no two people are alike, there are probably no two handmade cards alike. Another reason for the popularization of handicrafts is the need for creativity. Man is made that way. He needs it.
Making cards with your own hands is very exciting and interesting activity, children like it of different ages. Even the most simple cards DIY items will bring great pleasure to moms, dads, grandparents and friends.
This greeting card is easy to make, does not require expensive materials and is quite feasible for students primary school. You will receive your finished work during one lesson.
Materials for making postcards:
1. Postcard base:
Colored cardboard or corrugated cardboard (velvet paper).
Viscose household napkins (option: colored crepe paper, cotton pads).
Green crepe paper.
2. Tools for work:
The scissors are simple and curly.
Curved and corner hole punches.
Stapler.
3. Adhesive materials:
PVA glue (pencil)
Glue gun.
Lace, ribbons, cords, threads, sewing.
Beads, rhinestones, sequins, beads.
Stickers are three-dimensional, holographic and flat.
Markers, pens, colored outlines and glitter gels.
Congratulation texts, postcard names, wishes.
Stage 2.
Work progress:
Step 1:
We cut out blanks for a rose with a diameter of 4-7 cm from a viscose napkin according to the template.
.jpg)
Step 2:
We fold the workpiece into a ball and fasten it in the middle with a stapler.
.jpg)
Step 3:
Carefully turn the rose blank inside out. When making roses from corrugated paper, you need to be especially careful when turning the workpiece inside out, as the paper may tear.
.jpg)
Step 4:
We prepare the required number of stems from crepe paper. To do this, cut the paper into strips 2 (2.5) cm by 5 (6) cm.
.jpg)
Step 5:
Fold the strips in half lengthwise, and then in half again.
Step 6:
We cut the tip of the strip for the stem into a cone.
.jpg)
Step 7:
Let's expand. We twist the stem, leaving the sepals unfolded.
.jpg)
Step 8:
Glue the stem to the rose.
.jpg)
Step 9:
Fold a sheet of colored cardboard of the required shape in half.
And we place the flowers on it in random order. Decorate
Postcard with decorative elements.
.jpg)
.jpg)
Glued and painted ones are valued much higher than purchased options. You not only create unique things, but also put your soul into your work. We invite you to learn how to make a greeting card with your own hands on various themes.
Card for teacher
The “Happy Teacher’s Day” greeting card, created with your own hands in the craft style, will be quite interesting. It involves the use of several separate pictures, letters and decorative elements that are assembled into one. You will need A4 cardstock for the base of the card, an A5 picture for the background and a few pictures of school related items. For example, these could be letters of the alphabet, a backpack, a note sheet, a ruler, a compass, and so on.
First, make the base, that is, simply bend A4 cardboard in half. Paint it if necessary. Then stick the picture with the background on the front side. It will be nice if its format is a little smaller (A5). Then cut out the prepared images of school items along the contour. You can also print out a small rectangle with the words “Congratulations” or “Happy Holidays.” Place the pictures on the background as they should look in the final version. Glue them. You can also decorate the card with ribbons or various decorative elements. DIY greeting card “Happy Teacher's Day”. All that remains is to sign it.

in kindergarten
Children's teacher preschool age It will be very nice to receive a congratulatory card made by your students. You can borrow the idea of finger painting as a basis. First prepare the base of the card. To do this, take cardboard or craft paper and fold it in half. Then thin the paint and apply it to your lips. Make several shades - this will make the picture brighter.
Now have each child dip their finger into the sponge and put a fingerprint on the front of the card. You can combine them by drawing below which extend from the lower points. This way you will get a bunch of balls. On the plastic side you can write “Congratulations!” Thus, your DIY greeting card is ready!
Another cute baby card
A personal greeting card presented to the teacher will bring a lot of positive emotions. You can make it with your own hands from the most ordinary colored paper. Moreover, the only additional things you will need are scissors and a pen. Fold the paper in half and place your child's hand on it so that his thumb and forefinger touch the fold line. Trace it along the outline and carefully cut out the card. As a result, you will get a cute card that is shaped like a baby’s hand. When opened, there are already two of them. All that remains is to fill out the card and present it to the teacher.

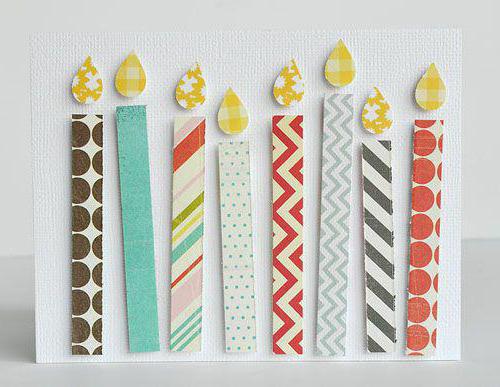
Simple postcard
To get such a card, you need to take cardboard for paper, thin double-sided tape, several types of kraft paper or regular colored pictures with designs, as well as yellow sheets. First prepare the base of the greeting card by folding the sheet in half. Then cut some strips from different paper. Try to make them the same in width, but different in length. Now cut out shapes resembling drops from yellow sheets. There should be as many of them as there are stripes.
When all the details are ready, you can start decorating the front side. To do this, lay out the strips on the card. It will turn out more beautiful if they are not parallel. Lay them out slightly at an angle. Then take one strip and glue a piece of double-sided tape to the back of it. Place the rectangle in place. Glue all the strips onto tape in the same way. Finally, attach the drops over the paper candles.
This DIY school greeting card is made very quickly. Therefore, it is ideal for the topic of the lesson or class hour. As a result, each student will have their own greeting card, which they can then give to someone on their birthday.
Paper greetings for the New Year
Making DIY greeting cards for the New Year is even easier. For example, to create such a card, you will need red cardstock or craft paper of the same color. Also take a narrow and wide ribbon in a beige or gold shade, the same tone as a drop-bead or rhinestone.
Fold the paper in half. Take a special gun or Moment glue and attach a small piece of narrow ribbon on top. It should be in the center. Draw a circle under it with a light pencil movement. Place bead drops inside it so that most of the space is filled. Then glue all the elements. It is most convenient to use tweezers. All that remains is to make a bow from a wide ribbon and glue it over the ball. Sign the card.
Volumetric card with balls
You can make very beautiful greeting cards with your own hands using thick double-sided tape. Also, for example, to create a card with balloons you will need several types of craft paper or cardboard with designs, a small piece of thin ribbon and beautiful threads (floss, wool, decorative twine, and so on).
First, make a blank for the card by folding the cardboard in half. Then take decorative paper and draw circles, hearts or ovals on the back side. These are the shapes of our future balloons. Then take scissors and carefully cut out the shapes along the outline. Now cut the threads. You need the same quantity as the number of balls you got. Connect the thread to the cardboard figure using double-sided tape. Place the balloons on the front of the card and then glue them on.
Tie all the ends into one bundle using a thin ribbon. Glue the back of it to the card. Align the ends of the threads. The three-dimensional postcard is ready! Using this principle, you can make many different greeting cards. Just prepare the elements and stick them on thick double-sided tape.

Preparing a postcard in scrapbooking style
You can make original greeting cards from paper with your own hands in scrapbooking style. To do this, you will need to take several types of beautiful cardboard, a thin ribbon and PVA glue. First, prepare the base. It can be cardboard folded in half, or just a square or rectangular piece of paper. Then take red paper and cut out exactly the same shape as the card itself, only a centimeter smaller on each side. Cut out another exactly the same piece, only white or beige. In addition, it should be several millimeters smaller than the previous one. Glue the red sheet on the front side of the card first, and then the light one.
New Year's decor postcards
Now cut out three rectangles from different papers. They should differ in length by 1 centimeter. Glue a medium-sized rectangle horizontally in the middle. Cut a piece of tape and glue one end to reverse side long rectangle. Place the shape under the center piece and glue it in place as well. Lift the tape up. Glue the last rectangle on top, having previously wrapped the second piece of ribbon under it. Make a bow from the leftover ribbon and stick it on the top of our gifts.
Under the picture, write “Happy New Year!”, “ Happy holidays! or “Congratulations!” It is noteworthy that depending on what color of paper you use, the content of the postcard changes. If you take cardboard in neutral shades with a pattern of hearts or circles, then the card can be presented for a birthday.

Greeting card in minimalist style
For such a card you will need a plain, beautiful, dark-colored cardboard. As well as white thick paper and several types of colored tape. Make the base of a greeting card from dark cardboard. Cut a few strips and simply stick it onto the front of the card. The stripes should go horizontally, maybe a little diagonally.
Take white cardboard and use a pencil to beautifully and carefully write “Happy Birthday!” in two lines. or one “Congratulations!” Letters must be bold. Circle the inscription in a frame, and let it connect with the words in some places. Now take a sharp utility knife and cut everything along the contour. Using PVA glue, stick our blank onto tape. All. A greeting card in a minimalist style is ready. Despite its simplicity, it turns out bright and stylish.

More design options for minimalist cards
Handmade greeting cards: “Happy Birthday” or “Happy New Year” turn out beautiful. Especially if you use colored tape in the process. There is no need to use any other materials or tools. Simply apply the tape to the front of the card in different orders or make different shapes out of it. It could be candles, a gift, a cake, and so on. To finish the card, you simply paste a greeting message cut out of white cardstock over the tape. This way, you will have several options for simple, but creative and stylish greeting cards.


