The orchid is a beautiful exotic flower that people like to decorate modern interiors with. Caring for orchids is quite difficult, so we will make this exotic flower from foamiran. Flowers made from foamiran look beautiful and do not require any care. You can make any orchid from foamiran. I will tell you how to make a white orchid, phalaenopsis orchid, cymbidium orchid and other types of these flowers.
White orchid from foamiran, master class with step-by-step photos
When talking about white orchids, the variety most often meant is phalaenopsis. In the photo you will see what kind of orchid we should end up with.
Photo of a white orchid from foamiran
To create an orchid from white foamiran you will need:
- white foamiran;
- yellow, lilac oil pastels, as well as a sponge for application and shading;
- phalaenopsis orchid mold and cattleya mold;
- iron;
- second glue;
- scissors;
- cotton swab.
Pattern for white orchid

The pattern was developed by foamiran master Elena Semanova. For one flower we need only three parts.

We cut out all the details one blank from white foamiran.
White orchid flower assembly
We begin processing the orchid petals. We heat the three-petal circle on an iron, one petal at a time, at a wool-silk temperature and press it onto the Cattleya mold.

We also heat the double petal on an iron, one petal at a time, and press it one by one on the phalaenopsis orchid mold.

Before processing the orchid's tongue, we will tint it with oil pastels. We apply tint on both sides. We tint the tail with lilac, the head with yellow, the wings along the edges with lilac, and in the middle we apply red dots.

Then we begin ironing at silk-wool temperature. We apply all the parts one by one with the front side so that they are slightly bent. Tail, head, wings. Then we collect them all together upwards and heat the base and treat it with a sponge.

You can make a lot of beautiful flowers with your own hands from various materials. It could be plastic bottles, leather, foamiran, satin ribbon etc. Flowers made from any material are very beautiful and unusual. In addition, they will serve you for a very long time and will delight you with their beauty. Today we will look at two interesting master classes on making orchids from foamiran. The author of this master class is Irina Zvereva. Look at what a beautiful orchid Irina made with her own hands and shared with us the manufacturing process. Also, if you want to learn how to make an orchid from a satin ribbon, you can watch a master class on how to make it.
To make an orchid you will need:
* Foamiran of the desired color.
* Orchid petal patterns.
* Dry pastel.
* Scissors.
* Iron.
* Cotton swab.
* Thermal gun.
How to make an orchid with your own hands:
To make an orchid we need templates. These are the templates we will use during our work. We draw templates on paper or thick cardboard and use them to apply patterns to the foamiran. Foamirn by color choose which one you like best. Then we cut out our blanks. Photos of templates can be either reduced or enlarged, depending on the size of the flower you need.


We carefully apply the edges of the petals to a hot iron and use our fingers to stretch them a little. This is how we process two parts. You should get a slight waviness of the petals.


We wrap the top of the stick with foamiran and then divide it in the middle so that we have a line left.

The photo shows what the middle should be like. cotton swab. Next, we begin to collect our flower. First, glue the tinted petal around the center.

Then glue the next double petal.

We still have three petals left. First, glue one petal on top, and then two on the bottom. You should end up with an orchid like in the photo.


Look how beautiful orchids Irina turned out.

You can make beautiful decorations from ready-made orchids or simply use them for interior decoration.


We thank Irina for a fascinating master class on making an orchid with your own hands from foamiran.

Master class - DIY orchid


To make an orchid we will need:
- Foamiran of the desired color.
- Thermal gun.
- Molds.
- Pastel in the right colors.
- Brush.
- Hairspray.
Method for making an orchid from foamiran:
To make a flower, we need patterns; we draw orchid petals on a piece of paper. To make one flower we need 6 petals.

We will also need these molds to make an orchid.

Cut out the required number of petals.

We heat them on the iron and immediately, before the petal has cooled down, use a mold to add texture to the petals.


We heat the core and give it this shape.

Here are the finished petals for making an orchid.

We trim the petals a little, but this is optional. Olga thinks it will be prettier this way.


These are the petals we should get for the orchid.


Select the shades you need and tint the base and edges of the petals.

This is how it should work! At the end of the work, we fix the pastel with hairspray so that it does not crumble or get dirty! Also, after varnishing, the colors will become a little brighter and more saturated!


We use decorative wire for ease of assembly. Then we remove it.

This is the kind of petal you should get for making an orchid.

Then glue the two petals together.

Then three petals together.

Now we glue the fourth petal; it does not need to be glued at the base.

Opposite it we glue the fifth and last petal.

We glue the center in the middle of the flower and this is what we get.


We take a thin brush and, using it and acrylic paint, decorate the core of the flower.


DIY orchid made from foamiran is ready.

You can make many beautiful orchids that can be used as decoration for your interior or as a hair decoration.

Olga made a beautiful panel of orchids and roses with her own hands.


I also offer you two more videos of a master class on making orchids from foamiran.
Copyright © Attention!. Copying text and photographs can only be used with the permission of the site administration and indicating an active link to the site. 2019 All rights reserved.
You can make a lot of beautiful flowers with your own hands from various materials. These can be plastic bottles, leather, foamiran, satin ribbon, etc. Flowers made from any material are very beautiful and unusual. In addition, they will serve you for a very long time and will delight you with their beauty. Today we will look at two interesting master classes on making orchids from foamiran. The author of this master class is Irina Zvereva. Look at what a beautiful orchid Irina made with her own hands and shared with us the manufacturing process.
To make an orchid you will need:
* Foamiran of the desired color.
* Orchid petal patterns.
* Dry pastel.
* Scissors.
* Iron.
* Cotton swab.
* Thermal gun.
How to make an orchid with your own hands:
To make an orchid we need templates. These are the templates we will use during our work. We draw templates on paper or thick cardboard and use them to apply patterns to the foamiran. Foamirn by color choose which one you like best. Then we cut out our blanks. Photos of templates can be either reduced or enlarged, depending on the size of the flower you need.

We carefully apply the edges of the petals to a hot iron and use our fingers to stretch them a little. This is how we process two parts. You should get a slight waviness of the petals.
We wrap the top of the stick with foamiran and then divide it in the middle so that we have a line left.

The photo shows what the middle of the cotton swab should look like. Next, we begin to collect our flower. First, glue the tinted petal around the center.

Then glue the next double petal.

We still have three petals left. First, glue one petal on top, and then two on the bottom. You should end up with an orchid like in the photo.


Look how beautiful orchids Irina turned out.

You can make beautiful decorations from ready-made orchids or simply use them for interior decoration.


We thank Irina for a fascinating master class on making an orchid with your own hands from foamiran.
Master class - DIY orchid
Target="_blank">http://mnogo-idei.com/wp-content/uploads/2014/06/getImage7-300x212.jpg 300w" width="500" />
Target="_blank">http://mnogo-idei.com/wp-content/uploads/2014/06/getImage-116-224x300.jpg 224w" width="500" />
To make an orchid we will need:
- Foamiran of the desired color.
- Thermal gun.
- Molds.
- Pastel in the right colors.
- Brush.
- Hairspray.
Method for making an orchid from foamiran:
To make a flower, we need patterns; we draw orchid petals on a piece of paper. To make one flower we need 6 petals.
Target="_blank">http://mnogo-idei.com/wp-content/uploads/2014/06/getImage-210-300x224.jpg 300w" width="500" />
We will also need these molds to make an orchid.
Target="_blank">http://mnogo-idei.com/wp-content/uploads/2014/06/getImage-36-300x199.jpg 300w" width="500" />
Cut out the required number of petals.
Target="_blank">http://mnogo-idei.com/wp-content/uploads/2014/06/getImage-45-300x199.jpg 300w" width="500" />
We heat them on the iron and immediately, before the petal has cooled down, use a mold to add texture to the petals.
Target="_blank">http://mnogo-idei.com/wp-content/uploads/2014/06/getImage-56-300x199.jpg 300w" width="500" />
Target="_blank">http://mnogo-idei.com/wp-content/uploads/2014/06/getImage-65-300x199.jpg 300w" width="500" />
We heat the core and give it this shape.
Target="_blank">http://mnogo-idei.com/wp-content/uploads/2014/06/getImage-73-300x199.jpg 300w" width="500" />
Here are the finished petals for making an orchid.
Target="_blank">http://mnogo-idei.com/wp-content/uploads/2014/06/getImage-82-300x199.jpg 300w" width="500" />
We trim the petals a little, but this is optional. Olga thinks it will be prettier this way.
Target="_blank">http://mnogo-idei.com/wp-content/uploads/2014/06/getImage-92-300x199.jpg 300w" width="500" />
Target="_blank">http://mnogo-idei.com/wp-content/uploads/2014/06/getImage-102-300x199.jpg 300w" width="500" />
These are the petals we should get for the orchid.
Target="_blank">http://mnogo-idei.com/wp-content/uploads/2014/06/getImage-115-300x199.jpg 300w" width="500" />
Target="_blank">http://mnogo-idei.com/wp-content/uploads/2014/06/getImage-122-300x199.jpg 300w" width="500" />
Target="_blank">http://mnogo-idei.com/wp-content/uploads/2014/06/getImage-133-300x199.jpg 300w" width="500" />
Target="_blank">http://mnogo-idei.com/wp-content/uploads/2014/06/getImage-142-300x199.jpg 300w" width="500" />
Select the shades you need and tint the base and edges of the petals.
Target="_blank">http://mnogo-idei.com/wp-content/uploads/2014/06/getImage-152-300x199.jpg 300w" width="500" />
This is how it should work! At the end of the work, we fix the pastel with hairspray so that it does not crumble or get dirty! Also, after varnishing, the colors will become a little brighter and more saturated!
Target="_blank">http://mnogo-idei.com/wp-content/uploads/2014/06/getImage-162-300x199.jpg 300w" width="500" />
Target="_blank">http://mnogo-idei.com/wp-content/uploads/2014/06/getImage-172-300x199.jpg 300w" width="500" />
We use decorative wire for ease of assembly. Then we remove it.
Target="_blank">http://mnogo-idei.com/wp-content/uploads/2014/06/getImage-182-300x199.jpg 300w" width="500" />
This is the kind of petal you should get for making an orchid.
Target="_blank">http://mnogo-idei.com/wp-content/uploads/2014/06/getImage-193-300x199.jpg 300w" width="500" />
Then glue the two petals together.
Target="_blank">http://mnogo-idei.com/wp-content/uploads/2014/06/getImage-201-300x199.jpg 300w" width="500" />
Then three petals together.
Target="_blank">http://mnogo-idei.com/wp-content/uploads/2014/06/getImage-212-300x199.jpg 300w" width="500" />
Now we glue the fourth petal; it does not need to be glued at the base.
Target="_blank">http://mnogo-idei.com/wp-content/uploads/2014/06/getImage-222-300x199.jpg 300w" width="500" />
Opposite it we glue the fifth and last petal.
Target="_blank">http://mnogo-idei.com/wp-content/uploads/2014/06/getImage-232-300x199.jpg 300w" width="500" />
We glue the center in the middle of the flower and this is what we get.
Target="_blank">http://mnogo-idei.com/wp-content/uploads/2014/06/getImage-241-300x199.jpg 300w" width="500" />
Target="_blank">http://mnogo-idei.com/wp-content/uploads/2014/06/getImage-251-300x199.jpg 300w" width="500" />
Target="_blank">http://mnogo-idei.com/wp-content/uploads/2014/06/getImage-261-300x199.jpg 300w" width="500" />
We take a thin brush and, using it and acrylic paint, decorate the core of the flower.
Target="_blank">http://mnogo-idei.com/wp-content/uploads/2014/06/getImage-271-300x199.jpg 300w" width="500" />
Target="_blank">http://mnogo-idei.com/wp-content/uploads/2014/06/getImage-281-199x300.jpg 199w" width="500" />
DIY orchid made from foamiran is ready.
Target="_blank">http://mnogo-idei.com/wp-content/uploads/2014/06/getImage-29-300x199.jpg 300w" width="500" />
You can make many beautiful orchids that can be used as decoration for your interior or as a hair decoration.
Target="_blank">http://mnogo-idei.com/wp-content/uploads/2014/06/getImage-301-300x199.jpg 300w" width="500" />
Olga made a beautiful panel of orchids and roses with her own hands.
Target="_blank">http://mnogo-idei.com/wp-content/uploads/2014/06/getImage-312-217x300.jpg 217w" width="500" />
Target="_blank">http://mnogo-idei.com/wp-content/uploads/2014/06/getImage-341-199x300.jpg 199w" width="500" />
One of the most luxurious and majestic flowers is, of course, the orchid. The beauty of this flower leaves no one indifferent, which is why many needlewomen try to convey the beauty and stateliness of this flower with the help of artificial materials and often use foamiran for this.


In this article we offer you step-by-step master class and video tutorials on how to make this flower.

If you have a great desire to make such a flower yourself, then stock up on materials for work and go ahead!
To work on creating an orchid you will need:
- foamiran of different colors,
- glue,
- scissors,
- iron,
- foil,
- corrugated paper,
- floral wire,
- pastel pencils,
- floral tape.
Orchid from foamiran: master class
Following MK's tips, our orchid will be little different from a real flower. But before you get started, it’s best to prepare orchid patterns; they will be very easy to cut into according to the template:

Stages of work
We cut a sheet of foamiran of the main color, i.e. the color of future petals, into equal squares with a side of 4 cm, plus cut out 1 rectangle with dimensions of 4x2 cm.

From these blanks we make the petals of the future flower using ready-made pattern or drawing by hand on a sheet of paper:

Using pastel pencils, we tint the edges and core of each petal, giving them visual volume:

When all the petals are tinted, we move on to the stage of adding texture. To do this, we will need an iron, with which we will need to heat the petal wrapped in corrugated paper.


Please note that it is advisable to use 1 strip of paper per 1 petal to maintain a clear texture pattern.
After heating, roll the petal in paper into a tight tube and twist it. Keep in mind that these manipulations must be done quickly enough, before the petal cools down.

After we unfold the workpiece, the leaf should take on a new shape:

We bring the shape of each petal to perfection by slightly stretching and pressing on it:

The result should be something like this:

Let's move on to forming the core of the flower. For this we need foil and wire.

A piece of foil needs to be rolled into a small ball, then stretched out a little, giving it an oval shape, and secured to the end of the wire:

We begin to glue the orchid petals to this core.
The petals need to be glued very carefully and evenly so that they do not move apart:

Glue the second row of petals as in the photo :
As a result, you should end up with a flower like this:
We move on to decorating the wire-stem of the flower. To do this, take tape (you can buy it at a flower or craft store) and wrap it around the entire stem. It is best to make a 2-layer wrap so that the work looks more neat, hiding all the nuances of creating a flower: 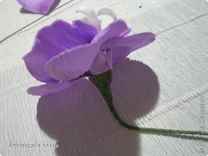
After this, we begin to make the elegant core of the orchid flower. You can use ready-made templates or show your imagination:

Using the template, we cut out a figurine from Thomas and decorate it with acrylic paints or a marker. In the place where the cross is, you need to drop a little glue:

Glue a petal of the same color on top of this blank:

And again we drip a little glue to fix the shape of the core:

To make this workpiece look natural and realistic, we heat its edges with an iron, so they curl up a little:


We glue the resulting core into the middle of the workpiece with the petals:

Since there are usually 4-5 flowers on one orchid branch, we should have several blanks:

We connect the finished flowers on the wire to each other using tape. The result is a thick stem that matches a real flower.

As a finishing touch, glue a small bead into the very center. The orchid is ready:

Well, as a bonus - several detailed videos lessons on how to make orchids from foamiran.
A selection of videos on the topic of the article
Hello dear readers. I already told you that this summer I learned how to make orchids from foamiran. I took a lot of photos. I believe that any novice craftswoman can try to make an orchid if she wishes. I learned how to make orchids this summer. My friend from Crimea, Anya, whom we visit every summer, showed me her foamiran orchids. This is truly a miracle. I liked the orchids so much that I couldn’t resist and asked her to show me a master class on how to make an orchid from foamiran, she happily agreed. I am very grateful to her for this. I also took a photo of her orchids.
True, this is just part of the photo. Orchids look really gorgeous, very natural and beautiful. These orchids can decorate any room.
What a miracle, isn't it? And this is what an orchid looks like in a pot. The orchid is placed in a pot and filled with alabaster.
You can decorate the top with stones or beads. In general, as your imagination allows.
Here is a green orchid, also very beautiful. Foamiran for orchids can be painted in different colors acrylic paints, pastels, even shadows and blush... I bought acrylic paints for myself.
The veins on the leaves are made with ordinary colored pencils. But the buds are made from beads; below I will show you how else you can make buds for an orchid.
I also liked the pink orchid, but it was only in the process of being made, so I photographed one flower.
Moreover, Anya told me how to make an orchid from foamiran without mold. To be honest, I looked for the mold, but didn’t find it.
Not every store even sells foamiran, let alone mold. I’ll tell you a secret too))) You can add texture to the petal using a shell. And there are plenty of shells in the sea. Below I will show in more detail how to decorate a petal using a shell.
I won’t bore you with stories for a long time, now I’ll show and tell you, with step-by-step photographs, how I make orchids. Of course, my master class is completely for beginners. Experienced craftswomen They make orchids using molds, paint each petal with pastels, which is indistinguishable from a real orchid.
I don’t have much experience, but I will be happy to share my knowledge with you. Perhaps my experience will be useful to someone. I made it earlier, decorated it as a hairpin and gave it to my daughter.
Orchid from foamiran. Master class. For beginners
We will need:
- Foamiran
- Beads (stamens can be used)
- Tape tape
- Wire
- Foil
- Scissors
- Toothpick
- Acrylic paints and brush
Anya shared the patterns with me, and she printed them from the Internet. You can also print templates from the Internet. I traced the patterns onto cardboard, so it’s easier to work with them.
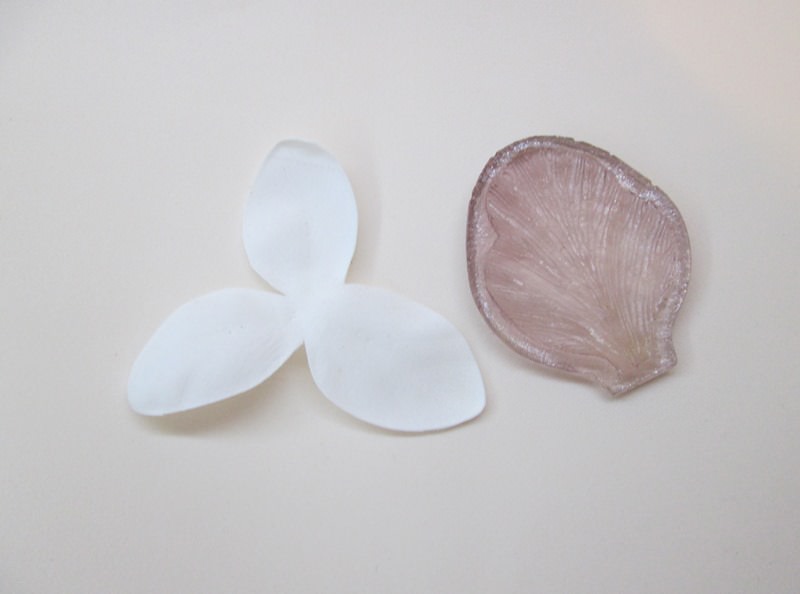
It is best to trace petal patterns with a toothpick; unlike a pencil, a toothpick does not leave marks on white foamiran.
Cut out the petals with scissors. We need 5 petals of each.
Cut out the center of the orchid. I will make an orchid sprig with 5 flowers. Therefore, I need to cut out 5 centers.
The only downside to making orchids is that you need to have time.
When all the blanks are ready, I start decorating the middle. I will decorate it with acrylic paints. I take a very ordinary brush and paint the edges of the middle with yellow acrylic paint.
And then with a thin brush I put dots of purple acrylic paint along the yellow edge of the middle. I put dots on the white part and draw stripes. Just like in the photo.
This is how I draw on 5 centers. I let them dry well, turn them over and cover them with yellow paint. reverse side middle, and also put dots on it.
I did this on a napkin. I tried very hard not to get anything dirty and to do everything neatly.
Orchid made of foamiran without mold. Photo
Now I will show you how to add texture to a petal without mold. My first experience was in Crimea, and it was quite successful; I found even shells.
You can use any shells, as long as they are not small ones. The shell should be large or medium to cover the entire surface of the orchid petal.
We apply each side of the petal to a hot iron, and then to the shell, and so on for all 5 petals of 1 flower. To give each petal texture.
Try to keep the iron warm, not hot.
We do this with all 5 colors. You can make the edge of the orchid petals wavy. To do this, apply the petals to the iron and stretch the edges. But this is optional.
We also apply the centers to the iron and remove them. They curl inward a little.
Now everything is ready and you can start making the orchid itself.
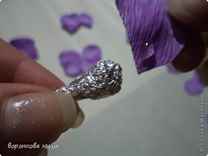
You can use stamens or a piece of ear stick (the part with cotton wool). I use a bead. I bought 5 identical beige beads.
For flowers I will need wire. It can be purchased as a finishing material for handicrafts. It is sold in skeins. I had some wire at home, although it was thin, so I used two pieces of wire.
I thread the bead to the center and twist the wire into a rope.
I already had 28 cm wire cut into pieces. Therefore, when twisted, the length of the wire is 14 cm. And the flower itself is 14 cm.
Now we thread the wire with the bead into the core of the orchid. I pierce the foamiran with the same wire.
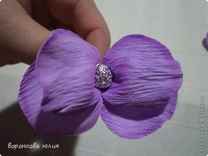
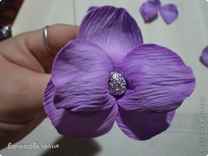
We pierce the wire in the middle of the petals.
As a result, we get such a wonderful and delicate orchid. Everything is very simple, it just takes a lot of time to prepare everything, and collecting the orchid is easy.
Now I will show you how to decorate the back side of the orchid. To do this, we will need scraps of rectangular foamiran 1 by 2 cm and green tape.
Tape is most often used by florists. What is this? Tape tape is a durable, elastic tape with an adhesive effect. The store where I bought the tape had green and brown tape. I bought the green one.
What do we need to do? Turn the orchid over. Twist a strip of foamiran 1 by 2 cm in a spiral. You can glue it a little super glue. Now you can wrap the tape with tape.
In the end, this is what happens. It is clear that we carry out this manipulation with all 5 colors. So, orchids look beautiful and believable from all sides.
We first wrap the tape around the foamiran in a spiral, and then along an oblique line downwards.
Now to create an orchid, so that everything is believable and natural, we need to make orchid buds. And we will get an orchid branch with buds.
How to make buds for an orchid from foamiran
We will need:
- Foil
- Wire
- Glue gun or glue moment
- Foamiran
Making orchid buds is much easier than. But if you decorate a sprig of an orchid, then with buds it will look more luxurious.
I'll tell you how I make buds, you can make buds differently. I tear off small pieces from the foil and make droplets out of them. I take 2 pieces of wire and make a wire cross on the top of the droplet. At the bottom of the droplet I twist the wire with a flagellum.
I cut a square of foamiran 2 by 2 cm. I glue a drop of foil over it. For the petals, I cut pieces of foamiran 1 cm by 1 cm and make a petal. For 1 bud I needed 3 petals.
I glue the petals to the bud, and decorate the stem with tape.
When everything is ready, you can start assembling the orchid, and now I will show you how to assemble an orchid branch from foamiran.
DIY orchid sprig from foamiran
An orchid sprig made from foamiran can be used to decorate the interior and decorated in a pot, filled with plaster and decorated as desired. As I already wrote above.
To make an orchid branch we will need wire. I have a piece of wire 40 cm, but you can take 50 cm.
I twist 2 orchid buds among themselves, one slightly higher, one lower. I screw them to the main wire. I use regular green floral wire.
Then I take the previously prepared flower and wrap it around the main wire. Now we secure everything with tape; it is better to do this along an oblique line.
I continue to attach the flowers to the main wire in checkerboard pattern. Wrapping a twig with tape. Focus on connecting the orchid to the wire.
This is how we design an orchid sprig. Previously, I already tried to design an orchid branch from foamiran. True, I made orchid flowers from green foamiran.
This is what orchid branches look like. My first work was also done without mold and without shell. I heated each orchid petal and stretched it with my hands, thus giving the petals a “wavy” shape.
These are my orchids. The green one is my first creation, and the white foamiran orchid is my second creation.)))
Such an orchid sprig can beautifully decorate the interior of a room. The orchid looks very beautiful and natural.
Or you can arrange it in a flower pot. The orchid looks beautiful too. A flower pot is worthy of decorating any windowsill. True, if the flowers are exposed to sunlight, the flowers may fade in the sun. This should be taken into account.
In a pot, an orchid looks even more natural, just like a real one. Very beautiful and tender.
Orchids are a symbol of perfection, luxury, beauty, wisdom, love. By creating an orchid from foamiran, you will thereby make yourself a talisman. I hope you understand the master class on creating an orchid with your own hands. A large number of photos will facilitate the process of making an orchid.
You can decorate a bouquet with a sprig of orchid made from foamiran. Make a hairpin out of a flower, or glue it to a headband, make a brooch, or. Or you can decorate it in a flower pot, everything is in your hands.)))
And if you make hair clips and elastic bands, I recommend you make them, it looks very beautiful and gentle.
Write below, do you make flowers from foamiran? Do you like this hobby? Thank you for being with me. I hope that I will delight you with new master classes soon.


