Often, professional athletes (especially bodybuilders) and those people who very closely monitor their body size resort to measuring their volumes. own parameters, afraid of gaining excess weight.
And for many women who sew clothes or order them from online stores, it is very important to take correct measurements, because this determines how, for example, a new skirt or pants will look on your figure. All pregnant women are measured regularly, so doctors get the data they need. In general, this indicator can play an important role in a given situation.
Surely many will now think: “ What could be simpler than this procedure?" But no. There are many nuances in measuring your volumes that can affect the formation of incorrect results. And, despite the simplicity of this procedure, not everyone knows how to measure the hip circumference correctly without adding extra centimeters to themselves.
Therefore, today we decided to cover the topic of measuring hip volume in more detail, and also tell you a few secrets thanks to which you can measure this figure figure without having special devices. Let's get started.
In order to find out the volume of your hips, as a measuring tool, as a rule, you take a cloth or rubberized tape. However, professionals (seamstresses, athletes, doctors) are inclined to the latter option, since the tape is based on simple material It can stretch very easily, if you just slightly pull on its end, you can end up “increasing” your volume by a few extra centimeters.
For men and women who want to sew something for themselves using foreign sources with pattern diagrams, a double-sided measuring tape will be very relevant, where on one side there will be the usual centimeters for us, and on the other - inches, since all foreign patterns are calculated in exactly this value.
If you still couldn’t find such a measuring device, then you can measure the volume of your hips with a simple rubberized tape and convert the resulting result, in centimeters, into inches - 1 centimeter is equal to 0.397 inches.
If you don’t have a measuring device at hand, and it is extremely important to correctly measure the volume of your hips, then you can do without it. All you need is a simple ribbon, a belt, or a non-stretchy rope. We tie a small knot at one end, measure the hips and again make a small knot at the end mark.
You can also use chalk, a felt-tip pen, a ballpoint pen, a piece of dry soap (soap) and other devices that can make a mark. Now we unroll the ribbon (thread, rope, etc.) and measure the resulting volume using a very ordinary ruler.
Most men try to measure the volume of their hips using a tool meter, which has a metal base. But this is not correct, since this device will not completely describe your shape, therefore, you are guaranteed to gain a few centimeters in girth.
How to properly carry out measurement procedures?
 The easiest way is to measure your hip circumference using the same rubberized measuring tape. We stand in front of a mirror (it is advisable that most of your body is visible in it, eliminating the possibility of any tilts and turns).
We put our feet together and begin to carefully examine our body. First you need to determine by eye which part of the thighs the most protruding point is located. For all men and women, depending on individual parameters, this line can be located either at the level of the buttocks themselves or slightly lower.
As for the latter, this applies to a greater extent to people whose entire volume is concentrated on their sides. Also people with overweight they can also “grab” part of the strongly hanging belly into the hips.
When measuring hip circumference, it is extremely important to place the measuring tape strictly parallel to the floor surface in order to increase the accuracy of the measurements.
But how to measure the hip circumference of that category of people who have problems with the outlines of their figure, when the tummy and sides (in common people they are also called “ears” or “breeches”) protrude very widely, and there is no certainty that when measuring the circumference according to gluteal line, you will get a reliable value.
However, there were craftsmen who were able to come up with a very effective and accurate way to measure volumes for men and women who do not have a classic figure.
Step one
We take several small sheets of thick paper (whatman paper), but it is better to use one large one, so the accuracy of the procedure will be higher.
Step two
Filming outerwear and turn into whatman paper.
At this stage, it is necessary to pay attention to the fact that the cylinder fits very tightly to the body, but does not warp and stands strictly perpendicular to the floor surface.
Step three
We take one of the available writing instruments (pencil, pen, marker, soap, chalk, etc.) and mark the junction of the sides of the Whatman paper.
Step four
 We remove the cylinder from ourselves, unfold it and, using a ruler or measuring tape, measure the resulting distance. And voila, you have the most accurate hip circumference!
It is very important to maintain the correct body position during such a procedure, since the accuracy of the measurement depends on this factor.
Firstly, you need to stand straight, with a straight back, and straighten your shoulders. Secondly, if during measurement you place your legs shoulder width apart, then in the end you will get an inflated result. And thirdly, during this procedure it is not recommended to tighten the measuring tape in order to obtain a smaller girth.
As a rule, this method of measurement is typical for women. There is no need to indulge yourself in dreams, because what the device shows is not a natural value. It is better to strive for the desired result than to reassure yourself with the indicators of a pulled tape. It should fit snugly to the body and should not sag.
A few important nuances
 Surely everyone knows that when measuring hip circumference, you need to get rid of excess clothing. If possible, try not to carry out this procedure when you are wearing elastic, modeling (shaping) underwear or tights.
And yet, if you needed measurements of the hip circumference to sew a skirt or pants that you will wear with such underwear, then you should not get rid of it.
If you want to get the most accurate hip circumference results, you'll need some outside help. Then you will not have to make unnecessary movements to take measurements, therefore, the accuracy of this procedure increases. If you do not have this opportunity and you have to take your own measurements, then do it in front of a mirror, so you can control the entire process.
During the measurement procedure, it is extremely undesirable to strain the muscles of the legs, buttocks and abs. After all, your body is not always in good shape, sometimes you want to relax and be more natural. And the most beautiful and fashion clothes, sewn according to low specifications, will hinder your movements while walking, causing a feeling of discomfort.
If you need measurements of your volumes for sewing clothes, then there is also such a type of measurement, often used in sewing workshops, as the half-circumference of the hips (most often designated POB). Did you know that this particular measurement is considered the size of the bottom part of your clothing (skirt, trousers, shorts, etc.).
For example, you measured your hip circumference and the result was 88 centimeters. You don't need to know much about sewing to understand that the half-circumference is equal to half the circumference. So, with simple calculations, it turns out that the semi-circumference of the hips is 44, from which we can firmly say that the size of your clothing corresponds to 44 of the domestic standard, or according to foreign classifications it is size S.
To calculate european size, you need to multiply the total circumference of the hips by 0.397 (convert to inches), we get 88 * 0.397 = 35, that is, it is 34-36.
As you can see, calculating the circumference of your hips is not at all difficult; it is only important to take into account all the recommendations and nuances that you learned about today. Now you can safely adopt one of the methods proposed above for carrying out this procedure and shine with your knowledge among your friends!
And remember, it’s never too late to expand your knowledge and improve your own skills. The main thing is desire, and everything else will appear with it. We sincerely wish you good luck in all your endeavors!
There are main and auxiliary measurements.
TO basic measurements include: Height (R), Chest circumference (Og), Waist circumference (From), Hip circumference (Ob), Sleeve length (Dr), Side length of trousers (Dsb), Inner leg length (Step length) - (Lsh );
These measurements are taken from the client's figure.
Auxiliary measurements should be calculated and compared with values obtained from measurements.
Basic measurements
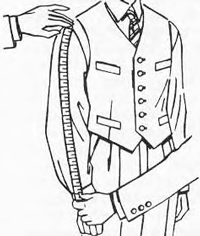
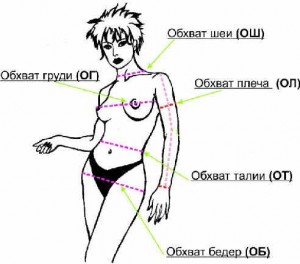
Chest circumference (Og)
A measuring tape passes through the protruding (nipple) points of the breast, through the back corners armpits, through the protruding points of the shoulder blades and closes in front.
The measuring tape is not positioned horizontally - it is raised at the back. When taking this measurement, you should place your finger under the measuring tape so that it is not pulled too tight. The client must be wearing the clothes with which he will wear a jacket (most often a shirt or a shirt and a vest). If the figure has strongly protruding shoulder blades, then this should be taken into account when calculating the width of the back.
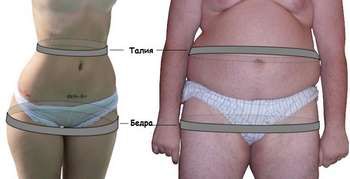
Waist circumference (from)
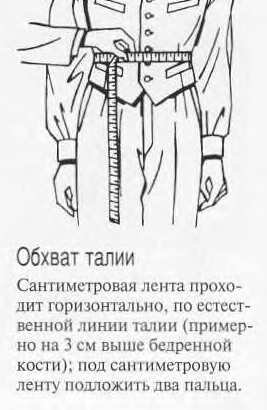 The measuring tape runs horizontally along the natural waistline (approximately 3 cm above the hip bone), closing in front, at the most protruding point of the abdomen. When taking this measurement, it is recommended to place two fingers under the centimeter fly and not pull it too tight. This measurement is taken to construct shoulder products.
Note: To construct waist products, the measurement of the waist circumference at the level of the belt (Wtp) is taken.
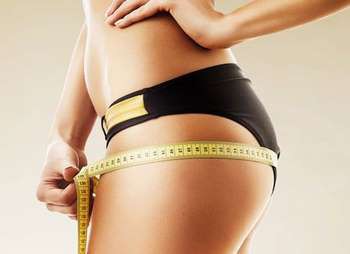
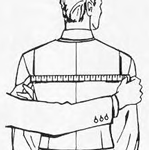
Hip circumference (About)
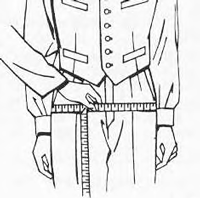 The measuring tape runs horizontally along the most protruding points of the buttocks and thighs.
When taking this measurement, you should place two fingers under the measuring tape and not pull it too tight.
Sleeve length (Dr)
 Sleeve length is measured from the shoulder point along the outer surface of the shoulder and forearm to the wrist.
Pants side length (DSB)
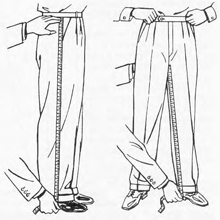 Measured Dsb from the bottom edge of the trouser waistband to the floor or to the top edge of the heel.
This measurement does not take into account the width of the waistband.
Leg length along the inner surface (Step length) (Lw)
Measured from the bottom of the middle seam of the trousers to the heel or to the top of the heel with the legs slightly apart. This measurement is taken with the trousers slightly pulled up.
Auxiliary measurements
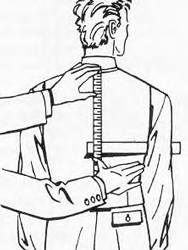
Back neck length (Dgs)
Measured DGS along the base of the neck from the seventh cervical vertebra to the highest point of the designed shoulder suture.
Armhole depth (Gpr)
 Before obtaining this measurement, a strip of cardboard (approximately 35x5 cm) should be inserted into the client's armpit. With your right hand, fold the cardboard strip over the client's back. Press the beginning of the measuring tape against the seventh cervical vertebra, the tape should hang along the spine.
The measurement value is read at the top edge of the cardboard strip.
Hips Height (Wb)
Measured Wb from the seventh cervical vertebra to the level of the most prominent points of the buttocks (at which it was measured About).
Back width (Wsp)
 Measured Shsp between the posterior corners of the armpits at the level of the protruding points of the shoulder blades.
The measuring tape is placed horizontally, with some tension.
Armhole width (Shpr)
This is the distance between the front and back corners of the armpits, the measuring tape passes under the client's arm.
Chest Width(W)
Measured Shg in front, between the anterior corners of the armpits.
Shoulder width (W)
Measured from the point of the base of the neck in the middle of the shoulder slope to the shoulder point.
Arch of the shoulder girdle at the back (D)
Measured horizontally across the back between the shoulder points.
Front armhole depth II (Gpr II(p)) taking into account DGS
Measured Gpr(p) from the seventh cervical vertebra - a measuring tape passes along the base of the neck to the point at the base of the neck on the side (i.e., to the highest point of the designed shoulder seam), then lowers down through the nipple point, to the level of the depth of the armhole in the front.
When taking this measurement, a cardboard strip should be used, which the client holds with his hand in the armpit.
The measurement is read at the top edge of the strip.
The value of this measurement, minus DGS, need to be compared with the calculated value Gpr(p).
Front waist length II (Rtp II)
Measured Accident II from the seventh cervical vertebra - the measuring tape runs along the base of the neck to the point of the base of the neck on the side (i.e., to the highest point of the designed shoulder seam), then lowers down through the nipple point, to the level of the natural waist line.
The value of this measurement is minus DGS must be compared with DTS on ready-made patterns for non-standard figures.
This is to use a certain scheme for its manufacture. When sewing, it is imperative to take measurements correctly. To sew any item, you need to be able to take measurements correctly so that the result is a product that will fit perfectly on your figure.
It is better to take measurements when you are wearing a T-shirt and tights, allowing the measuring tape to easily slide over your figure, without tightening your body, but also not allowing the tape to hang loosely.
We must remember that there are basic dimensions, and there are additional ones. Basic measurements are used to construct most basic patterns, but sometimes patterns are so intricate that a few extra measurements are needed, as you can learn from the pattern description.
1. Chest circumference (OG)
We take measurements along the protruding points of the chest around the figure.
2. Waist circumference (OT)
We measure at the narrowest point in the waist area around the body.
3. Hip circumference (H)
We measure at the most convex points of the buttocks.
Some women experience the “golife effect.” In this case, it is recommended to duplicate the measurement. To do this, we measure the volume along the protruding lines of the “golifa” just below the measurement of the girth of the buttocks.
4. Chest height (HH) - these are the points of visual transition from the neck to the shoulder to the most protruding point on the chest.
5. Front length (accident)- this is the point in front of the visual transition of the neck to the shoulder to the waist through the most protruding point of the chest.
6. Product length (DI) - measurement from the waist to the length you need in the finished product.
7. Back length (DTS)
We find the seventh cervical spine and measure from this place to the waist line, so as not to make a mistake with the place at the waist, you need to tie a cord at the waist line.
8. Back width (ShS)
We measure the width of the back horizontally through the center of the shoulder blades along the straightened back.
9. Shoulder width (SH)
We find the most horizontal points on the shoulders and measure the width from one shoulder to the other.
The difference between 15 and 16 measurements gives us the seat height measurement ( Sun), which will be useful for those who decide to sew their own trousers or shorts.
The seat height can also be measured by sitting up straight and measuring from your waist to the surface on which you are sitting. If these two indicators turn out to be unequal, then take the average between them to construct a pattern.
17. Thigh height (WB)
We measure from the waist line to the hip line along the outside of the thigh.
A formula is usually used to calculate armhole depth, but this measurement can also be measured.
18. Armhole depth (GPr)
You need to take a strip of paper and hold it under the back of your arm, after which you can measure the depth of the armhole - this is the distance from the 7th cervical vertebra to the strip of paper you are holding.
September 10, 2009
Sometimes it’s worth measuring the size of your FAVORITE (it can’t be otherwise) body. The reasons may be different: to clearly assess the impact on your so-called anthropometric data:
- diets,
- training,
- diet changes,
- own laziness,
- time of year.
And also prepare for buying underwear or clothes, because having learned how to correctly measure the size of your body, we will be able to find out the size of clothing that suits us.
Everyone knows, except for height and weight, that 90-60-90 has remained unchanged for several decades, namely chest-waist-hips. In addition, you can measure the following parameters that are needed for sewing clothes.

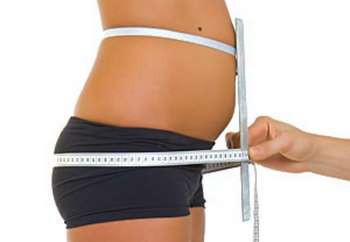
- Abdominal volume (3 cm below the navel)
- The volume of the hip from above, in common parlance “the volume of the thigh”
- Volume under the knee
- Volume calf muscle(shin)
- Forearm volume
- Wrist size
- Ankle volume
- Neck volume
I'll tell you how to measure the most popular sizes.
1. Bust volume.
You should measure while exhaling, that is, exhale the air and measure. We take measurements at the most convex point of the chest, in most cases this is the nipple. We hold our measuring tape straight, parallel to the floor, do not tighten it, but press it tightly.
2. In order to do it correctly, you should also know the volume under the breasts. Also, immediately after exhalation, we follow the line where the mammary gland ends, again parallel to the floor.
Based on the results of the first two measurements, you can judge your breast size.
3. Waist size. We exhaled and measured, and before that we found the narrowest line on our body, because... Some consider the waist to be the place in the middle between the chest and hips, not taking into account that everyone has their own specific figure. At the same time, we try not to make the belly narrower or wider, i.e. We don’t pull it into ourselves and don’t inflate it like a drum.
4. Hip volume. We measure where our butt is widest, i.e. we find the most prominent points. As in all previous measurements, we hold the tape parallel to the floor, do not tighten it, but press it tightly to the body.
5. Top thigh volume, i.e. thigh volume. For me, this is the most insidious place, as, in principle, for many girls and women, because... the inner thigh is not very involved in movements everyday life, that’s where everything that’s not too lazy is put aside. We measure as follows: we place our leg on a chair, with the knee at approximately 90 degrees to the floor. The leg should be relaxed so that the muscle does not strain and the volume does not increase.
Are you wondering how to measure hip size in women? Most ladies carefully monitor their figure, so they regularly measure their parameters. But how correctly do they do it? In some cases (tailoring, buying things online), a difference of even a few millimeters plays a big role. Therefore, the ability to correctly measure your figure will not be superfluous.
How to measure hip size in women? First of all, you need to purchase a measuring tape. You can buy this at a sewing store or hardware store. Next, follow the detailed instructions:
- Stand in front of the mirror. It should be quite large so that you can see yourself in full height. Using a mirror, it will be easy to control how the measuring tape lies, because it can twist and “go to the side.”
- In order for the measurements to be correct, they must be taken undressed. It is not necessary to completely undress. You can leave thin underwear on your body. Jeans, tight skirts and tights will distort the indicators. This is especially important if you plan to buy clothes online or have custom-made clothes.
- Place your feet together. A wide stance will not allow you to get an accurate result. Straighten your back. Stand sideways to the mirror.
- The concept of “hip volume” includes the volume of not only the hips, but also the buttocks.
- Mark the widest part of the pelvis.
- Place the measuring tape on your hips, moving it to the widest part of your hips. Press the ends of the tape tightly as you wrap it around your hips.
- Connect the 2 ends of the measuring tape and loosen it slightly. Look at what mark the second end of the measuring tape is located. This will be the volume of your hips.

If you don't have time to go to the store to buy a measuring tape, you can use paper tape or string. They are applied to the hips in the same way as a tape measure. After measuring, place a string or paper tape on the ruler and count the number of centimeters. This is not the most reliable way to measure the parameters of a figure, since you are unlikely to achieve millimeter accuracy, but sometimes it is the best way out of the situation. You should not use a tape measure to take measurements. It is quite dense and inflexible, so you will only get distorted results with it.
Have you taken measurements for tailoring? Then add a couple more centimeters to the result obtained, since walking in clothes that are too tight will be uncomfortable.
What to do if you are not satisfied with your hip size?
If you took measurements, but the result did not please you at all, it makes sense to adjust the parameters. Of course, the most reliable way is to exercise and review your diet. But there are cases when the hips are much wider than the waist or, on the contrary, have the same parameters. These are the proportions that nature has endowed, and they can only be corrected with the help of clothing.

What to wear for women with wide hips?
- The task of women with curvy hips is to visually increase the top. Blouses and shirts with flounces, ruffles, yokes, and shoulder pads are suitable for this. You can decorate the top with a neck scarf, a voluminous necklace, or a shawl.
- The top and bottom should be as contrasting as possible. You can play up the ensemble using the color or texture of the fabric.
- To make the hips appear visually smaller, long thin belts hanging down, a silhouette widened at the bottom, and a straight, loose cut of skirts and trousers are suitable.
- The best style of skirt for ladies with wide hips is a-line. The optimal length is to the knee, but you can afford a shorter option. Especially if you have beautiful, long legs.
- Vertical folds and dark, rich shades will help correct your figure.
- Choose shoes with medium or low heels.
- Avoid low-cut trousers, pleated skirts, and clothes with voluminous patch pockets.
- A great way to “visually lose weight” is floor-length trousers combined with high heels.
![]()
What should women with narrow hips wear?
- Skirts should be as full as possible so that they visually add volume to the hips. Good decision will be a tulip skirt or an extended skirt downwards. A pleated skirt, a circle skirt, or a model with flounces and ruffles also look beautiful. High-waisted models will help emphasize the waistline. The optimal length is just above the knee.
- If you have narrow hips, don't hide them in baggy pants. This can make the problem even worse. Slacks have the right to be in your wardrobe, they must fit perfectly.


