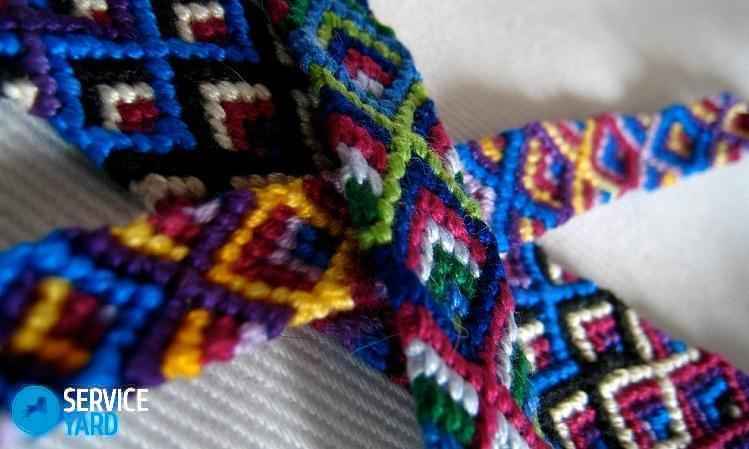
A bauble is an original bracelet made of threads, woven by hand. Throughout their history, such accessories have been not only exclusive decorations, but also symbols of friendship, mutual love and loyalty. There are two main techniques for weaving bracelets - oblique and straight. The first method is simpler, but the variety of patterns for it is limited. Straight weave baubles, on the contrary, can be made with designs of any complexity, including inscriptions and even portraits.
Features of direct weaving bracelets
The basis of the direct technique, just like the oblique one, is the right and left knots. In this case, the rows of nodes are located horizontally, and their direction changes in each row.
The process of weaving a bauble Using the direct weaving technique, you can create amazing patterns...
 ...and also baubles with names
All threads for direct weaving of baubles can be divided into 3 categories:
- The main (leading) thread is the longest and corresponds to the background of the pattern. It is attached to the weaving without cutting it off from the ball, and it is recommended to take 5 m or more in length.
- Warp or background threads. Their number depends on how many cells are in the row of the pattern you have chosen (according to the width of the product). They should not be very long, on average it is 40-80 cm, but the consumption depends on the pattern. The base color is chosen to be the one that is most often found in the pattern - as a drawing, inscription or outline. If the bauble consists of two colors, this will be the color of the inscription or design. If it is difficult to identify the second most important tone in a multi-color scheme, choose the one that occurs first in the weave.
- Auxiliary threads. These include all other shades in multi-color schemes (3 or more colors). They are introduced into the pattern as needed and the ends are cut off when finished.
Straight weave bauble
Instructions for weaving baubles with straight weave differ depending on how many colors are used in the pattern - 2 or more.
How to weave a two-color bauble with straight weaving
In addition to threads of two colors, for this work you will need patterns of baubles with straight weaving, tape, a pin or other convenient device for securing the threads.
 Scheme for a two-color bauble Scheme "Panda" Scheme "Panda2"
  Bauble straight weave according to the “Panda” pattern
Most often, the patterns are small, so the design can be repeated on the bauble several times or made in the middle.

 Monochrome bauble
Let's look at how to weave a straight weave bauble in more detail.
Advice:
If you want to weave a small pattern exactly in the center of the bracelet, you need to count the number of same-color rows before and after the pattern.
First, let's calculate the length of the pattern itself: divide the number of rows in the pattern by 5 (approximate number of rows in 1 centimeter of weaving). Having previously measured the circumference of the wrist, subtract the resulting number from it. The remaining centimeters will need to be woven without a pattern. If we multiply them by 5, we get the number of rows (rounded to a whole number if necessary). Half of the empty rows will be before the pattern, the other half will be after it. Let's take a closer look at how to weave two-color bracelets with straight weaving:
- We fasten the threads in any convenient way. Using the working thread located on the left, we tie right-handed knots on each of the main threads in turn.
- We align the row, pressing the nodes with a ruler, and do the same with each new row.
- In the second row we tie left-hand knots, moving from right to left. In the future, the directions alternate in the same order. We weave to the row in which the pattern begins.
- For example, we need to make 4 knots with a working thread and switch to a different shade. To do this, we braid the working thread with the warp thread, tying a knot in the opposite direction. The working thread moves along the knots.
- In the same way, we continue weaving the bracelet in 2 colors, tying the background and pattern knots in different directions.
How to weave baubles with straight weave
 Having mastered the technique of direct weaving, you will be able to create bracelets of any complexity
How to weave multicolor baubles according to patterns
Weaving a bauble according to a pattern in which there are 3 or more colors is somewhat different from two-color weaving. Before work, select in the pattern the main color (working thread), the second most important color (warp threads) and auxiliary threads.
 Paired bauble of three colors, diagram
In another version, any, even unnecessary, threads can become the basis, and the entire pattern is made with auxiliary ones. Let's look in detail at how to weave baubles with a large number of flowers:
- We fasten the warp threads and the working thread, weave the required number of single-color rows. We weave to the place in the pattern where we need to attach the auxiliary thread.
- We fix the new thread together with the skein on the working surface. We bring it to the place of weaving, grab the working thread and braid the warp thread. It is imperative to grab the leading thread each time, otherwise gaps will form between the knots. We tie the knots of the pattern in the same direction in which the background ones were tied. We introduce the remaining colors in the same way.
- If the color at the end of the row and at the beginning of the next does not match, we bring the desired thread to the edge of the bauble, grab the outermost working thread and braid the base.
- We carry out the pattern according to the diagram, again finishing the work with “empty” rows of the background.
- We cut off the auxiliary threads, leaving tips of about 3 mm on the wrong side of the baubles.
Straight weave in several colors

Elizaveta Rumyantseva
Nothing is impossible for diligence and art.
Content
A bauble or bracelet is a decoration made from various materials: leather, threads, beads and simple cords. Some consider them decorative, others prefer to call them a symbol of friendship. How to weave baubles if you have never done it? You just need to decide on the type and materials used and follow our recommendations step by step. We'll sort it all out possible options so that you don't have any questions.
We braid in the form of a braid
Try a four rope braid first:
- In this case, two central threads are taken: the left one is superimposed on the right side, and the right one on the left. As a result, the two outermost threads appear in the center.
- Continue weaving to the desired length.
A bauble is woven in a similar way from an even number of ropes. When using an odd number, the outer ones are alternately crossed in the center, as in the case of three. With a little practice, the braid forms especially quickly.
There are also more complex methods, when the outer threads are intertwined around one central one.

Oblique weaving

Once you understand the basic principles of knot formation, you will quickly understand all the techniques. First of all, it applies oblique weaving. To do this, the rows are performed either from left to right or from right to left. The symbols on the diagrams indicate which node should be in a given location. The beads are strung on a fishing line in accordance with the color indicated in the diagram.

If you wish, you can make a pattern in the form of arrows or a zigzag. We will talk about them below.
Two-color
In most cases, such decorations are woven using ribbons or cords. The ribbons should not be wide, but you can experiment if you wish. A bauble made of leather cords in two contrasting colors looks impressive.
There is nothing complicated about this technique. Watch the video tutorial and follow the instructions of the wizard. After a couple of knots you will understand the principle, and the work will go much faster.
Multicolored
Try to weave not only two-color bracelets, but also multi-colored ones - you just need to change the pattern.
- To do this, mark dots on paper and paint them with a certain color.
- Measure your wrist - this will be the length of the product.
- The width depends on your imagination.
If you use ribbon, use 2-3-4 colors. But especially spectacular bracelets are made from beads. Take absolutely any pattern as a basis, and each decoration will be unique.
Try it first simple diagram. Use . You need to start with a strip of beads strung on a fishing line. Next, work according to the scheme.

Once the length is sufficient, make the clasp. Use a hook or special locks. If desired, weave a long bracelet and wear it without unfastening it. Do not forget to solder the ends of the fishing line so that the braided fabric does not unravel.
With names
Jewelry with names is especially attractive. They are presented as a gift or a symbol of friendship. You will need several colors to create a design, but even with two colors of material you will get a beautiful memorial bracelet.
In addition to beads, prepare a lighter or matches, fishing line, scissors, and pliers (if you have a clasp). Start weaving by classic scheme given above. Use a stencil to create letters. To make it more convenient, draw a pattern on paper and knit according to it.

Bracelets can be wide, and then they will fit not only your name, but also other words and signs that are important to you.
Personalized products are not necessarily woven from beads. Check out the video tutorial, which explains in detail how to create letters from threads.
Main nodes

For ease of knitting, remember the basic knots. To do this, use our master class.
You will need:
- spool of thread or skein of yarn
- clip or pin
- pillow
- tailor's meter
- Prepare pieces 40-50 centimeters long. Connect them and tie them in a knot. Insert a pin into it.
- Next, you need to fix the pin on the pillow with a needle. Arrange the threads alternately or in the sequence you need, according to the diagram.
- We braid the working one with a knot, creating a loop. You need to put the same working one into it and tighten it.
- Repeat the process and you will have a double knot. Next you need to swap the threads. The loops should be identical and tight.
- As a result, the first thread became the second. We use it as a knot, and the third as a working one. We continue until the first becomes the last.
- Once you have a ring of the desired length, finish the piece with a regular braid and secure the two ends with knots.
- You can cut off the excess ends.
With rhinestones and stones

This master class will help you create a bauble with rhinestones. For beginners, we recommend a simple option.
- Take a needle, nylon threads and rhinestones.
- Start from the lock and stitch it in the middle or along the edges, stringing rhinestones, balls or beads on the front side.
The spike is secured in a similar way if it has screws.
- Using an awl, the element is tightly pierced and secured.
Advice: please note that the threads should not be broken through, but pulled apart with an awl so that the product does not unravel.
If skill allows, add rhinestones.
- As you work, simply weave the elements into the fabric, and knit using any chosen method that you have already mastered.
- Make sure that the position of the rhinestones is the same, and then the bracelet will turn out perfectly symmetrical.
With chain

If you already have a bauble or even a bookmark, using this technique you will update it by adding a chain. Agree, this decor looks good in the photo.
For work, take floss, a needle, and scissors.
- We take the threads and insert them into the needle. First, you need to tie a knot in the baubles.
- We begin to tightly sew our chain over the edge.
- Please note that the stitches should be the same length as the distance between the chain links.
- We continue working until the end of the bracelet.
- All that remains is to trim off the excess and enjoy the new decoration.
From satin ribbons
With this master class you will learn how to weave baubles from ribbons. Follow these steps sequentially:
- Take two ribbons and tie them together.
- Lay out one end in the form of a turn or loop.
- We also fold the next end into a loop and thread it into the previous turn.
- Tighten the loop of the first tape.
- We make the next turn and insert the previous one into it, also tightening it.
- Continue until the desired length is reached.

Use ribbons to make it more attractive different colors, and then you will have a nice strap.
From floss threads
Products made from floss are very diverse. It will not be easy for beginners to understand the technique, but after trying a couple of knots on simple threads, you will master this technique. You just need to follow the weaving pattern.

Except for floss, where cotton and nylon are used. It is more slippery and a little easier to weave for beginners. But the knots require a stronger tie, because they unravel if careless.
- Pick up required colors. To create unique decorations you will need a set of floss.
- Secure the required number of threads using a clamp and paper clip.
- Follow the video tutorial instructions.
Macrame style
The knots used in macrame will help you create a special pattern. Already from the photographs it is clear that these openwork products that simply cannot be created using floss or ribbons.
They are woven from nylon threads. You will need 5 of them. Using a ruler, measure 2 pieces of 80 centimeters each, 2 pieces of 55 centimeters each and one piece no more than 25 centimeters long. You will also need a ring.
- Fasten the segments medium length on the ring. To do this, fold them in half and insert them into the ring, creating a loop. You need to thread the ends into it and tighten it. Such fastening will be reliable and motionless.
- Next, take a piece 80 centimeters long and fold it in half.
- We put it under the two central ones.
- We will weave using long ends.
To get started, practice simple knots according to the following scheme:

With a pattern
For experienced craftswomen We recommend trying the technique with a pattern. She will hardly be disappointed by anything described above: these could be knots made of threads or patterns made of beads. The picture needs to be converted into a diagram with a picture, phrase or logo.

- Create the desired length of the product.
- Next, use the clasp of your choice. For narrow baubles, hooks are suitable; for wide ones, you will need to purchase a clasp.
- Sometimes it is necessary to make additional holes in it, which need to be drilled using a thin drill.
- If this is too difficult a process, sew on a button and make a loop at the other end.
With nuts
When creating jewelry, they use even more unusual objects: nuts.
- Look again at the description of the braid technique.
- When creating weaves, simply thread the thread through the hole in the nut and continue working.
- Decide for yourself where the nuts will be located: on both sides of the bracelet or only on one.

How to make a friendship necklace
Baubles are a symbol of friendship. Why not create a necklace in the same way? You can use any of the given techniques. Make a necklace from threads, floss, beads, with nuts and chains - it all depends on your desire!
Braided bracelets came into modern everyday culture from America. Since ancient times, Indians gave each other such things, and they were considered a symbol of friendship. Then this tradition was adopted by hippies, who spread it throughout the world. Symbolic meaning no longer plays such a big role. Of course, even now people give each other similar accessories as a sign of friendship, but often a thread bracelet is simply a spectacular addition to clothing. How to weave baubles from floss? You will learn about some of the features of this type of needlework from our article.
Materials
The Indians wove their baubles from literally everything they had at hand. The materials used for the bracelets were:
- threads and ropes;
- strips of leather;
- stems and roots of plants.
For a weaving technique that has become popular all over the world, the most best material- these are threads, and not just any kind, but folded into skeins of several thin fibers. Such threads have existed for a very long time. These are cotton floss. Previously, they were used only for embroidery, but weaving lovers also managed to appreciate them.
Important! You can also use cotton garus, folded in 2-3 layers “iris” or “snowflake”. But floss is better anyway.
Types of weaving
How to weave baubles from floss? For beginners, it will be useful to know that there are only two types of weaving:
- oblique;
- direct.
Oblique
Oblique weaving is also called mosaic weaving. It is considered simpler, so it’s better to start with it. Without special effort, but armed with patience, you can get both plain bracelets and those with an exquisite geometric pattern.
Direct
Straight weaving is not that difficult, but it requires some experience. Having mastered it, you will not only get the answer to the question of how to make baubles, but you will be able to create something larger, like a belt or a panel.
What else do you need?
Before you make a thread bauble, think about additional equipment. It's extremely simple. You need:
- scissors;
- large pin;
- jeans;
- table;
- scotch.
Scissors, of course, are needed to cut the skeins to the required length and trim the ends. Why the rest? The threads need to be attached to something. There are two options.
Option 1
The skeins are tied to a large pin (you can use a crochet pin, but in most cases a large safety pin will do). The pin is pinned to the jeans.
Option 2
The skeins are glued to the table with tape. But this can be considered an emergency option when there is no pin at hand. Scotch tape holds much worse than it does, so the threads can slip out - it’s difficult to achieve even weaving.
Choosing a color
The range of threads is extremely large - you can find threads of literally all colors and shades that exist in nature. Therefore, before weaving bracelets from floss threads, select colors. Most often, such items are given as gifts, so you should take into account the tastes of the person for whom the decoration is intended.
Important! For many people, colors and their combinations have symbolic meaning. In weaving baubles, almost all shades, except black, convey a positive mood.
Weaving baubles for beginners
Having examined a bracelet woven from threads, you can easily see that it consists of double knots. There are only four ways to tie such knots:
- right straight;
- left straight;
- right corner;
- left corner.
It is better to choose schemes - there are a great many of them. Legend are the same everywhere:
- The beginning of the arrow indicates the thread with which the knot is made.
- The arrowhead shows how the thread is positioned after the knot is made.
Main node
The straight left knot is most often used, and it is necessary to master it first - many masters call it the main one.
Important! You can learn on two threads, for example, fold a small piece of skein in half and tie it to a pin.
How to weave baubles:
- Take the left thread and place it on the right one.
- Pull the right thread.
- Use the left thread to make a knot, and then another one.
Important! The right straight knot is done in almost the same way, only the right thread is overlapped with the left one.
Corner nodes
After you learn how to confidently knit straight knots, you can move on to corner elements:
- Tie the first knot in the same way as the corresponding straight element.
- Pass the working thread under the tensioned one.
- Tie a second knot.
Some general rules
For those who are just starting to weave baubles from floss, it is useful to know some features of the technology:
- There should be 2 threads of each color.
- The skeins are positioned in a mirror manner: if the blue one is on the left edge, then on the right one too, the yellow one is second on the left and second on the right, and so on.
- You can start weaving from any side.
- If you weave from left to right, use left right angles; if you weave from right, vice versa.
We weave the first bauble
Having dealt with the knots, try to weave baubles from floss with your own hands. For the first bracelet you will need:
- 7 skeins of floss 100-120 cm long;
- scissors;
- thin crochet hook or needle (unravel bad knots);
- pin, electrical tape or tape.
The technology of weaving a simple bauble itself is as follows.
- We arrange the threads in the desired order (how the colors will alternate).
- Tie the ends of the skeins with a regular knot.
- Secure the workpiece in any convenient way (it is best to pin it to your pants with a pin).
- Start weaving with the two strands on the leftmost side.
- Place the one that lies to the left (in the first knot it is working) on the one to the right of it - a loop is formed.
- Pass the tip of the working thread from bottom to top through this loop.
- Tighten the knot by pulling the working thread up.
- Now you have a second thread to the left, and it has become working.
- Place it on the thread that is now on the right.
- Thread it through the loop.
- Tighten - you have your first double knot.
- Using the same working thread, tie all other threads with double knots - it should become the far right one.
- Make the next row with the thread that is now on the left edge.
- Weave in this way until you get a strip 18-20 cm long, consisting of double knots.
- Braid the remaining pieces of thread into braids.
- Secure it all with a knot.
- Untie the locking knot.
- From the edge where it was, braid the pigtails and also make a knot.
- Trim the ends.
Important! You only need to weave in one direction - left to right or right to left.
Straight weave
Once you have mastered oblique weaving, you can move on to straight weaving. It's a little more complicated and requires more attention.
Important! This type of weaving allows you to make bracelets with different patterns– geometric, floral and even with plot pictures.
It is better to start with threads of two colors: one for the background, the second for the knots. The second thread must be much longer, because it performs all the nodes.
Important! The threads for the background can be folded in half - then the base will be more impressive.
Operating procedure:
- Fasten the threads in the same way as for oblique weaving.
- Make the first row from left to right, as described in the previous method.
- Perform the second row from right to left, the leading (also known as working) thread will be the same all the time.
What types of schemes are there?
Getting comfortable with knots and trying your hand at three-color or two-color simple weaving, try reading the diagrams. They come in two types:
- full cycle;
- incomplete cycle.
The full cycle diagram shows a repeating part of the pattern. That is, after you finish this segment, the drawing must be repeated again. The incomplete cycle diagram shows which colors are on top and which are on the bottom.
Everyone has at least once encountered a person wearing a bauble. This small wicker bracelet is a symbol of friendship and peace, and it is not without reason that it has a foreign name “Friendship bracelet”. The history of this simple but stylish decoration began among the Indians of North America, who gave ropes woven in a special way to their friends. It was believed that the longer the bauble is kept on the hand, the stronger the friendship between people. Not torn, but to be independently removed from the hand, symbolized the end of friendly relations, and was one of the most powerful insults. The secret of how to weave baubles from threads was passed down from century to century, until in the early 60s of the last century these bracelets became one of the symbols of hippies and spread throughout the world.
In addition to friendship between people, baubles symbolize a person’s interests and passions. For those who know how to read the secrets of the threads of these cute bracelets, they will reveal a lot about their owners. The picture or pattern depicted and the color of the threads are both important. A widely known example is that if a guy and a girl have the same or very similar baubles on their hands, then these young people are a couple.

Gradually, the original meaning of exchanging baubles was lost, but they did not lose their popularity. These bracelets are a universal decoration and therefore now they can be seen not only on representatives of the hippie subculture or the hands of little needlewomen, but also on secular fashionistas and fashionistas. Baubles made from floss always add brightness and special color to an image.


The easiest way is to push the finished thread onto the wrong side of the product, leaving enough thread to later tie a knot.

We apply a thread of the same color to the tear site from the wrong side

And then we tie this thread with standard two knots.

From the wrong side, we tie the ended thread with the one that was just inserted.

The place where the threads join is hidden, and weaving can continue further.
Categories" There are many different assumptions about where this word came from and what it means. Most research suggests that this word is of English origin.
IN English the word thing is thing. Anyone who is at least a little familiar with this language knows that the first sound, which consists of two letters -th-, in many languages is pronounced as something between the letters “s” and “f”. Thus, we get “sing” and “fing”.
Most likely, for ease of pronunciation, these words later turned into “bauble” and “fenka”. Some are inclined to another option, the word “fenka” is a slang word in the language of hippies, among whom such people were extremely popular.

For hippies, this word means nothing more than “gift,” since baubles were usually given only as gifts and not bought. Be that as it may, it’s still very cool that we currently have a unique opportunity to create unique, magnificent floss bracelets. It should be noted that the creation process has become a whole direction in needlework.
Features of floss bracelets
The main feature of this type is the painstaking nature of their production. The weaving process, although pleasant, still requires the expenditure of a huge amount of energy, concentration and perseverance.

By creating such a person puts a piece of himself, his soul and thoughts into it. Therefore, it is very important to be positive and radiate positivity while doing needlework.
Many of the floss threads are made not just, but into friendship bracelets, which have a special meaning in a person’s life.
Types of floss bracelets
With all the variety of shapes and colors, there are only two types of weaving floss bracelets. And no matter what they come up with and no matter how hard the craftsmen try, in the end it all comes down to one of two weaving options; they have not yet managed to invent something ingenious and completely new. However, to create truly real masterpieces in the world, 2 weaving methods are quite enough.

So, weaving bracelets from floss it may be oblique, or it is also called mosaic. This type of making bracelets is considered easier, simpler and does not require special costs effort and dexterity. In this way, a variety of beautiful ones with geometric patterns are created.
The second option, how to weave bracelets from floss, is the so-called straight weaving. This type of bracelet creation is considered quite difficult and many people do not succeed the first time, so it requires a certain skill, dexterity, honey mushrooms, patience and accuracy. However, this particular one allows you to create not just baubles, but also things on a large scale.
All floss bracelets consist of a huge number of double knots, which, in turn, can be tied in four ways. There are two ways to tie straight knots - right and left, as well as two ways to tie corner knots - right and left.

The beginning of the arrow shows how the manipulation should be done and which thread to use, and the end of the arrow indicates the final position of the thread when the knot has already been made. The straight knot is the basis of many bracelets and is used much more often than other knots.
Although at first glance it may seem difficult, in fact there is nothing impossible here, you just have to practice a couple of times, and everything will certainly work out. To tie this knot, you need to take the left thread, then put it on top of the right one, which you need to keep constantly taut and make a knot, then tie a second knot.
For the right thread the process is absolutely similar. To tie a corner knot, you need to tie the first knot in the same way as in a straight knot, and the second by passing the main thread under the tensioned thread.
If you don’t understand something from the description, then don’t despair and renounce the idea of creating. You can watch visual video tutorials where everything is shown in detail.
This is all you need to master to create magnificent bracelets from floss. It's much simpler than it seems at first glance, and the process itself is creative and unique. You will certainly receive only positive emotions and pleasure from such an activity.
Now that you already know in theory how to weave bracelets from floss, you can safely start weaving your first bracelet. Below will be presented oblique weaving bracelets. Where to start? First of all, you need to prepare for work, and for this you will need:
Floss threads
Tape or pin or clip
Scissors
Good mood.

Here is a small list that you need. Floss threads are presented in a wide range, so there is no doubt that you can easily select exactly the ones you like. The thread calculation is done as follows: the length of the thread is approximately 4 times the length of the finished bracelet.
Measure the circumference of your wrist and add a couple of centimeters to it so that the bracelet does not fit tightly on your hand, and then multiply this result by four. Using scissors, cut the threads to the required length, usually the thread is about 1 meter long. We need tape or a pin or a clip to secure the beginning of our bracelet.
The threads are tied together in a knot, after which they pin it to the jeans using a pin, then the weaving will take place on your leg. Or glue a bundle of threads to the surface of the table with tape. Or they can be attached with a clamp to the cover of a book or a piece of thick cardboard, which will serve as an improvised weaving machine.
There are many options for floss bracelets for beginners; below is an example of weaving a bracelet with a herringbone pattern. It's very beautiful and bright!
To begin with, you will need 6 colors of threads (although you can take a different number - the width of your bracelet will depend on this), you need to cut 2 threads of each color, then connect them with one common knot and secure the knot itself, in in this case This was done using tape.
Place the threads symmetrically, that is, in the middle there are 2 threads of the same color (for example, blue), then on each side a thread of a different color (for example, beige), then the next pair and so on.

Weaving pattern for a floss bracelet called “Rhombus”

Pattern of a floss bracelet called “Herringbone”

In the diagram of a bracelet made from herringbone floss, the whole process looks like this.
In this case, weaving a bracelet from floss threads begins from the left edge. The first left thread (conventionally No. 1) is intertwined with the second left thread (No. 2). The weaving process is such that you draw the number four with a thread, and then thread the tip of thread No. 1 through the resulting window, so you get the first knot.

The knot must be tightened tightly and the same procedure must be repeated, that is, a second knot must be tied on the same threads.

After which you need to move to the right side, now you are working with the two outermost threads on the right (No. 11 and No. 12). Here you do everything the same, only with the difference that the node is directed in the other direction - that is, mirrored.

This procedure must be done with all the threads twice, so the inner colors will be on the outside. After which you tie two knots on the threads that were the outermost ones at the very beginning of weaving. The first stage of weaving, the first triangle of the herringbone, is completed.

Now your task is to repeat the first step many times until your bracelet reaches the desired length. The main thing is to follow the correct sequence of threads when weaving; when you gain experience, the need for this will disappear by itself. This is the beauty you should get at the end of the weaving.


You can see video floss bracelets. Here, step by step, the entire weaving process is shown from start to finish.
The process of weaving baubles with straight weaving is very complex and multi-stage, so it is best watch video master classes. Here you will need to concentrate on all the details, but the result is definitely worth your effort.
The meaning of a floss bracelet
Currently, the meaning of this type of decoration is somewhat forgotten and lost. First of all, it is a fashion accessory, a certain trend, a sign of style. Many people decorate their hands with whole rows of such bracelets; this emphasizes their individuality and uniqueness. To some extent, such bracelets can be called a tribute to fashion.
However, in hippie times, these bracelets had a completely different meaning. They say that before the hippie era, such bracelets were made in Indian tribes. However, in both the first and second cases, thread bracelets served as a symbol of friendship and love.
Bracelets were exchanged, this was a prerequisite, it was a gift. Such an attribute on a person’s body symbolized his connection with a friend, devotion in a relationship. If the bracelet was worn out and torn, then at that moment it was necessary to make a wish.

If for some reason the bracelet was removed from the hand, then this meant the end of friendly relations, and in some cases the beginning of a war between former friends. Bracelets were pride; the more such jewelry one person had, the richer he was considered, since he had many friends.
Price of floss bracelets
Floss bracelets- This handmade, so by definition such things are expensive. However, you cannot compare the prices of bracelets from jewelry and bracelets made from floss. Of course, you understand that the cost of the material is completely different.
It should also be taken into account that the complexity of the work when weaving a bracelet also varies. There are many more factors that can affect the cost of such a product. The simplest floss bracelet can be bought quite inexpensively, for example, for 50-100 rubles, but more complex work will cost more.