Any thing that a mother makes with her own hands is special for the baby. It is imbued with its warmth, energy, love. If a mother knows how to knit, then she can easily knit simple and warm things for her child. For example, a children's blouse with knitting needles for a child 2-3 years old. It is not so difficult to knit, but it is painstaking.
Materials and tools
For knitting, use three skeins of 100 grams of soft and pleasant yarn. Knitting needles 4.5 mm. Buttons - 5 pieces to match the yarn. You can choose two or three colors of yarn. It will be more effective this way. In the example, white, brown and beige were selected.
Pattern of a children's blouse for 2-3 years
We draw a pattern that consists of five parts. Back, two front panels and two sleeves. To do this, we need to take measurements: sleeve length, arm circumference at the widest part and the narrowest (wrist), the length of the blouse itself, the circumference of the hips, chest, and neck. We divide all the circles in half, add a centimeter per seam (except for the neck). Add two centimeters to the front placket on the side where the loops and buttons will be.

Back
We cast on the required number of loops on the back. For ages two to three years, the average is 46 loops. First we knit an elastic band two by two centimeters three or four, and then the pattern. The knitting of the pattern is simple; in some books it is called “children’s”. We knit one row, two knits, two purls, the second row according to the pattern, and the third on the contrary, two purls, two knits, the fourth again according to the pattern. Fifth, knit two, purl two, and so on. Gradually add yarn of a different color to the knitting; choose the thickness of the stripes yourself. Having reached the armhole of the sleeve, we decrease five loops on each side along the edges and knit further to the neckline. Next we divide all our loops in half (36:2=18), using a needle and thread we string all the loops to the middle, tie the thread so that the loops do not jump off and remove them from the knitting needle. We knit the second remaining half. Immediately close off nine loops and knit according to the pattern to the desired length. We close all the loops. Now we finish knitting the half that remains on our thread. Absolutely the same.
Shelves
Now we knit the front front. Divide the number of loops that you used for the back in half and add five loops (46:2= 23; 23+5= 28). We start again with the elastic, but only the edge on which there will be buttons or loops is knitted in garter stitch, that is, five edge loops on one side are always knitted in all rows. We get to the drawing, look at the color so that the inserted stripes match. We close five loops at the floodplain, fourteen at the neck.
We also knit the second shelf, but in the places of the loops, close two loops and make two air ones.
Sleeves
Now let's move on to the sleeves. On average, you will need twenty-six stitches per sleeve at the very beginning. Having knitted an elastic band and two centimeters according to the pattern, add two loops, one on each side. Then after six centimeters two more, and after 6 centimeters again two loops. Close five loops on each side at the armhole and knit according to the pattern to the end; you can use the knitted back and front placket as a guide.
Assembly
Now we knit all the parts from the wrong side with a hook or a needle with wool thread. We process the neckline by tying it a centimeter with a viscous elastic band (you can simply crochet along the edge), sew on the buttons, and sew the loops. The blouse is ready, try it on your little one. It’s a pity that we won’t have to bear it for a long time, our children are growing too fast.
This poncho is knitted as a gift for the little fashionista Ninochka on her first birthday.
To knit a poncho with knitting needles, we will need:
150 grams of yarn white(Gjestal Superwash Sport, 50 gr. = 100 m.);
- 200 gr. yarn "Grass" pink (Gjestal Orkide, 50 gr. = 85 m.);
- pink beads for decoration;
- knitting needles No. 2.5 and 3;
- hook No. 3.
Knitting description:
1. Cast on 128 loops with white thread and knit in a circle with an elastic band 1 by 1 for approximately 12-14 cm of the neckline;
2. Knit all the loops as follows: *2 purl loops, 6 knit stitches*. Repeat * 16 times. Knit 6 circular rows in the same way. [=128 loops]
3. In the next row, knit the braids and add 1 loop to the left and right of each braid: * 2 purl loops, 1 yarn over, remove 3 knit loops on an additional knitting needle and place before work, 3 knit loops, 3 knit loops from an additional knitting needle , 1 yarn over *. Repeat * 16 times. [=160 loops]
4. Knit the next 7 rows, repeating *4 purl loops, 6 knit loops* (repeat * 16 times in each row) [=160 loops]
5. Knit the braids and add 1 loop to the left and right of each braid: * 4 purl loops, 1 yarn over, remove 3 knit loops on an additional knitting needle and place before work, 3 knit loops, 3 knit loops from an additional knitting needle, 1 yarn over *. Repeat * 16 times. [=192 loops]
6. Knit the next 7 rows, repeating *6 purl loops, 6 knit loops* (repeat * 16 times in each row) [=192 loops]
7. Knit the braids and add 1 loop to the left and right of each braid: * 6 purl loops, 1 yarn over, remove 3 knit loops on an additional knitting needle and place before work, 3 knit loops, 3 knit loops from an additional knitting needle, 1 yarn over *. Repeat * 16 times. [=224 loops]
8. Knit the next 7 rows, repeating *8 purl loops, 6 knit loops* (repeat * 16 times in each row) [=224 loops]
9. Knit the braids and add 1 loop to the left and right of each braid: * 8 purl loops, 1 yarn over, remove 3 knit loops on an additional knitting needle and place before work, 3 knit loops, 3 knit loops from an additional knitting needle, 1 yarn over *. Repeat * 16 times. [=256 loops]
10. Knit the next 5 rows, repeating *10 purl loops, 6 knit loops* (repeat * 16 times in each row) [=256 loops]

Figure 1. Scheme of transition from the "Braids" pattern to "Grass" knitting (click to enlarge)
Knit the “Bumps” pattern as follows (click on the picture to enlarge):

12. Divide the entire knitting into 4 parts (front, back, 2 sleeves) of 96 loops and knit each part separately, continuing to increase, to the desired length.
In order for each part to turn out semicircular, it is necessary to knit in short rows, i.e. in each row, unknit a few loops and start each next row with a yarn over.
You can read more about knitting in short rows.
Pay attention!
1. The length of the product after knitting in short rows should be 3-4 cm less than the required length of the product in finished form, since then it will be necessary to knit several smoothing rows around the entire circumference of the product and crochet the product along the edge.
2. The back must be knitted 3-5 cm longer than the front.
13. After all parts of the poncho are knitted to the desired length, you need to knit a smoothing row, connecting yarn overs and adjacent loops together.
Pay attention!
1. To avoid the formation of holes between the loops in left side back (front or sleeve) yarn overs must be knitted together with subsequent loop, and in right side- together with previous.
2. The smoothing row can tighten the product, so I recommend knitting only each stitch together with the adjacent stitch. second Yarn over
14. Knit another 3-4 rows around the entire circumference of the poncho.
15. Close all loops (you can close the loops with a crochet hook).
16. Crochet the poncho along the edge according to the pattern

Figure 2. Crochet pattern
17. Crochet flowers: 3 air loops close in a ring and knit 12 single crochets. Knit the second row, alternating single crochets and arches of 2 air loops.

Figure 3. Flower knitting pattern
18. Sew flowers along the edge of the poncho, decorate the product with beads.
The knitted poncho for the girl is ready!
Advice:
 In the place where the front (back) meets the sleeve, sew with inside buttons. This way the poncho will not twist and it will be more convenient for the baby to move and bend over.
Additional photos:
 Front side of the poncho
 The wrong side of the poncho.
All parents want their child from the very beginning early age looked beautiful and stylish, especially the girls' mothers. This is where handicraft skills come in handy. After all, nothing diversifies the wardrobe of little fashionista girls more than knitted sweaters. If you understand the description, you can create very original things for little ones.
Clothes for every occasion
A jacket is very comfortable clothing for children. The traditional model has a front clasp, so it's easy to put on, easy to take off, and can be unfastened and fastened as needed. This item suits both boys and girls - as well as a blouse, which by definition is somewhat different from a jacket: such a piece of clothing can be with or without buttons, without a fastener and with a zipper or buttons. But in any case, the tips for selecting yarn and patterns will be the same.

When knitting sweaters, threads should be chosen according to two principles: the item should be comfortable and appropriate for the season. Of course, everyone has their own concept of convenience. IN in this case we mean that knitting clothes for children, in particular, sweaters for girls, requires selecting the “right” yarn. If you are making something for the summer, then it can be acrylic or cotton threads. For autumn and spring, you can use half-wool, but winter options are usually knitted from wool and mohair.
The design is also selected using the same criteria: the hotter the season the item is planned to be worn, the more delicate it needs to be made. In the case of sweaters, very wide possibilities for choosing patterns open up. Therefore, you can choose the most suitable one from the point of view of both the idea and the experience of the knitter.
Models from 1 year to 3 years
Knitted blouses for girls from 1 to 3 years old require taking into account several nuances during the manufacturing process:
- all details should be free so as not to restrict the movements of the baby who has just stood on her feet. Therefore, it is recommended to knit them in the form of rectangles;
- a jacket with a hood is very comfortable: if the little one wants to walk, and the mother has a back pain, you can always grab the “tied” headdress and, holding on to it, lead the child;
- It is not recommended to make the pattern too “holey” so that the baby is not tempted to stick her fingers into the cells. Otherwise, you can either damage the item or damage your finger.
Marshmallow blouse
This spring-autumn model looks very expressive on pink or mint threads.

Materials:
- 200 g acrylic yarn;
- knitting needles No. 3;
- scissors.
Instructions:

Jacket with collar
For this model, you don’t need to delve into the description for long: the pattern for the blouse in this case is the simplest.

Materials:
- 150 g cotton threads;
- knitting needles No. 3;
- hook No. 3.5;
- buttons;
- scissors.
Instructions:
- Let's start from the back. We cast on 70 loops, knit 3 cm with a 2 x 2 elastic band.
- We make “stars”. We knit 1 knit stitch, make 3 knit stitches from the next one, form a yarn over and knit it again.
- We knit the purl row the way the pattern “looks”.
- Repeat to the desired length and secure the loops with a crochet hook.
- For the shelf we cast on 40 loops. Repeat steps 1-4. We make two parts. On the right shelf we form loops at equal distances. To do this, we make a yarn over in an odd row, and in an even row we knit it purlwise, combining the next 2 loops.
- For the sleeve we cast on 36 stitches. We knit 3 cm elastic bands.
- We knit 9 knit, 3 purl, 12 knit, 3 purl and again 9 knit.
- We knit the next row according to the pattern.
- Next we do 3 purls.
- Then we remove 6 loops, make 3 for work, knit the next 3, and then return the first three and also knit them.
- We repeat the previous step, leaving only the 3 removed ones before work.
- After 9 rows of stockinette stitch, repeat steps No. 9-11. Having completed the knitting, fasten the loops and sew the parts.
- We crochet the collar, catching the loops along the neck. You can use threads of contrasting colors.
- We knit double crochets (even rows) and single crochets (odd rows) 4 cm.
- We sew all the details. Steam with an iron through cotton fabric. The jacket is ready.
Model from 3 to 5 years
Patterns and descriptions of knitting patterns for sweaters for girls 3-5 years old are based on the same principles as for younger children. Only for this category it becomes possible to make striped blouses, because the growth of children already allows for 3-4 noticeable alternations.
A blouse, jumper or jacket for a one-year-old girl can be knitted in different ways. Some craftswomen prefer to knit individual parts, which will then be sewn together, while others like raglan. The jacket can be openwork and thin or warm with buttons. In any case, knitting children's clothes is a very interesting activity.
A blouse for a girl can be knitted in different ways
Things knitted by mothers cannot but delight. A 3-year-old girl needs a warm product of a beautiful model, be it pink or another color. It is better for a novice craftsman to use ready-made diagrams in this matter.

A 3-year-old girl needs a warm product
Job description:
- Knitting blouses for 3-year-old girls involves working on individual parts, which will then be sewn together.
- Above is a pattern diagram for working on the back and two front parts of the sweater. You need to calculate the exact number of stitches that need to be cast on for the back. The diagram shows its width - 33 cm. This figure must be taken into account for the calculation.
- When the loops are put on the knitting needle, work can begin. A small elastic band is knitted, after which the work is done with an even fabric.
- When the product is knitted to the armhole, you should reduce 3-4 loops. The decrease should occur through the row so that the bevel is not too sharp.
- Next, one shelf is knitted. You need to make a small cutout at the neckline. Also, don't forget about the armhole! Decreasing stitches on the front in the armpit area should begin from the same row on which the stitches on the back were decreasing.
- The second shelf should be the same as the first.
- After this you need to work on the sleeves. For ease of operation, the loops are cast on with a knitting needle from the armpit area. But before that, you need to make the shoulder seam of two parts, the back and the front shelf.
Then the sleeves and sides of the blouse are sewn together.
Classic knitted blouse with buttons for girls (video)
How to knit a warm blouse for a 6 month old baby?
Knitwear is always and will remain in trend. The first year of a baby's life is the most difficult for his parents. Knitted items for children aged 6 months should be made using the raglan method.
So, the scheme of work:
- If you use medium-thick yarn, you need to cast on 51 stitches on circular knitting needles. It is not necessary to knit a raglan sweater on circular knitting needles; you can also use regular, straight knitting needles, but in the first case the work will be faster and easier.
- When knitting using the raglan method, it is important to take into account all segments of the work, namely the front panels, front panels, back, sleeves and raglan lines.
- The number of stitches on the knitting needle should be increased by yarn overs at the leglan line each time the work is done from the front side.
- Next we knit the sleeves. For convenience, all other loops can be removed with thread. It is advisable to make an elastic band at the ends of the sleeves. Alternatively, garter knitting can replace the elastic band.
- After this, the remaining parts of the blouse are knitted, namely the back and front. Loops are no longer enlarged.
- When the product is knitted to the desired length, you need to make a small elastic band at the ends, like on the sleeves.
Here is the raglan diagram:

Blouse with buttons for a 2 year old girl
Knitted blouses and sweaters for 2-year-old girls should be bright and creative, for example, you can make a blouse with ears on the hood.
Here is a diagram of this work:
Instructions:
- The first part that needs to be made is the back. The diagram shows the volume of the product - 62 cm, which means the back should have a width of 31 cm.
- When the smooth fabric is knitted to the armhole, it is necessary to make a shoulder bevel. To do this, in every 3rd row you need to decrease 1 stitch from the edge.
- Next, the front panels are knitted. In order for the jacket to be fastened with buttons, holes must be made at the edges of the placket. The simplest option is to yarn over. A hole is formed, but in the second row the yarn over should be knitted together with a loop, since if this is not done, the product will expand.
- Holes are made in every 12th row. If desired, they can be made wide.
- When knitting the front panels, it is also worth remembering the shoulder bevel. The decrease in stitches should be the same.
- Then the sleeves are knitted. The loops are picked up from the armhole. As you knit 5 loops, starting from the elbow, you need to decrease. This will narrow the sleeve towards the end.
- Now work is done on the hood. It is knitted on circular needles according to the above pattern.
At the last stage, the product is stitched. You can sew buttons on the front placket.
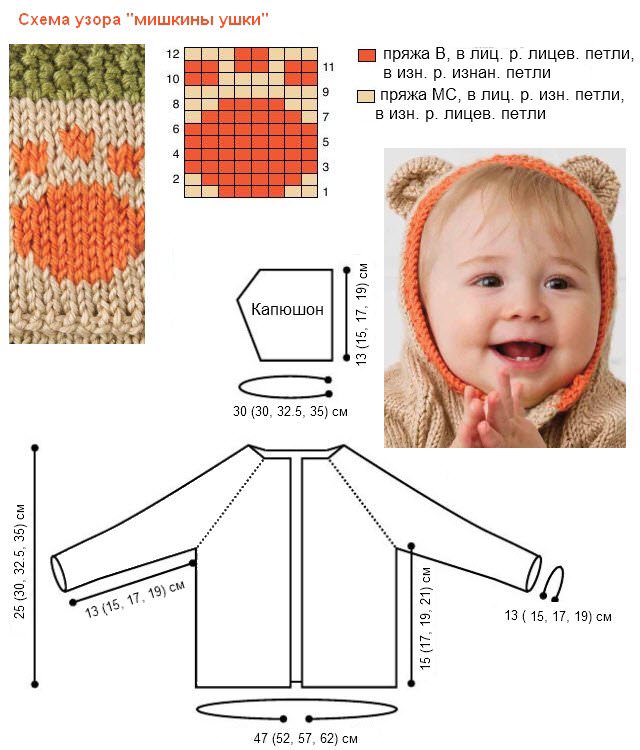
Knitted blouse for a one-year-old girl
Scheme of work:
Instructions for use:
- This product is knitted separate elements, which will then be stitched together. First you need to calculate the number of loops that will be cast on. The standard number of loops of medium-thick yarn for a one-year-old girl is 60. On the back you need to cast on 30 loops.
- The product is knitted evenly, without forming a shoulder bevel. You need to use 3 colors of yarn: green, beige and brown. The knitting pattern is described in the diagram.
- After the back, the front panels are knitted. One shelf is made of 15 loops. A front strip is made on each shelf. One of them should have holes for buttons.
- Then you can start working on the sleeves. To do this, pick up stitches from the shoulder seam. Before this, the product must be sewn along the shoulder.
It is important to make the sleeves the same length. They should also be striped.
Cute openwork blouse for a 5 year old girl, knitted
A 5-year-old girl will definitely like this product.
Pattern diagram:

Master class:
- This product can be worn in spring or early autumn. It is very beautiful and elegant, even if worn by a little girl. Yarn of raspberry or burgundy color is selected.
- To accurately calculate the loops, you must first knit the sample. The pattern is knitted according to the above pattern.
- The first part that needs to be made is the back. When the part is knitted to the armhole, you need to decrease the loops. There should be a clear shoulder slope so that the blouse fits the girl’s figure well.
- Then the front part of the product is knitted. At the front you need to make a rounded neck. To do this, 10 cm before the shoulder seam in the center of the front, you need to symmetrically decrease 10 loops in every 2nd row.
- Next you need to knit the sleeves.
- An elastic band is made at the end of each part, since the pattern is openwork, the elastic band should be at least 10 cm long.
At the last stage, the parts are stitched together.
- All seams are on knitted items should be done from the wrong side. This is done to disguise them.
- The neckline can be crocheted after the sweater is knitted. The easiest way is to pick up stitches from the neckline and knit the knitting pattern in two rows.
- To round the neck, you need to decrease stitches in each row. And if you alternate decreases, for example, reducing the number of stitches in every 3rd row, then the neckline will be V-shaped.
- The more loops you put on a knitting needle, the wider the product will be. Yes, this is a banal rule, but many beginning craftsmen make a lot of mistakes, casting on fewer stitches with the expectation that they will knit freely. As practice shows, this does not make the product wider; it simply dangles on the body.
Children's blouse knitted with openwork hearts: master class (video)
You should never be afraid to make a mistake. The world of knitting is far from simple, but that doesn't mean you should give up right away. Anyone who learns to make beautiful things with their own hands will certainly please their loved ones and raise their own self-esteem.
Every mother wants her baby's clothes to be not only beautiful, but also comfortable. Therefore, craftswomen knit clothes for any season. Every little fashionista should have a knitted sweater in her wardrobe. For both boys and girls, you can create an incredible number of interesting patterns with crochet and knitting.


Before you start making the model you like, you need to decide on the choice of yarn and knitting needles. After all, this choice will depend not only appearance, but also the heat-retaining qualities of the thing. It should be remembered that the size of the knitting needles will affect the density of the product.
For example, it is better to knit a heavy sweater with knitting needles with a smaller diameter, and a light openwork blouse is knitted with knitting needles that are much thicker than the thread itself. For a girl, you can knit any pattern.
Seamless blouse for newborn baby
If you don't know which model to choose, we bring to your attention win-win. The blouse, made of solid fabric without seams, is comfortable to wear. This option is suitable for the smallest beauties. And even inexperienced knitters can handle knitting.
Since knitting is done with one fabric, you will have to stock up different types knitting needles:
- knitting needles with fishing line;
- 5 pcs. circular knitting needles;
- 2 long knitting needles smaller diameter;
- 5 more circular knitting needles, the same size as the long ones;
- hook;
- scissors;
- yarn of any color and texture.

The work begins with making the neck. To do this, cast on 40 stitches on knitting needles with fishing line.
By the way, if you want to knit a larger item, just cast on the required number of loops from the beginning. The principle of knitting will not change from this.
Knit one and a half centimeters with a 1×1 elastic band.

Raglan is being performed. The loops in the work are distributed as follows: 5 loops for 1 front, 2 loops for raglan, 5 loops for sleeve, 2 loops for raglan, 12 loops for back, 2 loops for raglan, 5 loops for second sleeve, 2 loops for raglan, 5 loops for second front. Knitting with an elastic band continues, but before and after each raglan you should yarn over. No addition is made on purl rows.

After a few centimeters, the raglan lines will be visible. Continue working until these lines reach the desired length - up to the child’s armpits.

At this stage the product looks like this:

Now you need to lower the loops for the sleeves onto the auxiliary thread, as shown in the picture below.


We distribute the loops for the sleeves with auxiliary thread evenly on 4 circular knitting needles.

The sleeve is knitted with an elastic band before the beginning of the cuff; here knitting needles of a smaller diameter are used. This allows the elastic at the end to be elastic and comfortable to use. Close the loops in a convenient way.

We finish the second sleeve in the same way as the first.

It is necessary to tie the shelves. Cast on stitches along the edge of the product on a long knitting needle, knitting one knit stitch from each stitch.

Make holes for buttons on one side.

The second side is tied exactly the same, but without holes. All that remains is to sew on the buttons and hide the threads that have come out.

The principle of execution is now clear, on this basis you can perform various options. Instead of 1×1 elastic, any patterns are allowed. Some knitting patterns using knitting needles are shown in the following images of children's sweaters knitted for girls.


We knit an openwork sweater with long sleeves
This section will show you how to knit a sweater.

To make a blouse for a 2 year old girl you will need:
- knitting needles number 3;
- 200gr. any yarn.
Knitting begins with the back. Cast on 70 stitches on long knitting needles and make a 1×1 rib 3-4 centimeters high. Continue knitting according to the provided pattern.
For each shelf, cast on 40 loops, knit an elastic band so that its height matches the back. Then continue working according to the scheme.
To make the sleeves, 42 loops are cast on. Start again with a 1x1 elastic band to a height of four centimeters. Continue according to the indicated scheme.
Every five rows in the sleeve, add one loop on both sides. Knit to the required height, close the loops. All that remains is to attach the strips. Cast on loops along the edges of the shelves and make 2 cm of elastic. On the right side, knit holes for buttons. To decorate the neckline, you should also cast on loops along the edge, but one after another. Then knit three centimeters with an elastic band.
To assemble the product, you must choose the usual method. You can use a hook or a needle.
We must not forget about the protruding threads; they need to be pulled to the wrong side of the work. It is not recommended to cut threads that are too short, as the loops may begin to unravel.
Sew buttons to the finished product, steam the blouse and dry it.
Lessons on knitting original blouses
Video tutorials will help you learn important knitting principles. You can learn useful techniques from them, as well as learn new techniques for making knitted products.


