I welcome everyone gathered on my blog on this sunny (or maybe not so sunny) day. If you want to learn how to make cool flowers from ribbons, then I highly recommend reading this article to the end.
Flowers made from satin (and other) ribbons can be used both to decorate gift packaging and as a gift itself.
Especially if you collect such flowers in an elegant bouquet.
The most amazing thing is that sometimes the most beautiful of these plants are so easy to make with your own hands that it takes 10-15 minutes even for a beginner (trust my experience).
I've been doing this quite often lately different flowers and now I will share with you excellent master classes on making them
DIY flowers made from satin ribbons
I'll show you 15 cool (and easy) ways to create amazing flowers. You can “take” each of the photos from the master classes with you by copying the corresponding image.
Let's start with, perhaps, the most romantic and popular plants among girls - roses.
Ribbon roses
Stop buying expensive store-bought roses! Let's learn how to make them ourselves and save the lion's share of the budget.
We will have several roses today. The first of these is a rose, obtained by folding triangles as you go. To make it, prepare a piece of ribbon at least 2 cm wide and at least 50 cm long.
Unblown
Form a center by bending one end as in the photo. Twist and secure.

twisted rose
In terms of the method of creation, it vaguely resembles the previous one (at least the beginning). After forming the center, alternately turn the ribbon, twisting it and applying layer by layer. Secure at the end.

Kanzashi
The peculiarity of this rose is that all its petals are processed separately.

From braid
Finally, a rose, which is obtained by intertwining two wavy ribbons. After weaving, they need to be swept along the edge so that they do not fall apart. And then just roll it up.

Flowers from kanzashi ribbons
In general, kanzashi is originally a “hair decoration” from Japanese. It dates back to the times of geishas, who were distinguished, among other things, by their ability to skillfully do needlework.
Kanzashi has two petal shapes - round and pointed. The rest are already subspecies. So all flowers, to some extent, can be attributed to this type of art.
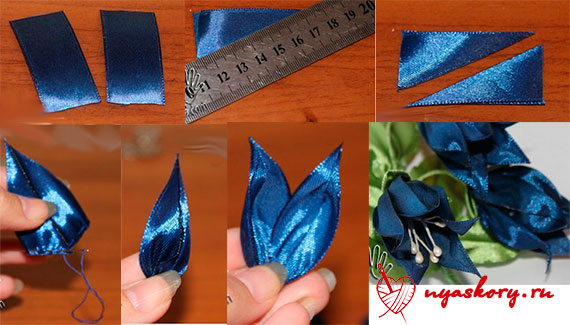
Hibiscus
An exotic guest, for which you will need a wide ribbon (about 5 cm wide), a base and stamens.

Just a flower with 5 petals
To make pointed elements, sew the center. Fold the future petal in half and hem it from the inside. Prepare 5 pieces, then string them on a thread. Decorate the middle.

Bell
For the bell, prepare the petals according to the photo. To roll them, fold the petals with their tall, straight edges facing each other and sew around the edge (glue the top a little). Pull the thread, assemble the resulting parts, decorating with stamens or beads.
Semitsvetik
For it you need to prepare 7-9 petals using the classic method used in kanzashi. Then all the petals are collected on a thread and, if necessary, glued together on the sides.

Aster
Just a dream, not a flower in terms of ease of execution. To make an aster, take a ribbon and sew a line of zig-zag running stitches across the entire width. Pull, roll. All

Peony
For the peony, take three ribbons: two for the petals, one for the green leaf.
Please note that the peony consists of two parts - a more closed bud and opening petals.

Master classes on colors in video format
Not everyone likes to study photographs, so I have prepared several flower-making tutorials for you in video format.
How to make roses from ribbon with your own hands, step-by-step photos and instructions for creating a flower, seven options for roses from ribbon in the form of buds and blossoming flowersHow to make roses from ribbon with your own hands, step-by-step photos and instructions for creating a flower, seven options for roses from ribbon in the form of buds and blossoming flowers
In this article we will talk about the queen of gardens - the rose. We will offer several master classes on how to create it yourself from various ribbons. An amazingly beautiful flower has delighted and captivated people for many hundreds of years. There are countless legends about the rose among different nations. Greek myths tell that a white rose emerged from the sea foam that enveloped the body of the goddess Aphrodite as she came ashore. According to Iranian legend, all the flowers came to Allah and asked him for a new ruler, instead of the beautiful, but lazy and idle lotus. Allah heeded their requests, creating a beautiful white rose with sharp thorns. According to Hindu beliefs, the goddess Lakshmi, the embodiment of beauty, was born from a rose bud. Scandinavian legends say that in the spring, with the laughter of the fire god Loki, the snow melts and roses bloom. The queen of gardens was a very revered flower among many peoples. In the Roman Empire, winners of battles were awarded wreaths of roses. When Cleopatra received the commander Mark Antony, his path to the queen’s chambers was strewn with rose petals several tens of centimeters in height. In Christian mythology, the white rose is considered the flower of the Virgin Mary. Roses were depicted on the coats of arms of many noble families of antiquity. There are now many varieties of roses, from the usual shades of pink and red to completely extraordinary ones: emerald green, blue, black and dazzling white. In this article we will make roses from ribbons. Thanks to the wide variety of ribbons in size, texture and color, their roses always turn out different and beautiful. Such crafts will be an excellent decoration for a hat or handbag. They will become an original brooch, decorate a hair clip or turn into a charming boutonniere.
Ribbon rose
 Option 1 Rose from ribbons 1 cm wide
  You will need:
- Tape 1 cm wide (approximately 75-80 cm);
- Needle and nylon thread to match the ribbon;
- Large needle with a wide eye;
- Cloth (you can take a napkin);
- Hoop;
- Coin;
- Pencil;
- Scissors;
- Decorative elements (lace, pearls) optional.
On the canvas you need to draw the outlines of a coin and mark five points along the perimeter at equal distances. Mark the center of the circle. We fix the canvas on a hoop and, using nylon thread to match the ribbon, embroider a snowflake with five “rays” intersecting in the center. We fasten the thread on the wrong side. 
 Now take the ribbon and tie a knot at one end. We insert the second end into the eye of the “gypsy” needle. Let's start embroidering a rose. We pass the needle and tape from the inside to the face in the center of the circle. We have five “rays” made of nylon threads. We will pass the ribbon in a circle, alternately threading the ribbon, now above the “ray”, now under it. Twist the ribbon in a spiral. The splendor of the rose will be directly proportional to the number of turns of the ribbon. The tape should not be tightened too tightly, as this can deform the canvas and make the rose petals flat.
 After you have reached the required volume of the flower, take the ribbon to the wrong side and tie a knot similar to the first end of the ribbon. Most of the ribbons are quite silky, and the knots can unravel over time. To prevent this from happening, grab both ends of the ribbon from the inside with a couple of three stitches using regular threads.
  You can sew several pearl beads into the core. As an additional decorative element, you can use round lace of small diameter. Just align its center with the center of the intersection of the “rays” of the snowflake, which serve to attach the tape. Now you can embroider a rose as described above.
 At the end, it is necessary to trim off the excess fabric, leaving the required minimum so that the thread fastening does not unravel. Option 2
  You will need:
- Tape 5 cm wide;
- Needle and thread to match the ribbon;
- Safety pins (you can take any pins with heads);
- Candle or lighter;
- Sharp scissors.
First you need to cut the blanks for the petals. For one rose flower you will need: 8 pieces 10.5 cm long and 9 pieces 11.5 cm long. The edges of all blanks must be melted over the flame of a candle or lighter so that they do not fluff. We begin to make a rosebud from a smaller piece. Turn the front side away from you and bend the upper right corner down, as shown in the photo. We got a small shiny triangle. Secure with a pin. Now take the lower right corner and fold it from right to left. Secure with thread.  Fold back a small strip of tape along the top edge. Make a couple of stitches along the bottom and secure the bud with a thread.
  The core of the rose is ready. Next we start creating the petals. We arrange the ribbons as before. We bend the upper part of the ribbon by about 7 mm and secure it with pins. We bend the upper corners of the tape down and secure it with pins again, as shown in the photo. We pass basting stitches along the bottom of the workpiece and slightly tighten the petal.
  We attach it to the bud, crossing the ends. Sew it on.
  We perform all the other petals of both sizes in the same way. Sew them in checkerboard pattern one by one.
  It turns out this is a rose. Option 3 To create the next rose you will need a soldering iron. Thanks to it, there will be no need to melt the edges of the tapes and gluing the workpieces. If you don't have a soldering iron on hand, you can use a wood burner. Sometimes it comes with a fabric attachment. You will need:
- Satin ribbon 5 cm for petals (choose the color to your taste);
- Satin ribbon 2.5 cm for green leaves;
- Soldering iron;
- Needle and thread;
- Metal round template for petals;
- Artificial stamens;
- Tweezers.
As a round metal pattern, you can use a cap from baby food or pickles. The size of the flower will ultimately depend on its diameter. Fold the 5cm wide ribbon in half with the shiny side facing inwards. Now you need to cut out circles with a soldering iron, as in the photo, leaving the lower part unsoldered. For each flower you will need at least 10 such blanks.  The edges of the petals are tightly secured with a soldering iron. Turn them shiny side out onto your face. We sew the unsealed bottom with a stitch. The thread needs to be pulled off.
  Fold the stamens in half. We wrap them into one petal and secure them with hot glue. Next, we begin to glue the remaining petals overlapping, like a real flower.
  Advice! If you are just starting to try your hand at floristry, and this is your first flower, use Moment Crystal instead of hot glue. The first option is faster and sets in seconds. The second one needs a couple of minutes to glue, and you will have time to arrange the petals in the best positions. To create the leaves you will need pieces of green tape approximately 8 cm in length. We position the segment vertically and bend the upper left corner so that the upper half of the ribbon becomes perpendicular to the lower one (see photo). Now fold the upper right corner (a) with the lower left corner (b). The resulting workpiece has a triangle-shaped top. We unfold the future sheet with the wrong side facing the face. We fold the lower right and left corners together, as in the photo. We cut off the ends a little and melt them over the fire.
  Now all that remains is to glue the leaves to the rose. Option 4 Ribbon rose using the kanzashi technique
  Materials and tools:
- Satin ribbon 5 cm wide;
- Needle and thread to match the ribbon;
- Tweezers;
- Scissors;
- Lighter or candle.
The number of petals will depend on how lush the rose you want to get in the end. We cut the tape into squares 5 x 5 cm. We melt the sections over a flame. Now you need to fold the square in half diagonally. The fold line is located at the top.  We bend the right and left corners to the bottom. Now you need to cut off the lower corner of the workpiece in a semicircle and glue it by melting it over the fire. If you have a soldering iron, you can use it. This tool allows you to skip the cutting step. After working with a soldering iron, the edges of the petals will be immediately smooth and glued together.
  Let's start forming the rose. Roll the first petal into a tube. The folded side faces outwards. We wrap the middle with the next petal and sew it on. Continue sewing the petals overlapping. The folded side should always be on the outside.
  The result is a rose like this. Option 5 Gorgeous lush rose made of champagne-colored satin ribbon
  You will need:
- Satin ribbon (wide);
- Candle or lighter;
- Scissors;
- Needle and thread in the color of the ribbon.
The tape must be cut into square pieces. We cut out rose petals from them so that one of the processed ends of the ribbon is the bottom of the petals. You can take a real petal as a sample. We melt the edges of the cuts over the fire, turning the wrong side towards the flame. After this, the petals will become slightly curved. For one flower you will need from 10 to 15 petals.  For the core of the flower, twist the bud. Take a rectangular piece of tape and fold it in half lengthwise. The fold line is located at the top. We lower the upper right corner (about 4 cm) down to form a right angle. Now fold the lower right part of the folded corner again and secure it with a couple of stitches of thread. We don’t cut it off, we begin to twist the ribbon around the package. Every two or three turns, stitch the workpiece with thread. When the bud is of sufficient size, fold the free end of the ribbon downwards. Secure with thread.
  Now you need to sew the petals around the bud. We attach them overlapping, as shown in the photo, with the convex shiny front side to the bud.
 Now you can attach the leaf and the rose is ready. Option 6 Miniature rose
  Such a crumb will look great as a decoration for a hair tie. You will need:
- Satin ribbon (medium width) for petals and leaves;
- Safety pins;
- Needle and thread to match the ribbon.
You need to put the ribbon on the table and bend it from left to right about 6 cm. Take this end of the ribbon and bend it down so that a fold of 45⁰ is formed. We secure this bend with a pin. The end of the tape looks down. We bend the second end of the tape up in the same way. We also secure the bend with a pin. This is what should happen in the end.  If we unfold our workpiece, you will see 4 small squares. Do not remove the pins. We unfold it back and use a stitch stitch to go around the entire perimeter of the workpiece. Now you can remove the pins and tighten the thread a little. We unfold the resulting spherical blank and straighten the petals of the future rose.
  Now we make the core for the flower. This will require another piece of tape. Fold its ends crosswise so that the upper part forms a loop (see photo). With pins you need to fix the place where the ends of the tape intersect. We cut the ends and sew them with a stitch, as shown in the photo. The figure resembles a pentagon with sides different lengths. We tighten the thread and again we get a spherical workpiece, but it does not have a hole in the center, like the previous one.
  Now we insert the smaller one into the larger part, thereby closing the hole. The result is such a cute little rose. All that remains is to make leaves for her. For this you will need a green ribbon. At one end we roll up a cone by simply throwing the edge of the tape over (see photo). At the second end you also need to make a similar figure. You need to pin the joints of the ribbon and then sew them to the finished rose.
  Now you can attach the craft to an elastic band or hair clip. Option 7 Opened lush rose made of satin ribbon
  Materials and tools:
- Satin ribbon of two colors (for petals and leaves) 5 cm wide;
- Glue gun and hot glue;
- Scissors;
- Candle or lighter;
- A decorative element for the core (a beautiful button, a large bead or something of your choice).
Cut the tape into pieces. For one rose flower you will need: 10 pieces 5 x 5 cm, 10 pieces 5 x 6 cm, 10 pieces 5 x 7 cm and 12 pieces 5 x 8 cm. Round off the right and left corners at the narrower side. Now you need to melt all the workpieces over the fire. We pinch the smooth narrow edge, as in the photo. Can be secured with glue or melted again.  Now all that remains is to assemble the flower using a glue gun, starting with the inner circle of the smallest petals. We glue them together. You will need approximately 5 pieces. The next layer and all subsequent ones will be in a checkerboard pattern. We insert a core into the center: a beautiful button, artificial stamens or a bead.
  If you want to make leaves, you will need 6 - 7 pieces of green tape 5 x 5 cm. From five we make exactly the same blanks as the petals. We glue them to the bottom of our flower. We use two pieces of green ribbon to make the base for the flower. To do this, coat the wrong sides with glue and glue them together. Cut out a circle from the blank. It is necessary to melt the edges over the fire. Now glue the rose with leaves to this circle and you're done. Can be used as decoration for hair clips and elastic bands. Make a brooch, decorate a handbag or hat. From small roses you can also make a charming and delicate topiary - the European tree of happiness. To do this, crafts must have a flat base. Experiment, create.
Many people today are interested in how to make roses from satin ribbons. And this is understandable: the hand-made style is becoming more and more popular among fashionistas all over the world.
Using satin ribbon roses
The luxury of flowers attracts the eye of any person. But today the world is actively promoting a thrifty attitude towards nature. Therefore, using artificial plants and flowers instead of cut natural ones is the first step on this path. And an increasing number of craftsmen are mastering a variety of techniques for making them.
But in fact: flowers look luxurious and like decoration wedding dress, both in a bouquet and as a detail in the design of the room. Roses made from satin ribbons using the kanzashi technique are also used. And some even create three-dimensional paintings in which they use ready-made artificial flowers.
Quiltagami - a method of folding fabric
This flower is quite simple to make. When we make roses from satin ribbons and choose quilts as a manufacturing method, we understand that the flower’s petals will be rectangular. Therefore, it is unlikely that it will be possible to achieve one hundred percent resemblance to a real rose. But such an imitation will look great on a dress.
These roses are made from satin ribbons by folding each petal, that is, using the quiltag method. This method is otherwise called “fabric origami”.
Rose with rectangular petals - instructions
To work, you will need a tape more than 7 centimeters wide.
- Squares are cut from it, which are folded “on the corner” diagonally.
- The resulting triangles are folded in half again.
- Now one acute angle is placed on top of another.
- The base of the petal (cut) must be sealed using a lighter. This is done so that the part does not unfold and unravel into threads. There is no point in ironing the part, if only with a slightly warm iron, so as not to deprive it of its volume.
- Next, the craftsman can only assemble the rose from the petals using glue or thread and a needle.
Such decoration can be made not only from ribbon. Wonderful flowers are also made from fabric: chiffon, nylon, silk.
Rose-kviltagami, second method
This option is also quite simple. It differs in that the master will need to make two types of petals. And the process of folding them from squares is different than in the first description.
So, a wide ribbon (from five centimeters) is cut into squares. Then they are also folded “on the corner” diagonally, as in the first option.
Next, the triangle is folded in this way: it is turned upside down, both sharp corners are bent forward and down, connecting to a right angle. The craftsman cuts off the lower part (where sharp corners meet straight ones) by about a third of the part and seals the cut with a flame.

Some of the petals are made in such a way that the sharp corners are connected when folded and an even square is obtained. Half of the parts are made with a gap, that is, the sharp corners do not fit evenly into the vertex of the right angle when bent, so the result is not a square, but a pentagon with a small side at the top - a few millimeters in length.
For a small rose, 16-20 petals are enough, and for a large lush flower - about 40.
Collect the rose, starting with squares, then move on to pentagons, placing them with the whole side inward.
Assembling a rose from round petals
If you use a candle flame to singe the cuts during your work, the result will be so close to the original that it will amaze everyone. These roses made from satin ribbons turn out very beautiful. The instructions for making them are quite simple.

MK "Roses from satin ribbon without cutting"
Even though these flowers look very chic, they are not that difficult to make. Roses from satin ribbons are often made by folding without cutting the original material.
First, the right edge of the tape needs to be folded lengthwise as shown in the first photo. Its lower edges form an obtuse angle - this is important to remember. Then the right edge of the tape is folded again lengthwise. This action is shown in the second photo.

Now the top edge of the left side is folded down so that a right angle is formed at the top. This stage of work is shown in the third photo. And now comes the main moment - directly twisting the inner rose bud.
Using satin ribbons in this way, a fairly similar imitation of a flower is obtained, if you remember that the ribbon needs to be slightly gathered at the bottom, making small folds so that the inner bud does not look like a tight twisted tube and has some splendor.

When the folded part of the ribbon ends, the moment comes to decorate the rose petals from satin ribbons. The photo shows how this is done. You just need to fold the tape across - back and down to form a right angle. Then you need to slightly gather the bottom, grabbing it with your left hand. Again the tape is folded at a right angle, but the working end is brought up. The algorithm is repeated until the desired flower volume is achieved.

The last stage of work will be securing the bottom of the rose. This can be done with thread and needle. The rest of the tape is cut off with scissors. As you can see from the master class, it is not at all difficult to make a rose from a satin ribbon with your own hands.
Making a rose from a solid ribbon, method two
This flower is completed in literally half an hour. The craftsman will need a tape 2.5 cm wide and 40 cm long. After soldering the sections, you should begin folding the workpiece. For fixation, safety pins are first used.
- The tape bends forward and vertically downwards.
- Then the working end is folded forward and upward, and the fold is pinned with a pin.
- The algorithm is repeated six times. Moreover, the workpiece is not straight, but in the shape of a crescent. The last fold should end at the bottom. The excess corner is cut off and the edge is singed.
- The craftsman passes the seam “forward with the needle” along one side of the workpiece.
- The thread is slightly pulled together so that the petals gain volume. Then, with several stitches, it is secured at the end of the resulting workpiece. The excess thread is cut off.
- Use your fingers to shape each petal, bending it inward.
- Begin to twist the workpiece from one edge, fastening the bud with glue.
Making a hair clip from a rose
If the master managed to make a rose from a satin ribbon, he can move on to the next stage of work. Now you should take a hairpin that will hold the flower. The attachment point is lubricated with glue. Many people add details such as green leaves, beads sticking out on wires. Handicrafts are a great way to realize creative potential. Therefore, the master classes presented here should not be considered the only options for making roses from ribbons. Every craftsman will definitely come up with and create something of his own, and maybe even invent his own method.
Making roses from satin ribbons is not as difficult as it might seem to a beginner. You can decorate lambrequins, curtains, and sofa cushions with such beauty. Yes, anything! It looks very gentle and elegant.
Roses can be used as a brooch, displayed on a headband, a hair tie, or even on beads. In a word, the scope of application of these satin roses is very wide.

Let's look at several master classes on making roses from satin ribbons.
Gorgeous rose made from a wide ribbon

To work on this little masterpiece we will need:
- Long pink satin ribbon
- sharp needle
- Pink threads
- Scissors

We take our satin ribbon by the edge. We bend it at an angle of 45 degrees so that a small tail remains. We sew the bend point over the edge.

We bend the tape towards itself again and also sew the folded area with threads. At this stage we should have a trimmed triangle.

We bend the ribbon again and the figure begins to resemble a square. We also trim this bend.

Finally, we bend it one last time until we get a square. Most of the tape at the top remains free.

We turn the square over so that the free end of the tape is at the bottom. On the right side of the square you can see the tail, which we made at the beginning of our work.

We turn the square over so that the free tape rests on our fingers.

And again we begin to bend the tape at an angle of 45 degrees, but without sewing the edge as before, but simply holding it with our fingers.

After 4 turns of the tape over the first square-base, we will get another, already voluminous square.

We follow this path several more times until we get several volumetric squares - future petals.


We make a “stack” of squares until the ribbon runs out. We twist the remaining small tip into a flagellum.

We tuck the edge of the flagellum into the core of the “stack” of squares.

The flagellum should come out from reverse side all squares.


Now the squares need to be tucked a little so as to imitate the arrangement of the petals in a rose.

We tuck, scroll, straighten them with our hands until we achieve maximum resemblance to a rose.

Turn the rose over to the other side. We sew the remaining tail of the ribbon more tightly to the flower. It should look like a slightly convex circle. As soon as it arrived, we cut off the rest of the ribbon.


Our beautiful flower ready!

Yes, it can be a little confusing at first, but after the debut attempt to create satin rose you will make flowers like this very quickly.
Rosette with elastic band
The rosette can also become a hair decoration. A rosette with an elastic band looks especially impressive. Let's try to make a rose from a satin ribbon, and then attach it to an elastic band.

We will also need a medium width satin ribbon. Color is at your discretion.
We put the tape on the table. We throw 5-6 centimeters from the left edge inward.

Then we bend the ribbon towards ourselves at an angle of 45 degrees and secure the bend with a pin so that the edge of the ribbon looks down.

We bend the tape up and repeat similar steps until a square is formed. We fasten the kinks with pins.


If you turn the square over, you get four small squares facing each other.

We take a needle and stitch all sides of our square. In this case, we do not remove the pins yet.

Now you need to carefully pull the thread so that the base becomes rounded, that is, the original workpiece will turn into a small round bag with a hole at the bottom.

Turn the rose over to the other side. We straighten it out, we have a neat, round bud.

Let's take the next tape. We place its ends crosswise to form a circle-loop at the top. We fix the intersection of the ends with a pin.

As a result, we will get a figure similar to a trapezoid. Its sides also need to be sheathed.

Again we pull the thread, again we get a voluminous bag. But there is no hole anymore.

So we got two buds: a large one and a small one.

We insert the small bud into the large one, closing the hole.

The rose is almost ready, all that remains is to make the leaf. To do this, we take a green satin ribbon. We bend the edge so that a cone is formed.


Use a pin to fix the place at the base of the two cones. Here we have the leaves for the rose. Sew them to the finished bud.

All that remains is to secure the rosette with an elastic band. Take a small piece of felt in the same color as the elastic so that it covers the place where the rose is attached to the elastic.

Braid a braid or a playful ponytail and secure it with your new homemade elastic band. Very gentle, feminine and original. It’s unlikely that anyone will guess that this satin ribbon rose was made by your own hands and not bought in a store.

Bouquet of roses
And another original way of making roses from satin ribbons. In order to make a dazzling bouquet of such roses, you need to make each flower separately.

To twist one such rose, we will need a round base. It can be cut from thick burlap or gauze folded in several layers (to make it denser, starch it), as well as from felt. Here's what we do next:
Cut out a circle with a radius of 3-5 cm (at your discretion).

In the circle we mark the dart segment, it needs to be cut and sewn, as a result we will get a small cone.

If you make a large dart, the cone will turn out to be tall, which will make the ribbon flower more voluminous.
We place a satin ribbon on the cone so that its edge covers the top of the cone with a square.

Sew the ribbon to the cone.

Using the method already familiar to us, we begin to bend the tape in a circle so that the result is a square.

We fix the kinks with our fingers.

From these volumetric squares a flower bud begins to emerge. The more squares, the more voluminous it turns out.

Gently straighten the petals with your hands and then the rose will be incredibly beautiful!

To create a bouquet of such roses, you must first make a base for it. It’s easy to make a pen for a bouquet from old felt-tip pens, folded together, covered with tape and rewound with satin ribbon. We fix a foam ball to the base of the handle with hot glue. If you don’t have one, you can make a ball out of papier-mâché or simply crumple up the paper to make a ball and cover it with tape. All that remains is to stick our beautiful roses. Such a bouquet can be given as a birthday present, used as a hand-made wedding bouquet, or fixed in a pot - to make a topiary - and placed on the windowsill.
There are indeed many ways to use such roses. They can be combined into bouquets, or you can use them to make incredibly beautiful head decorations.

Recently, wreaths made from artificial flowers have gained incredible popularity. Most often they are a satin bandage with an elastic band, the top of which is decorated with a floral volumetric applique. It’s really very fashionable, stylish, and a godsend for long-haired girls! You will immediately become like a beautiful fairy who somehow miraculously wandered to earth. Such wreaths are not that cheap, so making them yourself is not only a pleasant activity, but also economically profitable.


You will need to sew the headband itself from satin fabric, the color matching the flowers that will be on it. And then sew roses on it from satin ribbons, which we have already learned how to make. In this case, you yourself regulate the size of the roses, the number of them on the bandage and their location. And if you can make a rose from a satin ribbon, then designing such a delicate wreath will not be difficult for you.

Surely you have girlfriends who would be happy to see such decoration on one of their wardrobe items. And you can safely call yourself a designer - after all, you created such beauty with your own hands. Satin ribbons are a cheap, beautiful and very affordable material.

Categories,
Let's continue our acquaintance with in different ways making roses from ribbons. In this ribbon embroidery lesson we will get acquainted with another version of a rose based on assembly using basting stitches. And if in the “Lady” rose the basting was done along U-shaped lines, then in this rose we will baste along a straight line.
Required materials:
- tapes of different widths (for example, 10, 20, 30 and 50-60 mm)
- thin needle (for example, beaded)
- thread to match the ribbon
- scissors
- lighter
- maybe sewing pins

Option one: the gentlest of the tender
This option for creating a rose from satin ribbons is the simplest of those presented in this master class, but this does not detract from the beauty of the rose!

We take a tape 25-30 mm wide and 70-90 cm long, cut the corners at an angle of 45°, and scorch the edges with fire.

We tie a secure knot on a thread that matches the ribbon and place a basting stitch along the edge of the ribbon, starting from the corner and ending at the corner.


We assemble according to the basting, distributing it evenly, and secure it to the corner with several stitches. We do not cut the thread.


We begin to twist the ribbon, not forgetting to secure it with several stitches at the base.
You need to twist it so that the front side of the tape is inside the tube.


At this stage, the blank can be sewn to the fabric and then the rose can be formed, fixing each petal directly to the fabric.

This is the rose we got.

It can be used for decoration or sewn to fabric in embroidered work.

As an experiment, you can make the same rose from a wide ribbon (6 cm or more). Fold it in half along the edge, lay a basting seam, not forgetting to make the corners at an angle of 45°. Then the manufacturing process is the same as for 30 mm tape. Such a rose will be even more magnificent.

Option two: extraordinary two-tone rose
Using two ribbons, one of which is narrower in width and of a contrasting color, you can make a two-color rose, with an emphasis on its middle.

I have an orange ribbon 12mm wide and a red ribbon 20mm wide, length 70cm.

Now you need to overlap the ribbons with a basting stitch along the face using a thread to match the ribbon that will be on top. I have an orange ribbon on top, I sew it with an orange thread.


This is how it turned out on the wrong side.

Now you can lay a basting stitch for assembly and then twist the rose. I want to show how you can make a flower even more natural.
We wrap the sewn ribbons on a ruler (or any other device) or simply fold them, the width of the fold is 4-5 cm.

Carefully remove from the ruler, align the edges and trim the corners of all layers of tape. We singe the cuts along the entire length of the tape.

You can trim not only the corners, but also the edge to form a beautiful petal.

We twist it tightly at any edge of the ribbon, forming the center of the flower, and secure it with several stitches.

Place a basting stitch along the edge of the orange tape. At the end of the tape we make a basting at an angle of 45°.

We assemble along the basting seam.

And we collect the rose as in the first option.
The rose is ready. Sew, if necessary, to the fabric.

For clarity, video from Evgesha Ryzhkova.
Option three: luxurious blooming rose
This rose is also made using a basting stitch, but before basting, the tape must be folded in a special way.
The manufacturing process is somewhat more complicated than the two previous options, but the beauty of this rose exceeds all expectations and you will not regret the time spent.
For work, it is better for us to prepare a soft ribbon with a width of 25-60 mm (I have a 50 mm ribbon), it is difficult to determine the exact length, it is better not to immediately cut the ribbon from the skein.
The narrower the tape, the smaller piece of tape we need. Approximately, the length of the tape should be 20 times greater than its width. For example, if the tape is 5 cm wide, then for work you need to take a tape about 1 meter long.
We bend the corner as in the photo.

Secure it with a few stitches.

We form the center of the flower by twisting the ribbon. Secure with several stitches of thread to match the ribbon.

Now we need to bend the tape so that the edges meet. We bend edge BC to edge AB.


And along the edge line (DE) we fold it so that the edges and the fold are on the outside.


We sew all three layers with a basting stitch: edge, fold and edge.

We continue to work, connecting the edges, folding the tape and stitching with a basting stitch.


You can secure all three layers with a sewing pin before stitching.

The photo below shows an intermediate stage of work. The workpiece should be wrapped in a circle.

Two such circles are enough to complete this rose. This is what the preparation should look like.

Now you need to twist it. You can twist it right now, fixing the turns, and get a half-opened bud. This is what it will roughly look like.


Or you can make a blooming rose. To do this, you need to gather the workpiece along the basting seam.


And twist it, fixing the turns. This is how it will be on the wrong side.

Here we have such a blooming beauty!

The video from Anastasia Kulikova shows the entire process of making this rose.
These ribbon roses will undoubtedly decorate your work, be it a craft or an embroidered painting!
And in conclusion, beautiful roses made using this method, from the masters of ribbon embroidery.