If you know how to knit, then knitting mittens will not be difficult for you. And in order for the mittens to not only be warm, but also beautiful, they can be knitted with various designs, patterns and braids.
White mittens with braid pattern
For these tops you need 100 grams of yarn. 100 m. It is better to take thick yarn.
Circular needles size 7 work best.
We cast on 30 loops on the knitting needles and knit 6-9 cm with an elastic band. Elastic knit 1 p. purl 1 p. front.
After tying the elastic band, move on to the braid pattern. To start forming the pattern, we knit 2 stitches, purl 9 stitches and again purl 2 stitches. The rest of the braid is knitted only with facial loops, as shown in the diagram. Look at the diagram to the left and follow it. You just need to start knitting according to the pattern, and then the principle will become clear.
Having knitted 15 centimeters, we leave 6 loops on the finger, threading a pin through the loops, and put 6 new loops on the knitting needles and continue knitting.
When the mitten is the size of your hand, start casting stitches.
First on the sides of the picture and approximately in the middle of the palm. When 8 loops remain, tighten the loops.
So we got beautiful, knitted mittens.
Patterned Gauntlets

These mittens with beautiful braids are knitted on five needles or so-called double needles. We cast on 52 loops, this turns out to be 13 loops per knitting needle. The elastic is knitted 2x2 for about 40 rows. Below is a diagram and description of how to properly knit braids.
We knit a finger on the 10th row. On the side of the small braids, add to the two middle loops - 3 times in the second row. Then in the third row 3 times. When there are 18 loops, transfer them to a pin and continue knitting the mitten. The finger can be tied later. It is knitted exactly like the mitten itself, only in a smaller size.
Next comes double knitting, in the first row on knitting needles we alternately knit one knit stitch and two knit stitches together. In the second row with facial loops, two loops together and so on until the end of the row. Pull all remaining loops.


Beautiful knitted mittens

The mittens are knitted in stockinette stitch, circular knitting, all stitches are knitted.
Knit the braid according to the pattern (see pattern below).
Divide 48 stitches onto four needles and knit together to make a circle. From the first two knitting needles, these are 24 loops, there will be a palm. From the remaining two knitting needles, these are also 24 loops, there will be a back side. The first and second needles are knitted using stockinette stitch.
The third and fourth knitting needles are counted on the pattern, 3 knit loops, 9 knit loops, on one needle and on the second 9 loops on the braid and 3 knit loops. Next, after 40 rows, remove 7 finger loops onto a pin, and cast on 7 chain loops on a knitting needle.
Having knitted the mitten along your hand, start running, to do this, decrease a loop in every second row. To get a triangular start, you need to remove it from the 1st and 3rd needles at the beginning of the row. With the 2nd and 4th needles, last stitches. After 24 stitches remain, begin decreasing on each row. Pull the last 8 loops.
Knitting a finger
Separately, remove 7 loops from a pin onto a knitting needle, cast on 7 loops from the top edge on the second knitting needle, and remove two on each side. There should be 18 loops. Knit the finger in a circular stitch, all stitches are knit. After the desired size, run your finger, just like the mitten itself.
The edges of the mittens can be crocheted and decorated with beads or seed beads.
With the onset of cold weather, mittens are an indispensable item in everyone's wardrobe. It is very important to protect your hands from the cold, otherwise you can dry out the skin, which will lead to cracks and wounds.
How to knit mittens for beginners step by step
 For knitting we will need: wool - 100 g., sp. x 4. We start knitting from the cuff (the initial part of the product). We measure the circumference of the cuff according to the circumference of the hand.
We knit with a 2 x 2 elastic band, so that the number of stitches cast on is a multiple of four. We cast on loops for 2 sp., then distribute in equal quantities to the rest. Knitting occurs in circles. Please note that we make front loops (k.p.) behind the front walls, purl loops (p.) - behind the back ones.
 We make a cuff 5 - 6 cm high, then move on to the main pattern. We knit the main pattern, also 5 - 6 cm high, and create a hole for the thumb.
Let's assume that we have 12 loops on each needle (sp.).
We make a hole for the thumb on the third sp. according to the scheme:
1. We knit the 1st stitch, remove the next stitches with a pin or marker;
2. To another sp. we throw on as many air loops as we removed on a pin;
 We knit further in the circle. We knit the product to the end of the pattern. After we have knitted the main part of the mitten, we begin to knit the thumb.
 Drag the pinned loops onto the sp. The number of loops for the thumb should be a multiple of 3. We knit the loops in a circle, starting to decrease the loops from the thumb nail. When we have 6 loops left, we pull the woolen thread through the loops and tighten.
Knitted men's mittens with ornament
 In order to knit winter men's mittens with the “Deer” pattern for beginners, we will need: yarn - 150 g, knitting needles.
Basic patterns:
Elastic band 1 x 1 = 1 p.p. x 1 p.p.
- front surface: l.p.
Knitting density: 16 p. x 18 r. = 10 x 10 cm.
Work progress:
Left mitten with an ornament for beginner needlewomen:
We dial 36 p. on sp. and distribute it into 4 sp. We knit a 1 x 1 elastic band about 10 cm in a circle. Change the row between the first and fourth sp. Next we make knits. satin stitch - 2 r.
We knit a pattern with an ornament according to the diagram:
1. on the 1st and 2nd sp. do 2 p. rapport A x 9 r.;
2. on the 3rd and 4th bedrooms. knit 18 stitches of rapport C;
3. We repeat in rapport 1 the first and second rows, in rapports B and C we do from the 1st to the 24th row;
4. Starting from the 2nd row of faces. In satin stitch we make additions for the wedge of the thumb:
A. on the 2nd bedroom we knit the loops according to the picture. When there are 4 stitches left to the end of the row, then add 1 stitch;
b. We knit 2 stitches according to the pattern, then add 1 stitch again and so on according to the pattern. We include all the added loops in our overall drawing;
We do repetitions every 2nd r. x 5 times. After we have completed all the additions, we make 1 row. In the next r. above the loops we cast on new 2 stitches and continue knitting in the round up to 16 cm.
To form the top, at the beginning of the 1st and 3-1 knitting needles we knit 1 stitch, according to the pattern + 2 stitches. together. At the end of the 2nd and 4th knitting needles we knit 2 knitting stitches. together with a broach (remove 1 stitch like a l.p., then knit 1 l.p. and pull it through the removed one), 1 l.p. We repeat these decreases in each row until we have 9 stitches left.
Take scissors and cut the thread. Pull the thread through the loops and tighten.
When we reach the fingernail, we begin to decrease the loops. To do this, we knit 2 stitches. together until 4 stitches remain. Take scissors and cut the thread. Pull the thread through the loops and tighten.
Right mitten: knitted similarly to the left one, according to symmetry.
How to knit mitts for beginners
 Mittens - a fashionable winter accessory for the winter look of a young needlewoman. After reading the article, you will be able to knit mitts for beginners yourself.
To knit mitts we need: thread - 100 g, knitting needles x 5.
In order for the mitts to fit well on the hand, we will slightly reduce the number of loops. So, we knit 44 stitches, then after 5 cm we reduce their number to 40.
 We cast on loops and start knitting with an elastic band of 1 x 1, approximately 5 cm (1 stitch x 1 stitch). We evenly distribute the loops into 4 stitches, so 11 stitches on each.
 After we have finished knitting the elastic band, we reduce the number of stitches by knitting 2 stitches together and move on to the main pattern.
 The first 2 knitting needles are the front part of the mitts, the rest are the lower part. We knit the lower part only in single stitches, and make the front part according to the “double rice” pattern.
 We make 1 sp., knit 2 l.p. together for a "wedge". The basic pattern is very similar to the 1 x 1 rib, but with offset rows. We knit 2 p. according to the figure, the next ones change direction - above the l.p. we knit i.p. and vice versa. Thus, we alternate rows, changing direction. After 4 rows we knit a “wedge”, starting from 2 sts of the first sp. We make increases, knit 1 p., yarn over (n.), then 2 p. + n.
 We work according to the drawing. In the next r. We knit yarn overs. We reach the base of the thumb. We knit 1 stitch on the first knitting needle, then remove 9 stitches on a pin, and make 4 air loops. Next we knit yarn overs. In the next row we knit these loops 2 together.
 Towards the end we again switch to knitting an elastic band, then close off the loops.
 Let's move on to knitting the thumb. Add 7 more p. to 9 (= 16 p.). Distribute 4 sts for each sp. and knit l.p. - 6 rubles, then an elastic band.
 We knit several rows with an elastic band and close the loops.
The left mitten is ready!
We knit the right mitt symmetrically according to a similar pattern.
How to knit mittens for beginners using 4 knitting needles
 Knitting warm mittens is a hot topic during the cold season. In order to knit them for beginner needlewomen, we will need: wool - 160 g, 4 knitting needles.
Knitting density: 1.7 p. x 1 cm
Before we start knitting simple mittens, we measure the girth of the hand. We got 20 cm. The mittens are knitted on 4 sp. all around.
 We calculate the number of loops: 20 cm x 1.7 = 34 sts. Next, divide them into 4 sp.: 34: 4 = 8.5 Round up to 9 sts, thus cast on 36 sts. For each sp. 9 p.
Work progress:
We knit the first mitten. Mentally divide 4 joints. into 2 parts - lower and upper. Thus the first 2 sp. - the lower part, the rest - the upper.
We begin to knit the cuff with an elastic band of 1 x 1. We alternate the colors of our mittens every 3 rows, so we knit up to 5 - 7 cm.
 Next, we make the main part of the mitten in a circle, to the base of the thumb (approximately 5 cm).
We will make a hole for the finger on the 1st sp. for the right mitten, and on the 2nd for the left. We knit 1 st on 1 sp, knit the rest, and return to the 1st sp. This should give us a hole. Next we knit in a circle until the end of the knitting (8 cm).
 Let's make a toe. To do this, we decrease p. in the rows. On the 1st and 3rd sp. at the beginning we do 2 l.p. together, and on the 2nd and 4th we knit 2 l.p. at the end. We knit until there are 2 stitches left, close them off.
Let's return to knitting the thumb. We should have 7 loops on one sp., 6 on the other. Next we work according to the scheme, decreasing the loops at the end. Bind off the remaining 1 stitch.
 We make the left mitten symmetrically with the right one.
Warm mittens are ready!
Knitting openwork mittens on two knitting needles
 To knit openwork mittens on 2 knitting needles for beginners, we need: wool - 120 gr., sp.
Making the back part:
2. We work with an elastic band 1 x 1 or 3 x 3, as you like. Approximately 8 cm;
3. We knit with the main pattern up to the little finger;
4. Decrease the loops and close the knitting;
Making the front part:
1. We cast on the knitting needles the required number of loops (depending on the size);
2. Knit with an elastic band 1 x 1 or 3 x 3, as you like. Approximately 8 cm. Make a hole for the thumb;
3. Divide all loops into 4 parts. We remove 3 parts with a pin;
4. We recruit the rest on sp. and pick up as many loops as we have on the back. We knit the thumb, close the loops;
5. We work the main part with the main pattern;
6. Decrease the loops and close the knitting;
7. Connect the 2 parts;
Children's mittens knitting patterns and descriptions
After reading the article you will learn how to knit children's mittens for beginners yourself. In order to knit them you will need: threads and sp..
Guided by our description and diagrams, you can easily cope with this task, even if you are a novice needlewoman.
 To knit mittens with ornaments we will need: 25 g. threads of different colors, knitting needles, large needle.
We cast on 32 sts, wash it into a circle. We knit 17 rubles in a circle. elastic band 1 x 1.
 After the elastic band, add 5 stitches to the row, alternately changing the colors of the yarn. After 14 p.m. From the elastic we make a hole for the finger. On the back side we knit 22 stitches. We knit 7 stitches and throw them back. Next, we do the main part to the end. At the end we decrease the loops and close the knitting.
 We knit the thumb on the mitten. Take the loops and knit up to 16 sts.
 We knit 14 r. in height and decrease p. At the end, close the finger.
We make the second mitten in the same way as described.
Knitted mittens with ornaments for children
 In order to knit children's mittens with an ornament we will need: yarn - 200 g, knitting needles x 5.
We cast on the required number of loops, make 5 cm with a 1 x 1 elastic band. We look according to the description of the diagram.
On each sleep 12 p. We make a hole on the 3rd. Knit the first loop, remove the remaining 10 with a pin. Cast on 10 stitches on the right needle and then make the main part as described.
We do the second one symmetrically to the description of our circuit.
For girls, mittens with braids, knitting patterns and descriptions
 Cast on 52 sts and knit 40 r in the round. elastic band 2 x 2. Next, add 2 more stitches and work according to the diagram:
 1. The finger will start after 10 p.m. main pattern.
2. On the sides we add sts 3 times, so on the sp. 20 sts are formed.
3. Place the stitch on a pin. We cast on the missing loops and knit according to the pattern.
4. We make the main part according to the diagram. At the end we close the loops.
Children's mittens knitting patterns and descriptions for a 3-year-old boy
 In order to knit children's mittens for the 3rd boy we will need: yarn - 200 g, knitting needles x 5.
We cast on the required number of loops, distribute them to each sp.. We make a cuff with an elastic band 1 x 1, approximately 5 cm (the number of loops is briefly 4). First and second sp. - the top part of the product, the rest - the bottom.
We make the main part of the product (5cm), add 2 stitches in a row.
We make a hole for the finger. For the right hand we make a hole on the 3rd knitting needle, for the left hand - on the 4th.
On each sleep 12 p. We make a hole on the 3rd. Knit the first loop, remove the remaining 10 with a pin. Cast on 10 stitches on the right needle and then make the main part according to the diagram.
 After finishing the main part, we return to the thumb. We transfer the loops from the pin to the knitting needle, adding loops so that the total number is a multiple of 3.
Distribute the stitches onto 3 knitting needles and knit in the round. At the end of knitting the finger, decrease the loops and close the knitting.
We make the second symmetrically to the description of the first.
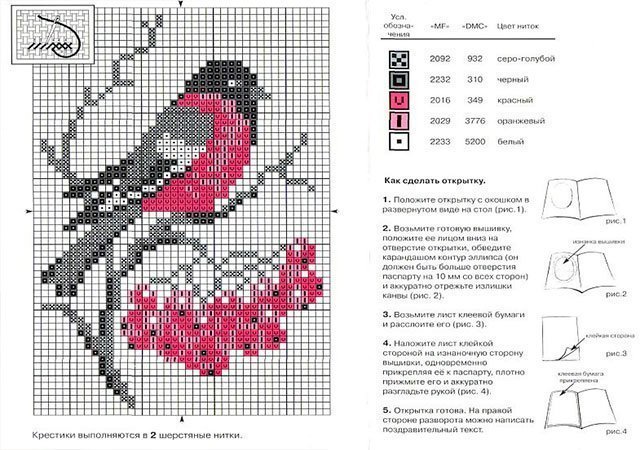
We crochet the details of the birds in st. b.n. Sew beads in place of the eyes.
How to knit mittens with knitting needles with a pattern
 To knit mittens with a pattern we will need: wool - 120 g, knitting needles.
We work according to the description:
1. Dial to sp. required number of loops (40 stitches);
2. We knit with an elastic band 1 x 1 or 3 x 3, as you like. Approximately 8 cm. Make a hole for the thumb. Remove the loops with a pin;
3. Make the main part the main pattern;
4. Decrease the loops and close the knitting;
5. Return to the thumb and knit according to the pattern;
6. Connect the 2 parts;
Knitted mittens for children video
There are many free video tutorials on the Internet on how to knit baby mittens step by step. For this we will need: thread - 150 g, knitting needles.
Watch the detailed master class in the following video
Beautiful patterns for mittens knitting patterns
Here is a description of several beautiful knitting patterns:
1. Openwork braids. The pattern repeat in the diagram is indicated by a red rectangle. The number of rows in the repeat is 10, loops are 18. Empty cells are front ones. In purl r. We make the front loops purl.
 2. Openwork leaves. Repeat pattern 16 p. (blue color). In empty cells - l.p.
 3. Openwork chessboard. Pattern repeat 13 p. Repeat the pattern in height from 1st to 24th p. We knit yarn overs i.p., purl r. according to the scheme.

Despite the fact that the 21st century is considered the century of technology, simple needlework remains popular and in demand. In this article we will tell you how to properly knit good, high-quality mittens or mittens using knitting needles. The described methods are suitable for knitting mittens for adults and for children.
First of all, the material!
You should learn with good, expensive threads, and also choose the right tools. The most common options for knitting needles are metal, plastic and wood (usually bamboo), and you should look at them when choosing.

Metal ones do not catch threads when knitting, they glide quickly when creating loops, while wooden ones are light and smooth, but the process is slower with them.

For the first time, you should choose an elastic, stretchy thread that will provide warmth to your palms. There are various yarn options for mittens; for beginners, it is better to stick to half-woolen threads - they are quite elastic, do not require a special approach, and as a result, they hold their shape perfectly and look beautiful on the hands.


Knitting pattern
Needlewomen have come up with many schemes and patterns for creating mittens with knitting needles, so you don’t need to have a printed manual nearby - all the photos are online. The first thing you should master using patterns is the ability to cast on loops; If you don’t master this basic skill, you won’t get any mittens or any other product.

Usually rows of loops repeat each other if the author’s idea does not include decorations, so it’s easy to learn. The most common casting pattern is circular, so five knitting needles are used simultaneously when knitting mittens.

After this, you need to learn how to knit facial loops, because... The product is sewn in the front and back layers. They differ in density: the loops on the wrong side are completely intertwined with each other, while the loops on the front side maintain a certain, even row. If the skill of processing both sides is developed, you can begin to draw up a pattern.


Calculation of loops and hand measurements
The measurement stage greatly facilitates future work. For convenience, you need to measure your wrist, fingers and palm. To create your own sample, you should calculate how many loops will fit into 1 cm of each parameter.

The result obtained must be multiplied by the length from the hand to the wrist, then divided by a smaller integer multiple of four. For example, calculations led to 66. The nearest integer divisible by 4 without a remainder is 64, and we take it as a basis.


Are you done? Then we move on to the main thing - knitting mittens.


The process of knitting mittens
You need to start the process with the cuff. The number of loops that will be needed to create a tight, good cuff should also be divided by four; the standard length is 7 cm. At the beginning of work, you need to gradually close the loops into a circle, and then knit tightly with an elastic band to the required length so that the outer part of the mitten can stretch to the size of your hand.

You need to knit up to the hole from which the thumb will then be made. Already at this point, it makes sense to move on to the beginning of the pattern, in which one cell will correspond to one loop - it’s easier to calculate and not make a mistake.


Having made it to the base of the thumb, you need to remove several loops with an additional thread - this way the circumference of the finger is adjusted. You need to pick up the same number of air loops, and then continue knitting up to the little finger. To better see how the mitten will look on your hand, you need to try it on periodically.

The edges of the mittens are made by decreasing two loops, which are tied together. When the number of remaining loops reaches 8, they also need to be tightly pulled together with additional thread and secured, and so that the mittens do not start to diverge, the tip of the thread must be tucked inside.


At this point, the base of the mitten should be ready. We remember about the hole and return to it: perhaps this is the simplest part - traditionally there are no patterns or decorations on the small finger. The mitten can be considered complete, the second one should be knitted in the same way as the first one, but in a mirror image (so that you don’t end up with two left ones).

Patterns and decorations
Without decorations, perfectly knitted mittens will look faded and monochromatic. To fix this, even while creating the mittens, you need to think about what exactly should be on the front or inside.

There are no clear rules, so we use our imagination: often ornaments, images of animals, beads and much more are used as decoration, including embroidery with multi-colored threads.


If to create an ornament it is desirable to knit in different colors, having thought through the picture on the pattern, then everything else is easy to add to the finished result.

A couple more options that should be used during creation are braids on the front side or mittens. The latter, however, are knitted differently; there are separate patterns for mitts.


Photo of the process of knitting mittens with knitting needles


Mittens have always been the most practical and comfortable for cold winters. Today there is a huge selection of mittens in stores for the whole family, but it is much more pleasant to wear things that were created with love with your own hands.
Having learned to knit, you can create entire sets: hat, scarf, mittens. They will harmonize beautifully with each other if they are made in the same style with the same pattern.
I propose to go directly to the discussion of the topic: “how to knit mittens with knitting needles - step-by-step instructions.”
How to knit mittens with knitting needles (step by step for beginners)
In order to learn how to knit beautiful stylish mittens, you need to learn how to knit the simplest ones, on the basis of which you can create the most original models for the whole family.
Seamless mittens - master class with detailed description (photo)
The most interesting thing is that even the lazy can handle this model. They can be plain, but the author suggests adding a few red stripes for variety.
Popular articles:
For work we will need wool thread (70 g), 5 double needles No. 3.
The product is knitted from top to bottom on five needles, as a result of which it will turn out without a seam. Calculation of the number of loops: 20 x 1,7 = 34 loops. Distribute 34 stitches onto 4 knitting needles. I suggest rounding up and casting on 36 loops, so we get 9 each.
To make the explanation easier, let's give each knitting needle a serial number. Closing the circle, we knit the four loops of the 1st knitting needle together with the end of the yarn remaining on the 4th knitting needle from the set of loops so that the circle closes more tightly along the edge.

The thumb will be knitted on the 1st needle, for the left - on the 2nd. To do this, knit the first loop on the 1st knitting needle with a thread of the main color. All other loops, except the last one, are knitted with colored thread. Then we return the loops connected with the colored thread to the 1st knitting needle and knit it again with the main thread. We get a colored touch. This will be the hole for the thumb in the future. Next, we simply knit up to the little finger (about 8 cm).

Then we proceed to decreasing the loops on the toe of the mitten. On the 1st and 3rd knitting needles, at the beginning, we knit the first two loops together using the front stitch in the second way (at the back walls), having first turned over the 1st loop. On the 2nd and 4th knitting needles we knit two loops together at the end of the knitting needle using the first method (behind the front walls). So we decrease the loops through the circle until each knitting needle has half the number of loops (in our case, when the number of loops on each knitting needle is odd, we decrease the smaller part through the circle - 4 loops), then we decrease the loops in each circle (5 loops). At the same time, on the 1st and 3rd knitting needles, in those rows where we do not decrease the loops, we also turn the first loops over and knit them in the first way. When there are 2 loops on each knitting needle, tighten the loops and secure them on the wrong side.
Now let's get started thumb tying. To do this, carefully pull the colored thread out of the thumb hole. Then we insert two knitting needles into the free loops, we get 7 loops on the lower knitting needle, 6 on the upper knitting needle. We begin to knit the finger, distributing the loops on 4 knitting needles: 4 loops on the first, 3 on the second and pull one loop from the side edge of the hole, on the 3rd and the 4th knitting needle will also have 4 loops (3+1 from the side edge of the hole). To make it more convenient, the end of the working thread can be lowered into the hole (on the wrong side of the product).

We continue to knit the finger in a circle until the middle of the nail, and then we begin to decrease the loops in the same way as when knitting the toe of a mitten: on the 1st and 3rd knitting needles at the beginning, on the 2nd and 4th knitting needles at the end, but decreasing We do it in every row. When there is 1 loop left on each knitting needle, we tighten the loops and fasten them on the wrong side.
Left mitten knitted similarly to the right one, but in a mirror image: we knit the hole for the finger on the 2nd knitting needle.
Step-by-step instructions for knitting on two needles
These long mittens can also be knitted on two knitting needles. You can knit two parts separately and then join the halves, but we will consider an option where you only have to make one invisible seam (this will be correct and visually more beautiful).
Needed: yarn, knitting needles, regular and knitting pins, measuring tape, hook, needle.

Let's start with the right part.
We measure the circumference of the wrist, the length of the palm and thumb. It is also necessary to measure the knitting density by knitting a little. We measure how many loops there are per 1 cm. My girth is 20 cm, there are 2 loops in 1 cm. You need 40p-4 = set of 36p + 2 edges.
We start from the bottom with a 2x2 elastic (knit 2, purl 2). It turned out to be approximately 10 cm (15 rows).

Next, we move on to the main fabric, where you can choose knitting needles of a smaller diameter. In the second row, add 4 stitches evenly. Next we simply knit 7 rows to the base of the thumb. You can try on and knit more/less if necessary.
The finger in the mitten is not on the side, but somewhat closer to the palm, so for the right mitten we knit as follows.

- A. - edge, 2p. We knit according to the drawing and remove it with a regular sewing pin.
- B. - For a finger, take 6-7 loops. Depending on completeness. We knit 7 loops according to the pattern, and remove all the remaining ones with a pin.
- V. - we only have 7 thumb loops left on the working knitting needle.
We knit in height with the main pattern, without edges!!! We multiply the length of the finger by 2. My finger is 6 cm * 2 = 12 cm in height. 21 rows came out. WE KNIT THE FIRST AND LAST ACCORDING TO THE DRAWING!!! We return the loops from the large pin to the knitting needle.


We divide all the loops into 2. We remove one part with a pin.

Let's start cutting down.

We knit the purl row according to the pattern. I don't have 20 stitches on my knitting needle. I knit like this: edge, knit 1, knit 2 together, knit 12, knit 2 together, knit 1, purl 1. Total 20 stitches. We shorten this way in each front row until there are 6-8 loops left on the knitting needle. I have 7.

Close the loops and do the same procedure with the second half. To finish correctly, simply knit two stitches together, transferring the knitted one to the main needle.


From these lessons we can conclude that knitting is not that difficult. Knitting mittens requires basic knowledge and a little free time.
Knitted mittens with a pattern (diagrams and description)
Having learned to knit the simplest patterns, you can dilute them with beautiful patterns, giving free rein to your imagination. In the article “” you will find them in large quantities.
And now I suggest switching to more complex mittens with knitting needles (diagrams and descriptions will help you understand this difficult task).
How to knit beautiful mittens with braids for women
Mittens with braids, knitting patterns and descriptions for lovers of the classics.
The braid will be the main decoration. We chose a simple braid, but if you are not afraid of difficulties, you can choose a more complex and original option.
Yarn - acrylic (can be made from angora), approximately 70 g; stocking needles No. 3.5.

Elastic pattern: K2, P2.
Knitting a braid pattern: 8 loops cross to the left (leave 4 loops on the auxiliary needle before work, knit 4 and knit loops from the auxiliary needle).
Cross 8 loops to the right (leave 4 loops on the auxiliary needle while working, knit 4 and knit loops from the auxiliary needle).
Cast on 48 stitches and distribute them onto stocking needles, resulting in 12 stitches on each needle. Knit with a 3.5 cm elastic pattern (if the elastic is not enough for you, knit more than cm).
Then, we start knitting the main pattern. For the convenience of knitting the “braid” pattern, I transfer the loops from the 1st and 2nd knitting needles to one knitting needle. Those. I have the loops distributed over 3 knitting needles (not 4 knitting needles), on the first knitting needle there are 24 loops of the main pattern, and on the 2nd and 3rd knitting needles from the palm side there are 12 loops each.
So, the first row after the elastic begins with a knitting needle with 24 loops, we begin to knit the main pattern.
Rows 1-6: K1, P2, K8, P2, K8, P2, K1, knit stitches on 2 knitting needles from the palm side.
7th row: K1, P2, 8 loops cross to the left, P2, 8 loops cross to the right, P2, K1, loops on 2 knitting needles from the palm side we knit. Repeat rows 1-7 throughout the entire work.

At a height of 10 cm from the beginning of knitting (you don’t have to have 10 cm, everyone’s hands and fingers are different), we form a hole for the thumb. Let's start with the left mitten. On the knitting needle from the side of the palm (3rd knitting needle) we knit 4 knits, remove 6 sts on a pin, put 6 sts on the knitting needle (so that there are 12 left, as before), k2.
We knit the hole for the thumb of the right mitten symmetrically, i.e. on the second knitting needle from the palm side: knit 2, knit 6, slip onto a pin, and knit 6, knit 4 on the knitting needle.
Formation of the toe carried out after the little finger on the hand is closed.

For a rounded toe, knit two middle stitches together on each needle.
Decrease stitches in each row until only 1 stitch remains on the needles (4 in total). After this, tear off the thread of the ball and thread it into the needle. Use a needle to pick up all 4 stitches, pull them off and fasten them from the inside of the mitten.
After the two mittens are knitted, we begin knitting the thumb. To do this, remove 6 sts from a pin onto a knitting needle, cast on 6 sts on a parallel row and cast on 4 sts on two side rows. In total, we got 20 stitches, distribute them onto 4 knitting needles (5 stitches per knitting needle).

And we knit circular rows of faces. to the required finger length. We form the toe of the finger similarly to the formation of the toe of the mitten.
Knitting mittens for children
Children really love it when their mother creates, for example, beautiful foxes or bears with her own hands, which they can put on their hands and go play in the snow.
Knitted children's mittens with owls
There is nothing more interesting for a child than mittens with a pattern. He wears such things with great pleasure, so I propose to please the child with marvelous owls.

Materials and tools:
1 skein;
stocking needles No. 1.5;
additional knitting needle or special stitch remover;
yarn needle;
four beads;
thread and needle for sewing on beads.
The mittens are knitted in two threads.
So, we cast on 32 loops, distribute them onto 4 knitting needles (8 on each).
Rows 1 - 10: knit 1 rib. x 1 purl.
11th row: faces.
Row 12: knit; add 2 persons from the broaches. on every spoke
13 - 18 rows: faces.
Row 19: we begin to knit the “owl” on 12 loops of the third and fourth knitting needles. The first knitting needle is knitting; second knitting needle - faces; third needle - knit 4, purl 6; fourth needle - 6 purl, k4.
Row 20: same as row 19.

21 row: first knitting needle - knit.; second knitting needle - k2, slip 6 stitches onto a pin for the thumb hole, cast on 6 additional stitches, k2; third needle - k4, p2, k4; fourth needle - k4, p2, k4.
22, 23 rows: first knitting needle - knitting needle; second knitting needle - faces; third needle - k4, p2, k4; fourth needle - k4, p2, k4.
Row 24: first knitting needle - knit; second knitting needle - faces; third knitting needle - knit 4, purl 2, remove 2 loops for additional stitches. knitting needle at work, knit the next two knit stitches, then knit stitches. spoke - persons; fourth knitting needle - remove two loops for extra. knitting needle before work, knit the next two knits., then loops on extra. knitting needles, knit 2, knit 4.
25 - 31 rows: first knitting needle - knit, second knitting needle - knit, third knitting needle - knit 4, purl 2, knit 4; fourth needle - k4, p2, k4.
Row 32: same as row 24
33 - 35 rows: first knitting needle - knitting needle; second knitting needle - faces; third needle - k4, p2, k4; fourth needle - k4, p2, k4.
36th row: same as 24th and 32nd.
Row 37: first knitting needle - knit; second knitting needle - faces; third needle - k4, p2, k2, p2; fourth needle - p2, k2, p2, k4.
38 - 41 rows: first knitting needle - knitting; second knitting needle - faces; third needle - knit 4, purl 6; fourth needle - 6 purl, k4.
Row 39: we begin to decrease. First knitting needle - knit the first 2 stitches together. behind the back wall; second knitting needle - knit the last 2 knit stitches. behind the front wall; third needle - knit the first 2 stitches together. behind the back wall; fourth needle - knit the last 2 knit stitches. behind the front wall. Knit the remaining loops according to the pattern (knit and purl)

When there are only 8 loops left on the knitting needles, tighten them with a needle. For the thumb, transfer the 6 loops removed onto the pin to the knitting needle, and cast on 2+6+2 loops from the edges onto three knitting needles.

We knit 12 rows in a circle. Then we transfer all the loops to two knitting needles and begin to decrease: on each knitting needle we knit the first 2 loops together behind the back wall, the last 2 - behind the front wall. We knit the second mitten in exactly the same way - only we leave the hole for the thumb not on the second knitting needle, but on the first.

Sew on bead eyes and enjoy this wonderful new product for winter.
Ideas with bullfinches (embroidery)
Having simple mittens on hand, you can decorate them with original embroidery, which will look great in a children's set.

Video lessons from the best masters
YouTube today has become a real treasure trove where you can find a huge number of educational videos. For example, on Svetlana Bersanova’s blogs you can watch a video lesson for free. And there are quite a few such good authors. You can find a mentor to your liking and receive valuable knowledge absolutely free.
Original mice or white hedgehogs for kids
How to knit mitts
Warm openwork for girls (double mohair)
Interesting two-color minions for a boy 7-8 years old
Jacquard products (video tutorials)
Jacquard with a winter theme is a classic that will always be relevant, so I suggest moving on to the most complex options that require maximum time and attention to detail.
Original knitting with ornaments (Norwegian patterns)
For girls with deer
If you want to learn how to knit a complex but very original “deer” pattern, this lesson with a detailed description will help you.
Men's mittens with arans for little men
If you learn all the lessons we offer, you will be able to fantasize and create products of any complexity: women's gloves without fingers, with a folding top, with a false pattern, from thick yarn and embroidery. Good luck in your endeavors. Try, experiment and pamper your family with pleasant fagots.
Mittens evoke the warmest associations for every person. Comfortable, practical, beautiful and functional - all this is about mittens. Mittens are worn by children and adults, experiencing the most grateful feelings for this carefully warming winter wardrobe item.
Today there are many different models in stores, but the most pleasant sensations are given by things made with your own hands. Classic knitting of mittens is the easiest and fastest way to learn the intricacies of needlework.
Knitted items- it is always original and unique. In addition, you don’t have to spend a lot of money on beautiful DIY kits, and the process itself will bring a lot of pleasure.
A warm accessory with an exclusive pattern will become a luxurious highlight of your winter look, a useful gift for yourself, as well as for loved ones. We offer beginners in the art of knitting several detailed lessons and patterns with descriptions of how to create luxurious mittens with ornaments.
Knitting lessons
No matter how many couturiers try to replace mittens with gloves, knitted mittens still remain a trendy winter wardrobe item. Mittens are worn with pleasure by children, young girls and confident businesswomen, and the stronger half of humanity is no exception. Designers have recently increasingly included such an accessory in their collections, using leather, knitwear, wool or fur to create them.
The designer item is expensive, and the mittens hand made are appreciated for the original idea and priceless manual labor of a skilled craftswoman. Do you want to learn how to knit beautiful mittens with your own hands? We offer several simple and interesting lessons with step-by-step instructions for beginning needlewomen on knitting mittens with patterns. We will use the following abbreviations:
- P – loops;
- LP – facial loops;
- IP - purl loops.
Beginners are offered simple schemes with detailed descriptions. All models are original and universal in their own way.
 Even a novice needlewoman can knit simple but comfortable mittens
 Seamless mittens
A basic lesson on knitting mittens that even a beginner can handle. The peculiarity of this model is the absence of a characteristic seam. The product will require only 70 grams of wool, as well as five needles No. 3.
Before you begin the creative process, you need to determine the knitting density. The optimal indicator for this model is 1.7 loops in one centimeter.
Measure the circumference of your hand; the standard measurement for a woman’s hand is 20 centimeters. Work on 5 knitting needles, this is how the mittens will turn out seamless.
Step-by-step algorithm:
- We cast on loops at the rate of 20 * 1.7 = 34 loops. All 34P are distributed over four knitting needles. For ease of calculations and multiplicity, dial 36 P, which are distributed in nine for each of the 4 knitting needles.
- Conditionally number each knitting needle. Knit, closing the circle more tightly, 4p of the 1st knitting needle together with the end of the yarn that remained on the 4th knitting needle from the set of loops.
- We start knitting with the right mitten. On the 1st and 2nd knitting needles we will count the loops of the lower part of the mitten, on the 3rd and 4th - on the right. Tie with an elastic pattern 1LP*1IP, the cuff height is approximately 7 cm.
- Knit the warp, moving in a circle, row by row, to the base of the thumb. The distance is 5-7 cm depending on the size. The finger is knitted on the 1st needle for the right mitten, on the 2nd needle for the left.
- Having reached the base, begin to decrease the loops at the toe of the mitten. On the 1st and 3rd knitting needles, the first 2P are knitted together with 1LP behind the back walls with a 1P turn. On the 2nd and 4th needles we knit in a mirror manner, that is, behind the front walls. Decrease until half the number of stitches remains.
- Tie the thumb hole. Insert two knitting needles so that the bottom one is 7P and the top 6P. Distribute them onto the knitting needles and knit in the round. Having reached the nail area, decrease the loops, as in the toe. When there are 1p left on the knitting needles, pull them together and fasten them from the wrong side.
- When the right mitten is ready, we knit the left pair in the same way, but mirrored.
Master class on knitting mittens in a seamless way (part 1)
Master class on knitting mittens in a seamless way (part 2)
Master class on knitting mittens in a seamless way (part 3)
Long mittens with two knitting needles
A stylish model with an elongated cuff will not only warm you up, but will also become an original detail of the winter beauty’s image. These mittens are knitted on two knitting needles.
There are two ways: the first - two separate parts are knitted and then sewn together, the second - continuous knitting with one invisible seam.
We suggest knitting the mittens using the second method. The process is more labor-intensive, but the result will be visually more accurate. To work you will need a skein of yarn, knitting needles, a pin, a hook, a needle, and a tailor's yardstick. Instructions:
- Start with the right piece. Take measurements and determine the knitting density in 1 centimeter. For a standard size it turns out 40P-4P=36P, plus 2 edge loops.
- Tie the cuff with an elastic band according to the 2LP*2IP principle. There are approximately ten rows for a length of 15 cm.
- For the main one, take knitting needles of a smaller diameter. Add 4p evenly, knit to the base of the thumb.
 In addition to the original appearance, the advantage of these mittens is that they warm your hands perfectly.
 Many beginners mistakenly leave room for their thumb on the side. In fact, the pipe is knitted closer to the palm, so your hands will be warmer and more comfortable.
- We knit 2 loops from the edge, and then remove them with a pin. For the finger, take 6P, knit them, remove them with a pin. 6P of the thumb will remain on the working knitting needle. Knit in height, multiply the length of the finger by 2, then enter the loops from the pin into the work.
- Tie to the little toe, move to the toe. To do this, you need to divide all the loops into 2, remove one part with a pin. We begin to shorten and knit according to the principle “edge, 1 loop, then 2 loops together.” Reduce until there are 6-8 stitches left on the needle.
- We close the remaining loops and work the other side in the same way. When the toe is finished, carefully sew up the hole at the base of the mitten.
Knit the left mitten similarly to the right one, in a mirror image. The master class will certainly appeal to beginners, because knitting or crocheting mittens is a fascinating creative process.
Master class on knitting long mittens (part 1)
Master class on knitting long mittens (part 2)
Master class on knitting long mittens (part 3)
Mittens with a pattern for children and adults
Mittens with a pattern are the next level for beginner craftswomen. The ornament is an original detail that turns an ordinary winter accessory into a designer item.
To make it easier for needlewomen to implement a creative idea, there are many diagrams with detailed descriptions. We offer an interesting tutorial on how to create stylish mittens with a classic pigtail pattern.
To work you will need 70 g of soft yarn, you can take angora or acrylic, as well as stocking needles. Don't forget to take the necessary hand measurements!
 Original knitted mittens
 Work algorithm:
- We start, as usual, with the right mitten. Knit a standard rib knit 2*p 2. Cast on 48 stitches, distribute equally onto each of the 4 needles and knit.
- Let's move on to the braid pattern.
The basic principle of creating a three-dimensional braid ornament: 8 loops cross to the left. To do this, 4 loops remain on the auxiliary needle, and the other 4 loops. knitted with an auxiliary knitting needle.
- From rows 1 to 6, knit according to the formula 1LP, 2IP, 8LP, 2IP, 8LP, 2IP, 1LP. Knit the loops on two knitting needles from the palm side.
- We knit the seventh row like this: 1LP, 2IP, 8P cross to the left, then 2IP, 8P cross to the right, 2 IP, 1LP. Knit the stitches on two needles from the palm side, repeat rows 1 to 7.
- Leave a hole for the thumb. To tie it, 2 persons. Slip 6 loops onto a pin, cast on 6 stitches, knit 4 stitches.
- We form the toe. To do this, we decrease the loops by knitting two loops together on each knitting needle, rounding the mitten towards the base. Carefully sew up the small hole in the thumb and toe with the same yarn.
Knitting Bella's mittens from the movie Twilight
Warm patterned mittens can be knitted for a child. For babies, choose soft, warm yarn so that it does not “bite” and cause allergies. Children especially like mittens knitted by the caring hands of their mother or grandmother. To turn a simple accessory into an interesting fun, decorate the mittens with beads, beads or embroidery.
Any of the master classes offered to beginning needlewomen is interesting to perform. Knit with pleasure, wear hand made items, it is always relevant, original, warm and beautiful. Finally, we offer a few more master classes on knitting interesting mittens
Owl pattern knitted
Another option for knitting mittens with owls


