How to get a voluminous shape:
Because I like big things, so my figurine will not be small. An exact copy is not an end in itself.
1 - find an image of the figurine itself. Enlarge the picture, print it on a printer, cut out the pattern.
2 - trace the pattern on a sheet of cardboard.
3 - cut with a margin in order to bend the edges left and right. Make slits on the parts.
4 - assemble the figure. It is already clear that it will not be a flat thing.
5 - fold the edges. Strips of thinner cardboard will be attached to them.
6 - interlace randomly with strips of thin cardboard.
7 - take burlap (cotton matting), cut into pieces; melt wood glue.
8 - cover the figure with burlap overlapping it. The top must be glued with simple rags such as calico. If this is not done, after the glue dries, we will get hundreds of “needles” from the wrapped and hardened burlap threads. Leave the workpiece to dry.
9 - place the dry workpiece on a stand so that you can work from all sides at once (just screw it from below with self-tapping screws to the board).
It is impossible to make such a large workpiece with PVA glue; the structure will be too flimsy.
10 - apply a rough layer of papier-mâché. The figure no longer seems so angular and crooked. It already looks like a sculpture.


Now you need to hang small parts on the blank (blind it from papier-mâché and glue it) so that it looks like Doga.

The stand was made from boards.
I bent the decor for the end from a polyurethane baguette - if you carefully heat the polyurethane with a hairdryer, it bends.

To make the sculpture practical and not just a dust collector, I cut holes in it and mounted a clock.

Painting the sculpture
The first paint is the color of green clay (olive).
We don’t paint it with the second color, but simply use the tip of a wide flute to give it a brick tone.
Using a smaller flute with fine bristles, almost dry, you need to go over the bulges with white.

And let's just go a little red around the very edges.
Photo on the right - the figure is half covered with varnish; You can see how the color changed under the varnish and “stretched out.”
Matte oil varnish.
Tips: For any final finish of a papier-mâché piece, an oil varnish is desirable, either matte or glossy, depending on whether you want your work to be shiny or not. Any colors. I use what I have on hand: watercolor, gouache, tempera. Maybe butter.
Usually the finished work is painted with a white water emulsion (primed), a thick base tone is applied to it and rubbed with a damp cloth.
You can make a matte one from purchased cheap glossy varnish on your own: take ordinary laundry soap (ours is smelly), grind it finely, dissolve it with kerosene and pour it into the glossy varnish (not to be confused with NC!).

In the photo, the varnish is almost dry and you can see that it does not shine. Pleasant color, like after heavy waxing. Looks like terracotta.
VKontakte
Crafts made from papier-mâché are widely popular. It's a success of different ages and adults. This is not surprising.
From papier-mâché you can make simple ones for the holiday or, but you can also create real masterpieces that you won’t be ashamed of.
Features of the material
Papier-mâché is a mixture of paper pulp and adhesive. Any crushed one can serve as a base (filler). It is considered one of the most technologically advanced materials, because... it dissolves well in water, forming a homogeneous mass.
 Papier-mâché is a mixture of paper pulp and adhesive
 The binding agent is the adhesive composition. The most common options are:
- Regular office glue or . It is most suitable for simple crafts performed by children of primary preschool age.
- Wallpaper glue. Easy to prepare, which ensures wide application.
- Paste. You can prepare it yourself by dissolving starch in boiling water while stirring.
To impart certain properties to the mixture, other components are additionally introduced. The plasticity of the mass is given by vegetable oil and. To give strength to the crafts after hardening, gypsum, alabaster or putty is added to the raw material.
Attention! Each master has his own secrets for preparing papier-mâché and adjusts the recipe experimentally in his own way.
The technology for making papier-mâché crafts includes several stages:
- Preparation of starting material.
- Forming the foundation. Several options can be used. - the mass is laid out on a flat surface in the form. Thin-walled - a complex shape is covered with a thick mixture, and the mass repeats all the depressions and bulges. A typical example is masks. Volumetric figures- they are formed on a frame or by analogy with plasticine. So you can make and.
- Hardening of the craft in natural conditions. The process can take several days, during which the product must be left at rest.
- Coloring. After the figurine has completely hardened, its final painting is carried out, with all the details drawn. The best option is . Volumetric coloring is achieved by adding the required dye (pigments, gouache) to the prepared raw materials. Often the figures are coated with varnish (colorless or with a tinting effect).
Papier-mâché is a fairly pliable material. Depending on the consistency, it can fill and repeat the most.
Idea! From it you can make decorative dishes, vases, boxes, figurines, various masks and decorative elements in different styles with your own hands. The master's imagination is not limited.
 Papier-mâché is a fairly pliable material. Depending on the consistency, it can fill and repeat the most complex shapes
 Where to start
The inflated ball is pasted over with paper pieces, and after the workpiece has hardened, it is pierced and carefully removed out. After coloring, you get a funny Kolobok.
 One more simple craft– “Kolobok”
 Crafts for the New Year
New Year's crafts made from papier-mâché can replace Christmas decorations and decorate the room. can be made using the machining technique.
For such toys, you can take any base - rubber, plastic balls. Paper pieces are glued on top, painted and varnished. The surface of papier-mâché can be decorated with sparkles or small colorful pictures.
 New Year's crafts made from papier-mâché can replace Christmas tree decorations and decorate the room
 To make three-dimensional figurines-decorations, a mixture is prepared. It is best to use toilet paper. A fairly plastic mass can be obtained by dissolving 1 roll of paper in 700-750 ml of water.
After obtaining a homogeneous mass, squeeze out the water and add a binder (PVA glue, wallpaper glue or paste). The mixture should resemble thick sour cream in consistency. You can make figures using children's sand molds. The mass is poured into them, and after hardening it is carefully removed and painted.
 Beautiful toys can be made using the machining technique
 Features of making dolls
There are many options for making a papier-mâché doll, from very simple children's crafts to original artistic creations.
The mass is prepared on the basis of loose paper - toilet paper, napkins, egg containers, etc. PVA glue, wallpaper glue or paste is used as an adhesive composition. The consistency of the mass should correspond to soft plasticine.
 There are many options for how to make a papier-mâché doll, from very simple children's crafts to original artistic creations.
 A simple doll is made in the following order:
- A mold for the head is molded from plasticine. It is then covered with a thin layer of paper pulp. After it hardens, you need to make an incision through which to remove the plasticine. The final thickness of the workpiece is formed by adding the required amount of mass. The thickness should be 5-6 mm. The eye sockets, nose, mouth, and ears are formed.
- A wire frame is assembled for the body. The prepared mass is applied to it with the simultaneous formation of the neck, arms and legs.
- Connecting the body to the head using PVA glue.
- The doll's outfit is sewn from fabric of the desired color.
- The entire doll is painted with white acrylic paint. You can add a slight peach tint. Facial features are drawn.
- The hair is made from floss or wool threads. They are glued to the head and a hairstyle is formed.
- Clothes are put on and secured.
You can also make a complex doll with movable elements from papier-mâché (jointed doll). This craft can be done by an experienced craftsman.
It is assembled according to pre-prepared drawings. The composition includes the following ingredients: toilet paper, PVA glue, gypsum-based putty, liquid detergent.
 You can also make a complex doll with movable elements from papier-mâché (jointed doll)
 The mass is prepared as follows. The paper is dissolved in hot water (55-65 degrees) for 5-6 hours; it is better to use a mixer for mixing. After obtaining a homogeneous mass, the water is squeezed out through gauze, glue and detergent are added (1 tbsp per 1 liter of mixture). The last thing to add to the mixture is putty (120-140 g/l).
All elements of the doll are molded from papier-mâché separately. To movably connect them together, a strong, tight elastic band or screw connection is used. In the latter case, a screw is inserted into one of the parts, and a nut is inserted into the adjacent element. The joint surfaces must be well machined to ensure a tight fit.
Steampunk technique
Recently, steampunk figures have come into fashion. In essence, this is a fantastic allegory with the transfer of ancient and outlandish elements.
In such figures, originality and irony are especially valued. The jumble of constituent elements may be the most unexpected, but they should create a unified impression.
 Steampunk figurines have come into fashion lately.
 As an example of a steampunk craft, consider making a fantastic Fish.
The materials used are papier-mâché, foam plastic panel, cardboard, hardboard sheets, leatherette, nails for upholstery, various small gears, and all kinds of spare parts. household appliances.
 As an example of a steampunk craft, consider making a fantastic Fish
 The base of the Fish is made of a foam plastic panel 1-1.5 cm thick. One longitudinal and several transverse corrugated cardboard ribs are placed on it. The entire base is covered with papier-mâché with the consistency of soft plasticine.
The fins are cut out of hardboard using a jigsaw according to a cardboard pattern and attached to papier-mâché. The scales can be formed from curtain rings and leatherette. Various mechanical parts are installed on top. Here you need to show your imagination, because... no specific order is provided.
 It is important that the fish looks like a mechanized monster
 It is important that the fish looks like a mechanized monster. Seashells are hung for decoration. You can sprinkle the figure with sand. Then the workpiece is primed to create a brown background, and some details are highlighted with acrylic paint golden color. Finally, the Fish is coated with varnish in 3-4 layers. The length of this craft is 85-100 cm.
Making masks
Some of the most impressive papier-mâché crafts are African masks. Such handmade creations can decorate the interior of any apartment. Their size is 35-37 cm in height, 21-24 cm in width.
The mass is prepared on the basis toilet paper. One mask will require 2 rolls. The paper is dissolved in hot water, and then mixed with PVA glue (420-440 g), and you need to take thick glue for construction work. To add plasticity, linseed oil (3 tbsp) is added. When mixing the mixture, it is advisable to use a mixer.
 Some of the most impressive papier-mâché crafts are masks.
 A spherical PVC food tray works well for the shape. Its configuration resembles a mask. A layer of pape-mâché is applied to this form. The main details are laid out separately - nose, eyebrows, lips. Eyes are formed.
Smoothing is provided by the fingers, as well as a stack and a knife. It will take 12-14 days for the craft to completely harden. Then the mask is puttyed with a thin layer and sanded after the putty has dried. The surface must be perfectly smooth.
 Such handmade creations can decorate the interior of any apartment.
 The mask is dyed in a special mode. First, a primer is applied, and then the entire front surface is painted with white acrylic paint. The next step is to apply black paint on top.
After drying, pearl enamel is applied to the desired places using a sponge. The final operation is coating with acrylic varnish. You can use glossy or matte varnish. The photo shows examples of crafts.
 The photo shows examples of crafts.
 In addition to the indicated colors, African masks can be painted in other colors. Elements of red, yellow and blue are often used. The craft will also be decorated with special details - piercings.
Papier-mâché is rightly considered an excellent material for various crafts. Even small children can make simple products. For teenagers and adults, such creativity develops into a hobby. Their creations can decorate the interior of any apartment.
The papier-mâché technique is one of the simplest and most inexpensive ways to create various crafts for the home. The advantage of papier-mâché is not only the ease of production, which does not cause difficulties even for children, the greater strength of the products, but also a wide range of finishing options for crafts - from varnishing to painting.
Papier-mâché - how to make molded figures
Using this technique you can make small figurines, nesting dolls or rattles. We will need:
- any paper - newspaper, office or toilet paper,
- PVA glue,
- flour,
- water,
- bowl,
- mixer,
- sieve,
- a primer that is applied before painting - latex or water based,
- tassels,
- paints – tempera, alkyd, oil or gouache with the addition of PVA,
- clear varnish,
- abrasive belt for sanding.
Preparing the paste. To do this, mix flour with water in a ratio of 1 to 3, stir thoroughly, breaking up all lumps, place the mixture in a saucepan and bring to a boil over heat, stirring continuously. After cooling, the paste is ready for use. You can store it in the refrigerator under plastic wrap.
To create a working mass, finely chop or tear the paper. Place it in a container in small portions, fill it with water, and grind it with a mixer until smooth. If there is no mixer, fill the paper with water (hot), wait about 3 hours, knead with your hands. Strain the mixture through a sieve, removing excess water. Next, add a mixture of PVA glue and paste to the paper pulp, knead until the mass begins to stick to your hands.

We form figures. Every 1-2 layers must dry completely before applying the next one. Products need to be dried on outdoors, since too high temperatures can lead to cracking of the figures. After completing the work, sand the product and apply a primer. After it dries, paint the figure. We complete the treatment with a layer of varnish.

Papier-mâché - how to make carnival masks using the classical technique
We will need:
- base mask,
- PVA glue and glue bowl,
- tassel,
- newspapers, paper towels, toilet or office paper,
- primer and paints,
- abrasive tape,
- cling film.
We prepare the paper by cutting or tearing it into small pieces of different sizes. It is convenient to use several types of paper to distinguish between the layers applied to the base. Then we pour glue into a container, apply it to the mask area with a brush, apply paper, and coat it with glue on top. If the product needs to be separated from the base, then cover the base with cling film before applying the first layer. We repeat the process until the entire mask is covered with a paper layer, while the next piece of paper should overlap the previous one. Next, apply the required number of layers.

To level small areas, shred toilet paper, put it in a container and fill it with glue. When the mass is completely soaked, apply the mixture with your hands to the desired areas of the mass. After completing the process, leave the mask to dry. If defects are visible on the dried mask, the process can be repeated.
Separate the papier-mâché from the base. We sand the product with an abrasive tape and apply a primer. Then we paint the mask in the selected colors.

Papier-mâché - how to make figures of various animals
We will need:
- PVA glue,
- Titan glue,
- plastic shells from chocolate eggs,
- wire,
- awl,
- skewers,
- toilet paper or napkins,
- sandpaper,
- tassels,
- peas,
- acrylic paints.
We process the plastic with sandpaper to ensure better adhesion to papier-mâché. We make holes with an awl, insert skewers-legs and necks, and form tails and ears from wire. We put plastic heads on the blanks and fix everything with Titanium glue. Apply PVA glue to the figures and make 3-4 layers of napkins in classical technique. After drying, add layers to necessary places, dry again.

Then apply a generous layer of PVA, wait for it to dry, and repeat the process. Let's start painting. Using a brush, apply a layer of acrylic paint of the selected color, after drying, apply a second layer. We paint each figure with white acrylic and a dry brush and dry it. Then we apply a finishing coat using a dry brush and gold, pearl or pearl acrylic. Glue pea eyes on the animals (they can be pre-painted). Draw the pupil.

Papier-mâché - how to make piranha fish
We will need:
- PVA glue,
- newspapers,
- toothpicks,
- heat gun,
- acrylic paints,
- tassels,
- bandage,
- marbles aquarium stones,
- threads,
- awl,
- scissors.
From dry newspapers we make a drop-shaped base for the fish, wrap it with threads for strength, then cover it with wet newspapers. After the newspapers have dried, we begin to apply the next layers of PVA glue using the classical technique. When the workpiece is completely dry, cut out the fish’s mouth and take out the dry newspapers. We paint the insides of the fish with orange acrylic.

We make eyes from stones and lay out two rows of side scales, fixing them with a glue gun. We decorate the joints with papier-mâché. Using toothpicks, an awl and a glue gun, we make fins and a tail. We glue a bandage on them, and after the glue dries, 1-2 layers of napkins. We glue the teeth using toothpicks and paint them with white acrylic. We paint the fish first with black and then with gold acrylic.

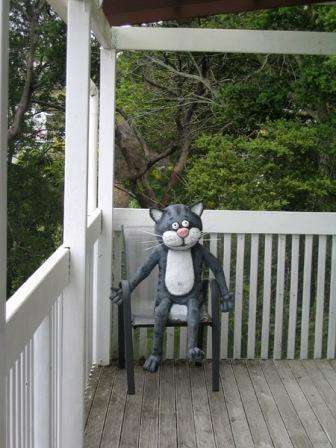
Do you want your dacha to be unique and inimitable? landscape design? Then beautiful garden crafts that you can make with your own hands at minimal cost will help you. - This is one of the most popular techniques that allows you to make figures of any size from newspapers or toilet paper. Find out with the help of a master class, how to make crafts from papier-mâché for the garden.
Master class: garden figure of a cat made of papier-mâché
First you need to prepare the following materials:
- paste;
- paper or newspapers;
- scissors and brushes;
- cardboard;
- identical plastic bottle caps;
- masking tape;
- cardboard;
- putty;
- scotch;
- paints;
- plastic bottles.
To make the cat's head, you need to inflate a balloon and spread cream on it. After this, tear the newspaper into small pieces and begin to cover the ball, coating it with PVA paste. Try to apply layers gradually so that there are no unevenness and the head turns out beautiful.

After this, you will need to leave your head for several days to dry. Balloon it will be possible to pierce and pull out, and then proceed to further design of the head. To do this, you will need two identical bottle caps, which will need to be secured with masking tape. These will be the eyes of your cat made of papier-mâché for the garden. You will need to make another spout from a large lid or foil.

Now cut out ears from thick cardboard and attach them to the cat’s head. Using several layers of paper, try to shape the cheeks. Do not rush, because all the parts must dry well so that later they can be processed efficiently.

In order to make the body of a cat, you will need a base, for example, a large plastic bottle. You can make a frame from plasticine, and then cover it using the papier-mâché technique. When the frame is dry, you will need to cut it to separate it from the plasticine, and then glue it together.

Connect the head and body together and coat with putty to hide the letters on the newspapers. While the papier-mâché craft is drying, start making the arms and legs. To do this, you can use newspapers that are rolled into rolls in several layers.


Toilet paper papier-mâché recipes
Recently, needlewomen have been using toilet paper as a material for papier-mâché. The thing is that even small details can be sculpted from the resulting mixture, so try

- Tear two rolls of toilet paper and place in a small container.
- After this, fill the paper with water until it is completely covered.
- Place a saucepan with water and paper on the fire and stir constantly.
- You should have a homogeneous mass, which should then be drained in a colander.
- Squeeze the paper well from the water and beat the mixture with a blender until smooth.
- Place the mixture on polyethylene and let it dry for half an hour.
- Then you need to pour the papier-mâché mixture into the container again and add PVA to it.
- Mix the mixture with glue well and start making garden crafts with your own hands.
We offer several photo ideas for papier-mâché made from toilet paper.
See what papier-mâché dolls you can make using toilet paper. From the same material you will make a piggy bank, toys, and New Year's crafts.
How to make a papier-mâché piggy bank with your own hands?
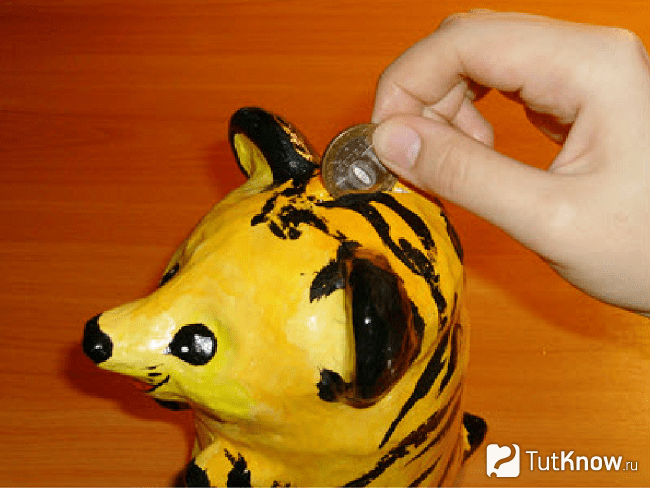
You will make such a funny tiger cub if you take:
- two sheets of white paper;
- newspapers;
- plasticine;
- small polyurethane jar;
- PVA glue;
- scissors;
- paste;
- gouache;
- stationery knife;
- thin and thick brush;
- acrylic pistachio varnish.

Prepare the paste. To do this, take a glass of cold water, pour it into the pan, pour 2 tsp here. starch, stir well. Place the container on the fire, stirring frequently, bring the liquid to a boil, and remove from the stove. When the paste has cooled, it is ready for use.
Remove the lid from the jar, turn the container over, and place it on the table. Covering the jar with plasticine, immediately form the ears, eyes, paws, and facial features of the tiger cub. Here's how to make a piggy bank next.

Tear the newspapers into small pieces and start covering the workpiece with them. Attach the first layer with water. The remaining 10 layers need to be fixed by smearing each piece of newspaper with paste.

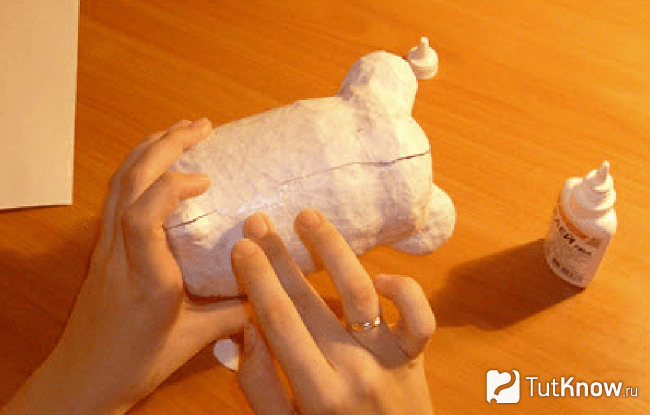
Leave the workpiece overnight to dry. In the morning, cover it with pieces of white paper, which must be attached using PVA glue, which will give the product strength.

Let the toy dry completely, then cut it into two halves with a utility knife.
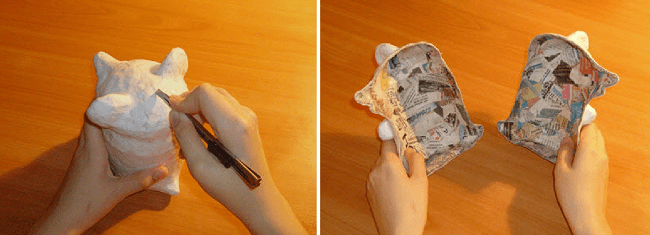
Remove these parts from the jar, connect them again, gluing them at the cut site with white pieces of paper greased with PVA.
At the top, use a stationery knife to make a cut of such a size that you can drop coins of the desired denomination into the piggy bank through this hole.

Now go over the outer surface of the piece with white gouache to prime it. When it dries, paint the product in the desired color.

Here's how to make a piggy bank from paper and newspapers. If you want to see how to make a funny pig, which is also designed for storing and multiplying small items, then check out the second master class.
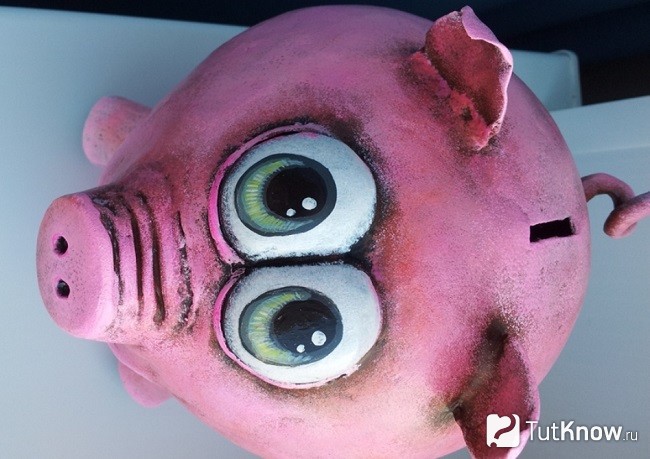
This is how touching and at the same time funny the pig will turn out to be. To do it, use:
- inflatable ball;
- toilet paper;
- acrylic paints;
- construction PVA;
- foil;
- newspapers;
- toothpicks;
- acrylic putty.
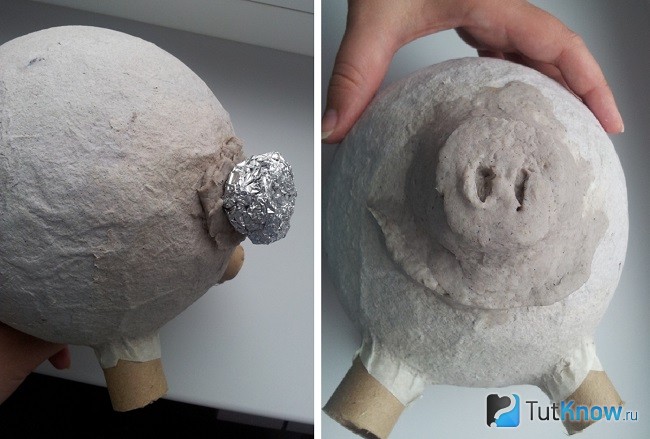
You can first moisten pieces of newspaper in water, then dip them in PVA, shaping the surface of the ball, and glue torn pieces of paper here.
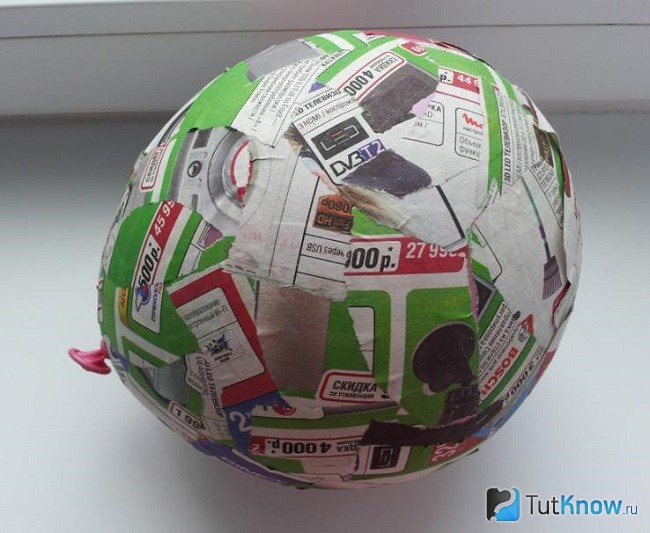
We make a mass for papier mache; for this, quite large pieces are torn off from toilet paper. Place them in a container to which you need to add PVA. After this, all that remains is to mix the contents well. Now, using a sponge or hands wearing rubber gloves, apply this mixture to the ball covered with newspapers.
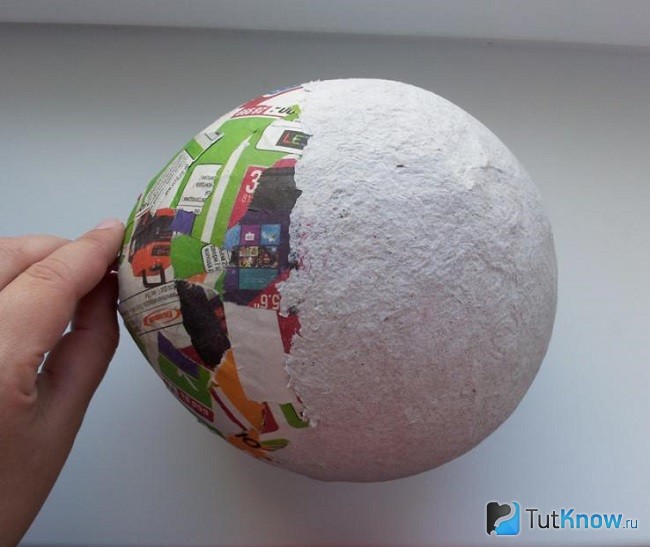
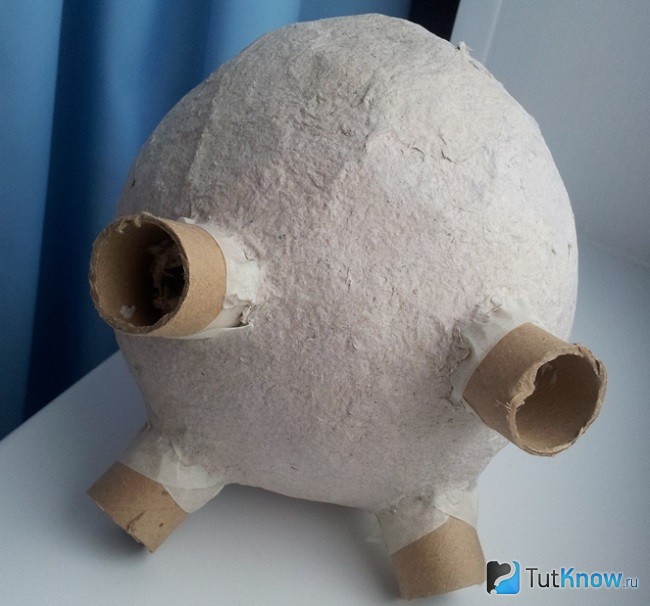
When it dries well, make a puncture with a needle. Take out the burst ball through the bottom hole. Cover the gap with two strips of masking tape, which are attached in a crisscross pattern. Legs for a piggy bank can be made from a reel left over from foil or stretch film. These cardboard tubes need to be cut into 4 parts with a knife. If you want, you can use toilet paper rolls.
These blanks need to be attached to the base with masking tape, and papier-mâché paste should also be applied on top.
Make a patch from a piece of foil, attaching it with toothpicks and tape. Cover it with toilet paper soaked in glue and form a nose.
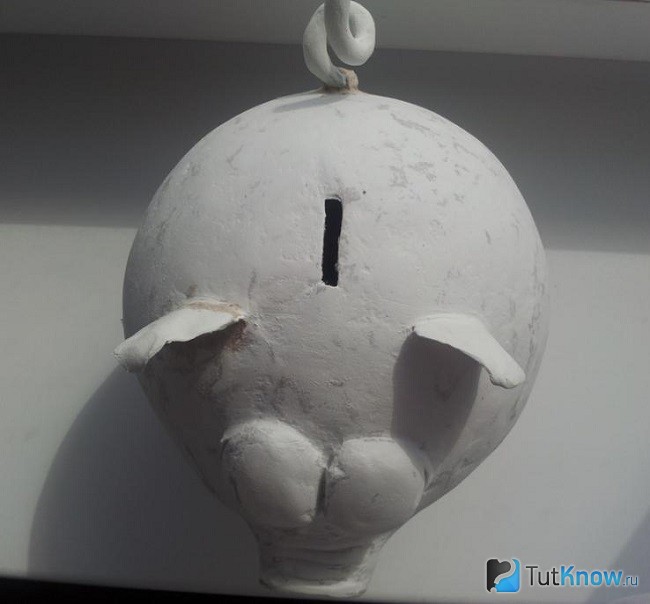
You will need to sculpt eyes from it and attach them in place with glue. Ears can be made from papier-mâché or clay

Now you need to leave the piggy bank so that the papier-mâché dries well. Then we sand the workpiece with sandpaper, after which we apply acrylic putty to it. We wait for it to dry, then wipe the piggy bank with a damp cloth to level the product. Apply putty in several layers until the surface is smooth.

Use a utility knife to make a hole for coins. We attach a tail, which must be made in advance from wire and papier-mâché.
We begin to paint the product. First, apply any dark paint, then, using a sponge, cover it with red.

Next comes pink, followed by a mixture of white and pink. The next layer is white paint, but you only need a little bit of it.
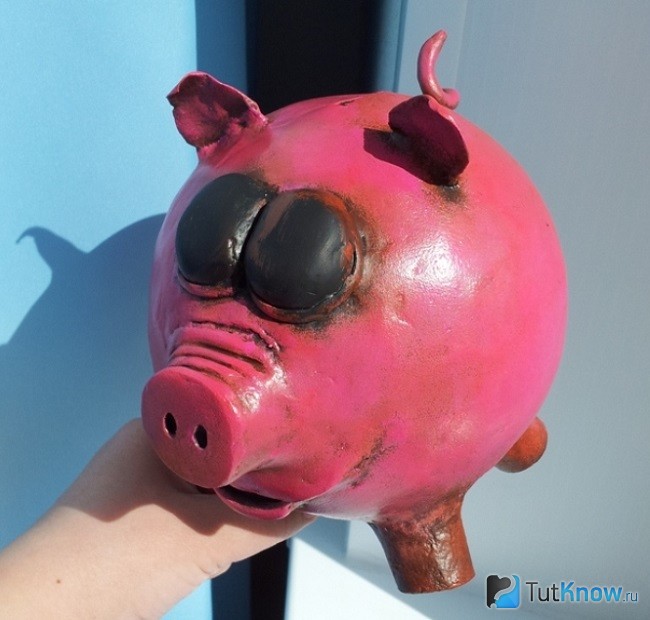
All that remains is to paint the eyes, after which the papier-mâché piggy bank is ready.
How to make paper modeling paste with your own hands?
The base is not always simply covered with torn newspapers; there are very interesting recipes for preparing papier mache paste. Meet one of them.
From such a mass you can make a figurine of an animal, for example, a bear. Take:
- 2 rolls of the cheapest gray toilet paper;
- 3 tbsp. l. linseed oil;
- 500 ml of universal or construction PVA glue of liquid consistency;
- 1.5 liters of water;
- gauze;
- large bowls;
- medium and fine sandpaper;
- colander;
- PVA glue.
Now you need to squeeze out the paper. To do this, place gauze folded in several layers on a colander, put a little mass here, some of the water will drain. Remove the rest by lifting the edges of the gauze and squeezing out the paper. Also squeeze out the rest, but do not dry it out, leave a little water.
Place all this paper in a large bowl, then add construction adhesive. Stir the mass. This will be easier to do if you mix the paper and glue in small portions.
Add flaxseed oil and stir. It will allow the mass to become more plastic. Now you can sculpt from papier-mâché or put this mass into molds to make toy parts. You will glue using PVA, which is called “Moment joiner”.
When the papier-mâché blanks are completely dry within a few days, they will need to be sanded with medium, then fine sandpaper.

The finished product is primed and then painted.
Master class: DIY Baba Yaga's hut
It can also be made from a mass whose recipe you just learned or use another one. This is how the house of this fairy-tale character will turn out.

But for this you need to work hard, but first prepare:
- a bottle of suitable size and shape;
- napkins;
- stack;
- PVA glue;
- ruler;
- pencil;
- mass for papier-mâché.

Starting from the bottom, papier-mâché paste is glued in strips. Decorate both sides at once, forming circles in the form of log cuts.

Using a stack, make stripes on doors and logs so that they convey the texture of wood.

Make smaller details of the door.

Let the house dry for 24 hours.
Make a window and shutters from papier-mâché mixture. Using a stack, decorate them with carvings. We begin to make the attic, in the photo it is pink.

Such elements need to be made above the window and above the door, then we design the roof.

Having made a row on one side and the other, leave it to dry, only after that make another tier.

Then complete the third row and pipe.

Use a stack to create a brick pattern here, then give these elements a roundness.

There will be another row at the top of the pipe. Then we decorate the wall with fly agarics from polymer clay.

Leave the house to dry completely. After that you need to paint it.

Baba Yaga's hut is ready.
DIY papier-mâché dolls
I can’t even believe that such wonderful works of art can be created from toilet paper.

To make such a Snow Maiden, take:
- an empty glass bottle in the shape of a trapezoid;
- copper wire;
- pliers;
- papier mache mass made from toilet paper;
- rubber glue;
- polymer clay;
- cotton wool;
- elastic bandage or well-stretchable fabric;
- scissors;
- paints;
- fabric for clothing;
- satin ribbon for hair;
- rhinestones for decoration.

Cut a piece of wire with pliers and wrap it around the neck to make the arms of a papier-mâché doll.

Moisten the elastic bandage with rubber glue and wrap it around the workpiece.

Now grease this bandage on top with PVA glue, attach papier-mâché here, forming the chest and back of the doll.

Make a head for her from the same mass.
To use less papier-mâché, you can first wrap the top wire with foil, then cover it with this mass, forming facial features and ears.
Leave the workpiece to dry completely, then sand it and apply putty. After it dries, it also needs to be treated with sandpaper.

To make hands, moisten cotton wool with an aqueous solution of PVA glue and apply it to the wire. Wrap with an elastic bandage or strip of fabric soaked in glue. Make brushes from polymer clay. Paint the doll using flesh color, mark the eyes, eyebrows, lips with appropriate shades.

Sew a petticoat and a dress for the doll from cardboard. Unraveling the satin ribbon brown, you will get such luxurious shiny hair. It will take a lot of time to make such a papier-mâché doll, but the materials will cost little, and what a luxurious result awaits you!

If you want to get acquainted with another example, then watch the second master class in this section.

You will get such a wonderful doll on a horse. To make this duet you will need:
- toilet paper;
- wire;
- cardboard;
- foam;
- strong thick thread;
- newspapers;
- foil;
- acrylic paints;
- foam ball.

Give the doll the desired shape by covering it with papier-mâché.

Let's make a horse. Bend the wire as in the photo and wrap it with foil.

Coat this blank with papier-mâché mixture.

When it is thoroughly dry, stick two pieces of wire into it to make the legs of the animal.

Cover the top of the piece with damp papier-mâché. Let the horse dry thoroughly. Now we need to add volume to both blanks; for this we also use papier mache, including to make the ears and nose of the prince. We make the horse’s ears from cardboard, cutting out parts of the appropriate shape. Sand the workpieces.

Trim the excess wire on the animal's legs, add a mane, tail, and muscles to the prince. Cut a strip with zigzag edges from cardboard, cover it with newspapers, and roll it into a crown. Cover with papier-mâché.

After finishing with sandpaper, the doll will look like this.

Glue on the crown using papier-mâché. We use the same mass to connect two heroes.

For the platform, a piece of foam plastic is used, which must be covered with newspapers.

Cut out the wheels from cardboard using coins as a template. Also cover them with newspapers and papier mache.

Apply the same mixture on top in 4 places of the cart to attach the horse.

Sand the workpieces, then paint them.
Let's create them using the same papier-mâché technique. If you want these funny hedgehogs to be on your Christmas tree, then proceed to creative work right now.

To create them, you will also need materials that do not need to be purchased - the savings are obvious. Take:
- two toilet paper rolls;
- cones;
- papier mache mass;
- cotton pads;
- paints;
- plasticine;
- Titan glue;
- two wooden skewers;
- brush;
- sparkles.

Disassemble the cones into scales, glue them on one side of the roll, as well as on the sides. Form rows starting from the bottom, placing the elements of subsequent rows in checkerboard pattern. Use Titan glue for this.

At the beginning of the article, you read how to make papier mache paste from toilet paper. You can use other similar materials, such as paper towels. In this master class, yellow napkins were used for this purpose; their color does not matter. Form the body and nose of a hedgehog from this mass.

Let it dry, make the front legs, attach them to the tummy, using the same mass. Here's what interesting crafts on New Year 2017 is working out. But for now we need to let our hedgehogs dry well, then cover the arms and tummy with beige, and then brown. We paint the animal spines in the reverse order - first we use a brown tone, then beige or white. Then the hedgehog’s coat will look like it’s dusted with snow.

Make eyes, eyebrows, mouth, nose out of plasticine, sculpt a mushroom, attach it between the animal’s arms.

If you want, you can make lower legs for the animal from plasticine or plastic, placing them on the ends of the laces, the middle of which is threaded through the upper hole. You can attach a bell so that when the hedgehog moves, it makes interesting sounds.

These are the most wonderful and interesting crafts you can make for the New Year.

Make them with your children. If it’s difficult for the kids to do this, then tell them interesting idea creating papier-mâché cakes that they will be happy to bring to life. Let the child make these as a New Year's treat for his dolls and toys.
To do this, place next to it:
- foil;
- cardboard;
- two bowls;
- not a food spoon;
- newspapers;
- paper towels or a cloth to dry your hands.
Cover the table with newspapers in advance and cover it with plastic wrap. Then the child will not stain the work surface.
Let him tear or cut the newspapers into small pieces and put them in a separate container. In the other you need to pour the paste. It is prepared like this: pour a glass of water into a saucepan, add 2 tsp. flour or starch, mix. Place on the fire and bring to a vigorous boil while stirring vigorously. Let the paste cool and pour it into a bowl.
Let your child roll the foil into balls.

You need to make a box from a sheet of cardboard. Look at the diagram to see how to cut its sides, fold them, and glue them.

Everything is ready, it’s time to start making crafts for the New Year with your own hands, the photo will show how to make it.

Everything you need is on the table. Let the child dip the lumps in the foil in the paste, then attach pieces of paper here.

Then you need to leave the craft for several days so that the glue dries well. If this is not done, the work may begin to mold.
When the cakes are well dry, let the child give free rein to his imagination. Using paints, small red pompoms, and finely chopped colored pieces of paper, you can make this festive treat for dolls.

When the paint is dry, it's time to arrange these cakes to decorate the toy table.
Using the same technique, you can make other children's crafts for the New Year. With their own hands they will build blanks from foil, which must be covered with pieces of newspaper. This process has just been described. To attach the toy to the Christmas tree, at this stage you need to tie a carpet ring with a lace or rope, as was done in the photo tip.

This is followed by another 2-3 layers of paper mache made from newspapers, after which the Christmas tree decorations need to be painted.

Now you can make papier-mâché dolls, New Year's toys from the same material, a piggy bank. We invite you to familiarize yourself with the process of making an apple. It turns out so realistic that you should immediately warn both guests and family that the fruit is not edible.
If you want to see how to make papier mache paste, then watch the second story.


