Delicate and sophisticated spring DIY peonies you can do it using paper and corrugated paper, satin ribbons and synthetic fabric. If you have a personal plot, then be sure to plant several peony bushes on it, which will fill your house with their unsurpassed aroma in the spring. Using paper, you can create with your children, because during the summer holidays schoolchildren have a lot of free time, which can be spent on mastering new creative techniques.
DIY peony made from satin ribbons
Ribbons can make incredible beauty peony by hand, master class will describe to you in detail all the stages of completing this craft. To make the bud look more natural, you need to choose ribbons of three similar shades, giving preference to bright, rich tones of the red palette. These are the soft pink or deep red buds that bloom in the wild, but you can create flowers of any shade with your own hands so that such a bouquet fits perfectly into the interior of your home.
Recently, it has become very popular to decorate weddings with homemade elements, for example, those created with your own hands from textiles, ribbons and paper. Peonies can also become part of the wedding decor, and buds can be added to the original bride’s bouquet.
To do DIY ribbon peony, we will need ribbons 5 cm wide, which must be cut into pieces 4 cm long. For one flower you will need 36 such blanks, 4 cm each. If you wish, you can make six central petals more dark color, in the outer petals - lighter.
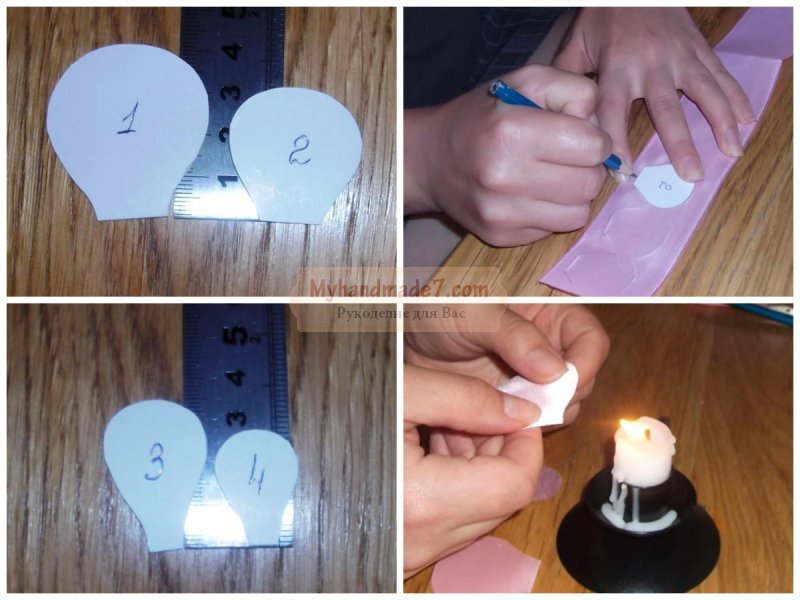
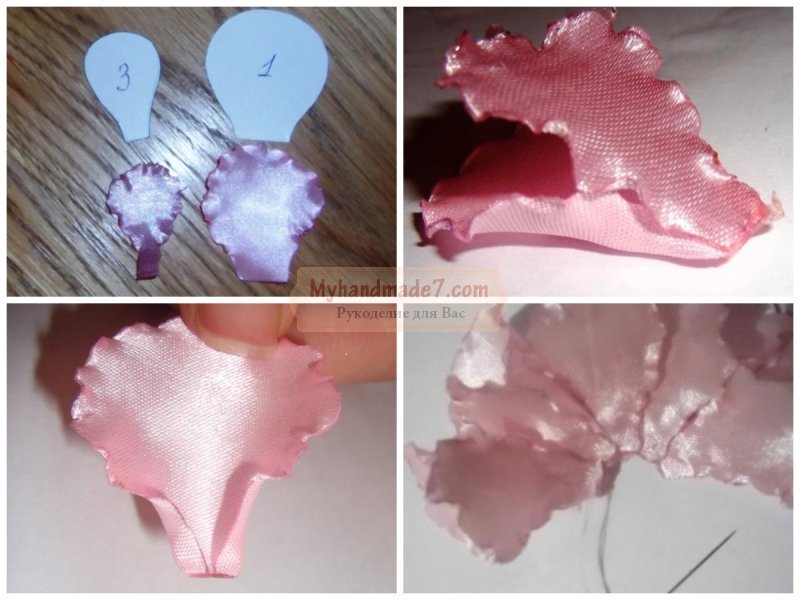
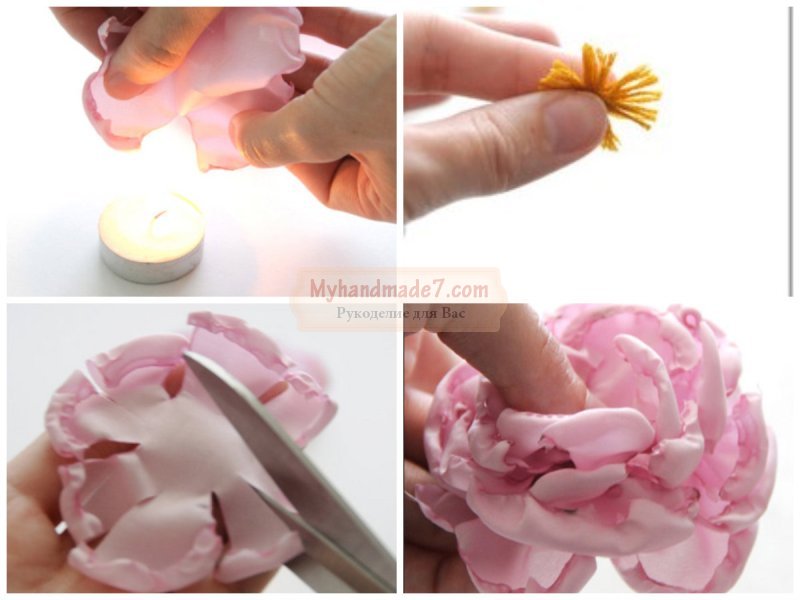
The petals can be given a more fancy shape, for example, making their edge wavy, but we decided to cut all the blanks for the petals according to the usual pattern - in a semicircle, because in the process of melting over a candle flame, each petal will take on its own unique shape. We leave it to you to choose for yourself what shape of petals you will cut using a satin blank.
In order to melt the edges, you will need a candle: first, over the fire, you need to melt the edges of the petals so that they do not fall off, and then warm them up, and use your fingers to give them a wavy shape. During the heating process, you will notice that the satin will be deformed, folded inside out, and as a result you will get a natural blank for the petal. When you do, always pay attention to the processing of the edges, otherwise they will crumble. The easiest way to process the edge of the ribbon is to carefully melt it over a candle, holding it with tweezers so as not to burn your fingers.
In addition to the petals, you need to make the middle, it should be a dark shade: you should cut a square with a side of 5 cm from satin ribbon, hand stitches sheathe the workpiece in a circle, and put a ball of cotton wool or padding polyester inside, then pull the thread off. Now you have a ball that will act as a core around which the petals will be located.
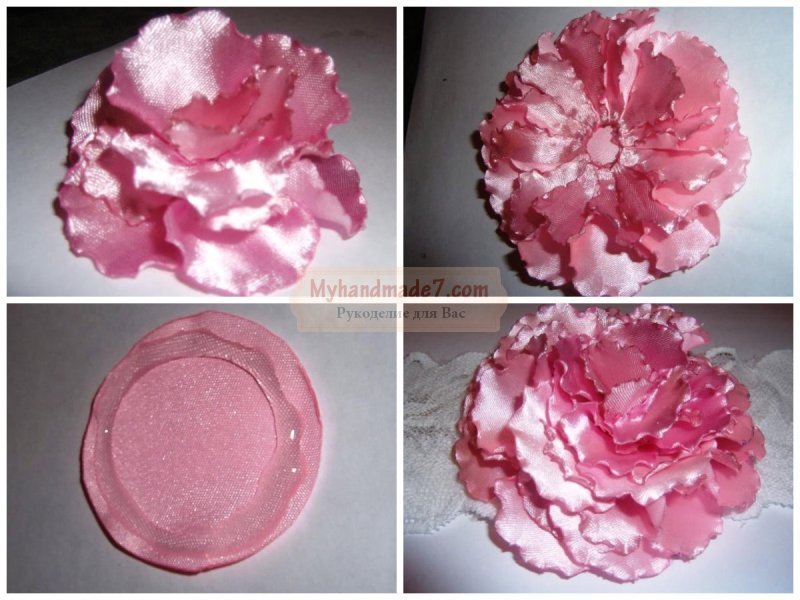
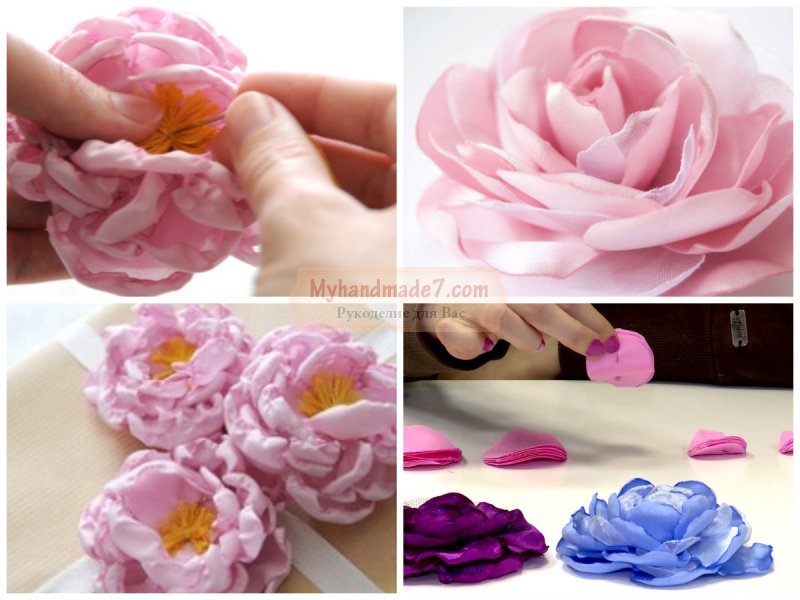
When all the pieces are ready, you can start collecting peony from satin ribbons with your own hands. 6 petals for the middle should be strung on a thread, then sewn to the core and pulled together. The remaining petals will be of a lighter tone; they must be sewn in layers to the resulting middle. The more layers you make, the more lush and voluminous your bud will be. When you gain experience, you can use glue instead of threads, with which the petals will be attached to the core.
Ready-made lush flowers can be attached to the stem or decorated with them in a flower basket. The buds can also be used to create jewelry: hairpins and brooches. And if you are making it for your daughter, then with the help of such satin flowers you can make a beautiful wreath on your head, fixing them on the headband.
How to make peonies with your own hands
It turns out to be unique DIY fabric peony, for which you can use textiles with any texture and pattern: from light, weightless, almost transparent to rough and dense.
IN in this case we will not just take the fabric from which we will cut the petals, but also dye it in the color we need, thus, from one piece of white fabric we can get peonies of a wide variety of color shades by painting them with paints.
The fabric must be synthetic, lightweight, in this case we used white. Scissors for work must be sharp in order to carefully cut the fabric without leaving fringe behind.
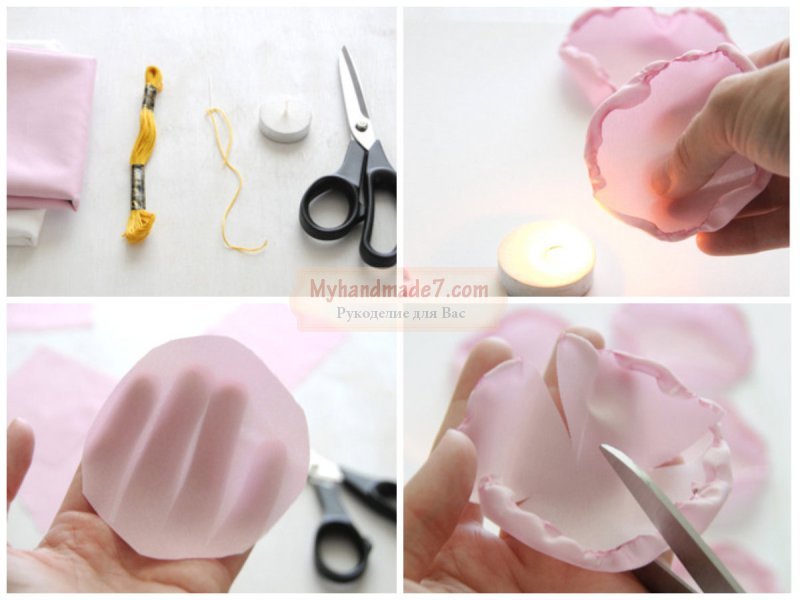
First, we will make patterns for the blanks, which we will then transfer to fabric folded in several layers, so you should prepare several sheets of white paper for the pattern. You can also lay the paper on the work surface so as not to stain it with paints while painting. Acrylic paints should be used; you will also need glue, a candle and matches, and wire for the stems.
DIY fabric peony
In the master class, how to make peonies with your own hands, we will need blanks of different sizes to make the flower voluminous and beautiful. First of all, we will draw three patterns, as shown in the picture: small - 5 cm, medium - 7 cm, large - 9 cm in diameter. Try to make all the petals symmetrical, however, even if the patterns are slightly asymmetrical, this will not be noticeable at all in the finished work.
Thin synthetic fabric can be folded in several layers and pinned together, then traced along the outline of the pattern. For one flower you need to cut out four large blanks, six medium ones and six small ones for a dense center. If you want to decorate the middle of the flower with pearls, then cut out only four blanks for it, then it will turn out less dense.
First, you need to use a brush moistened with water to walk along the edge of each workpiece, and color can be applied to the moistened pattern. To get the desired color, you can dilute the paint on the palette.
Painted blanks that have already dried can be cut out, and the edges must be processed over a candle. The edges of the workpieces must be melted carefully, without bringing the fabric close to the flame, otherwise their edges will turn black.
If you want to issue DIY bouquet of peonies, then in addition to the flower itself, you need to make stems with leaves. For the stems you will need floral wire, and for the leaves you will need to paint white fabric V green. The finished leaves should also be processed over a candle flame, and with the help of a heated knife you can make veins on the leaves. The leaves should be glued to the stem using synthetic glue.
DIY paper peonies
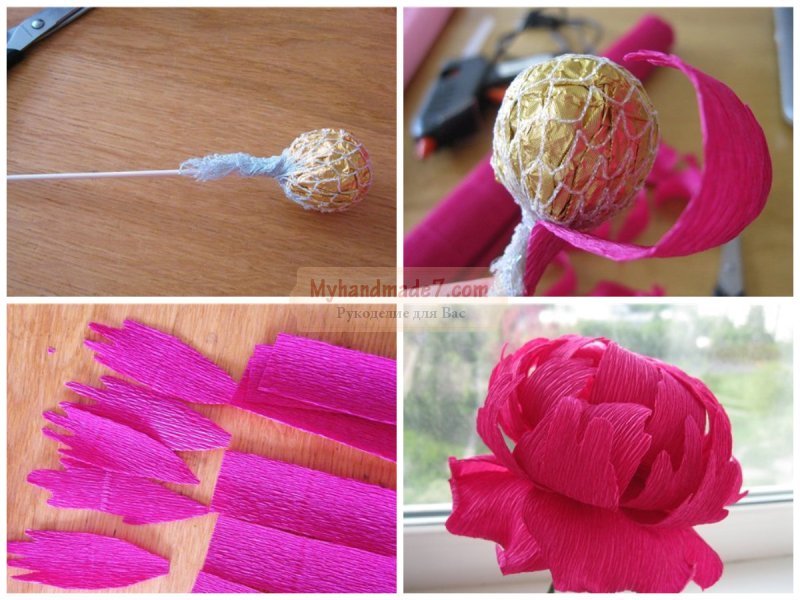
Can be used to decorate your home peonies from corrugated paper with your own hands, they can be made in any size and in any color palette. You can combine peonies in one paper bouquet different colors, and also add other paper flowers to the composition. In addition to lush flowers, the bouquet may also contain unopened buds.
We will be making a soft pink peony, so first you need to go to the store and buy a roll of corrugation. For the leaves you will need plain green paper. To form the stem, you will need 20 cm of wire, green tape, and during the work - a glue stick and scissors.
For the stem, you need to wrap the wire with tape, fixing the tip with glue. Then you need to glue two leaves cut from colored green paper onto the stem. After the stem is ready, you can proceed to the main stage of the craft - directly to the lush peony flower.
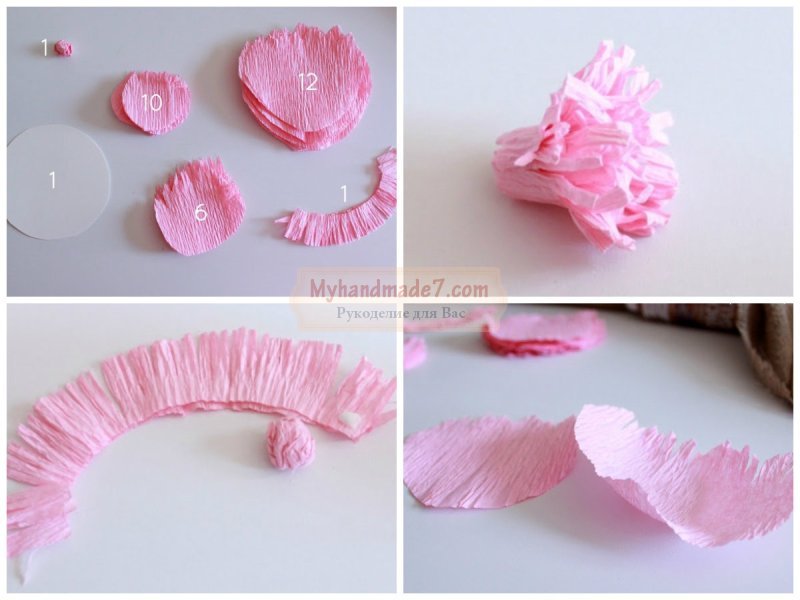
DIY paper peonies collected from separately cut petals. First, the corrugation should be cut into wide strips, a strip of about 80 cm should be folded several times and wide petals should be cut, which will be used to form the lower part of our flower. In the same way, you need to cut out the medium and very small petals, which will be located near the middle. You can see in our photo master class what shape the petals should be.
To make the middle, you need to roll a ball from a corrugated strip; this ball should have a small leg left, which must be glued to the tip of the stem and wrapped with tape.
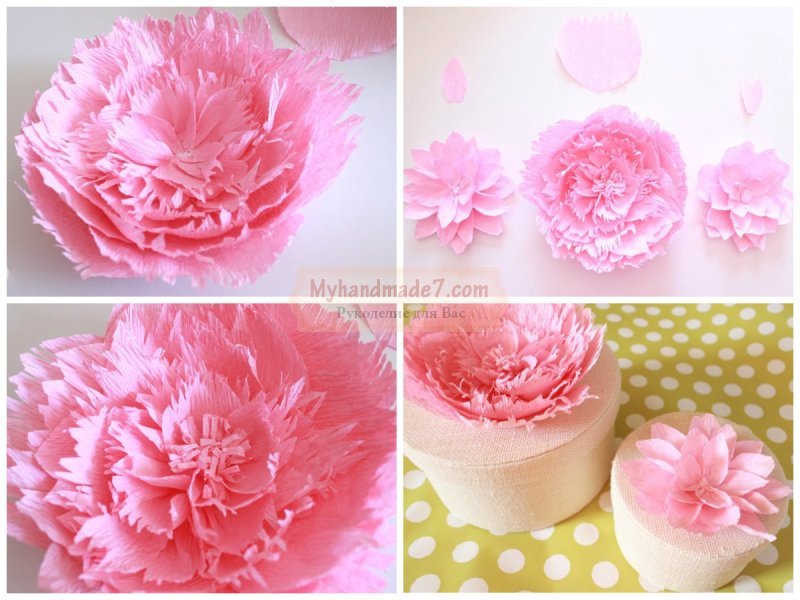
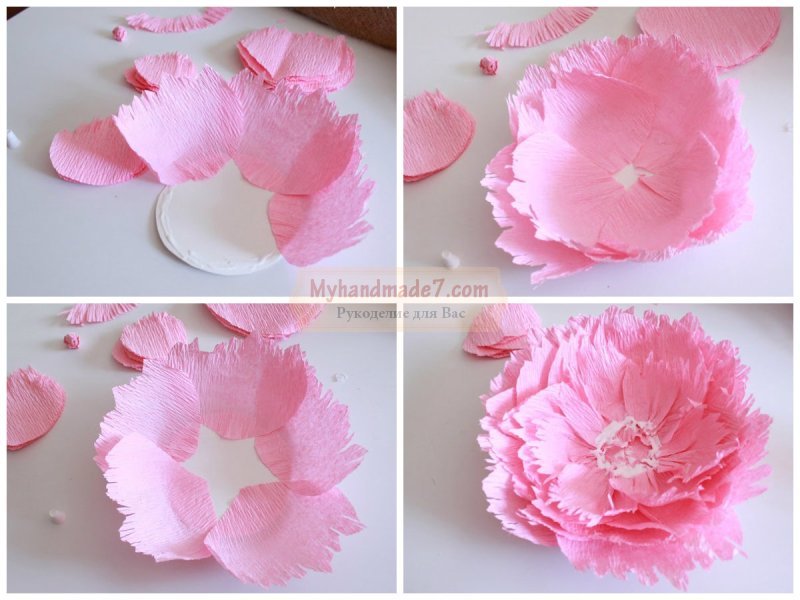
Each petal needs to be stretched a little with your fingers to give them a realistic concave shape. You should also stretch the edges of the petals with your fingers so that they become wavy, thus making the flower itself more magnificent.
Starting from the middle, it is necessary to fix all the prepared petals: the smallest ones are located near the middle, then the middle ones, and the largest ones will be the last layer.
Instead of the middle, you can use a round candy, and this will be the best holiday surprise for a friend.
DIY peony stand
Once you see blooming peonies, it is impossible not to fall in love with them. In garden conditions, they grow in large bushes, on which large, fluffy buds bloom in April-May. Homemade flowers made using textiles or paper will allow you to enjoy the beauty throughout the year in winter and autumn, but to decorate your garden in spring, you should definitely plant several peony bushes. In addition, they are completely unpretentious in care, but to prevent the bush from creeping along the ground, you will need DIY peony stand.
A similar stand can be used in garden design and for decorating other bush plants. To create such a stand, you must use aluminum tubes or metal rods. It consists of three legs and a circle, so the stand securely fixes the bush and its branches grow upward, rather than spreading along the ground under the weight of the buds.
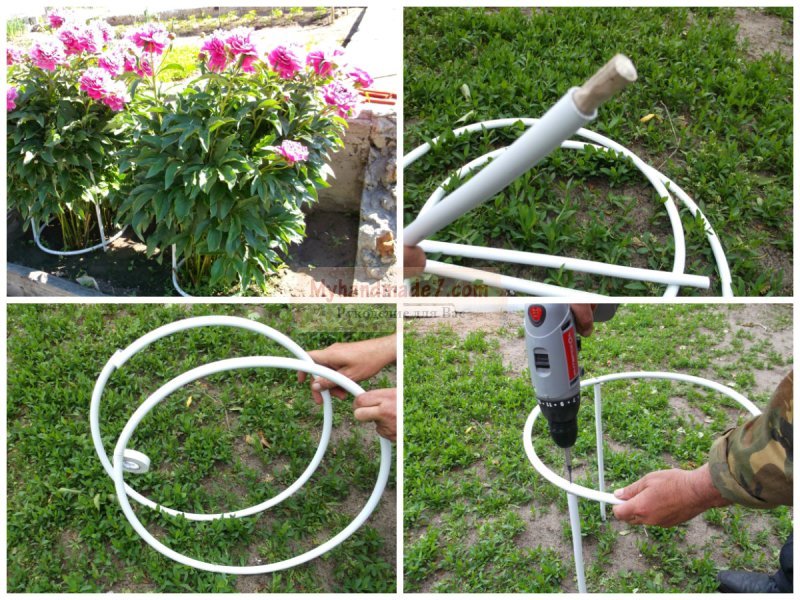
To create a stand, you can use a thin metal-plastic water pipe. To make legs from a pipe, you need to cut it into pieces, and drive wooden choppers inside on both sides; they are necessary to screw self-tapping screws into the wood to fix the upper and lower circle of the stand on the legs. To make a circle of the required diameter from a metal-plastic pipe, you can bend it around a hemp or bucket, and then fasten the edges.
The finished stand can be painted green so that it does not stand out in the photo of the green garden.
The summer season has come, the first peony bushes will soon bloom, and many people will need to protect their pets from damage due to heavy rains and winds. In this article we will look at a way to prevent the death of flowers and their nerve cells.
To manufacture this design, a minimum of parts will be required, but the result will exceed all your expectations.
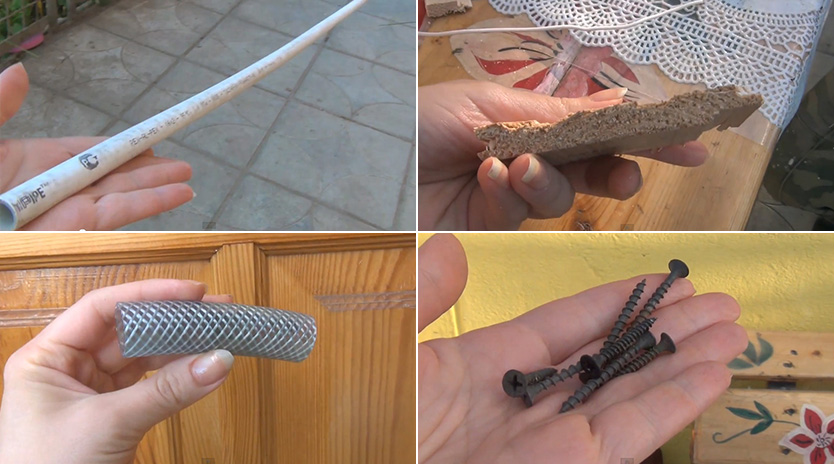
List of everything needed for work:
1. Metal-plastic water pipe with a diameter of 16 x 2.0 mm, which can be purchased at any hardware store. Thanks to the special structure consisting of polyethylene and aluminum, such pipes are not subject to corrosion, which means that our structure will remain in perfect condition and will last for a very long time.
2. Cuttings from clapboard measuring 5 cm x 7 cm or from any unnecessary board.
3. It is advisable to have a screwdriver, since the screws will have to be screwed into the metal of the pipe, but for lack of a better one, a Phillips screwdriver will do.
4. Two pieces of a regular garden hose 10–15 cm long. It is important that the diameter of the hose is slightly larger than the diameter of the pipe, otherwise it will not be possible to fit this piece of hose tightly onto the pipe.
5. Self-tapping screws in the amount of 6 pieces.
Let's get started
Making rings
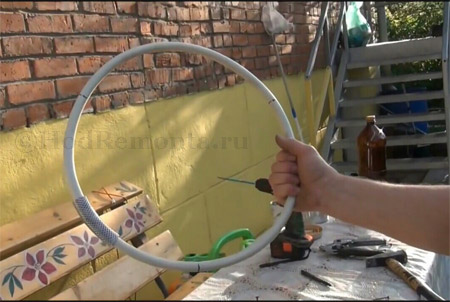
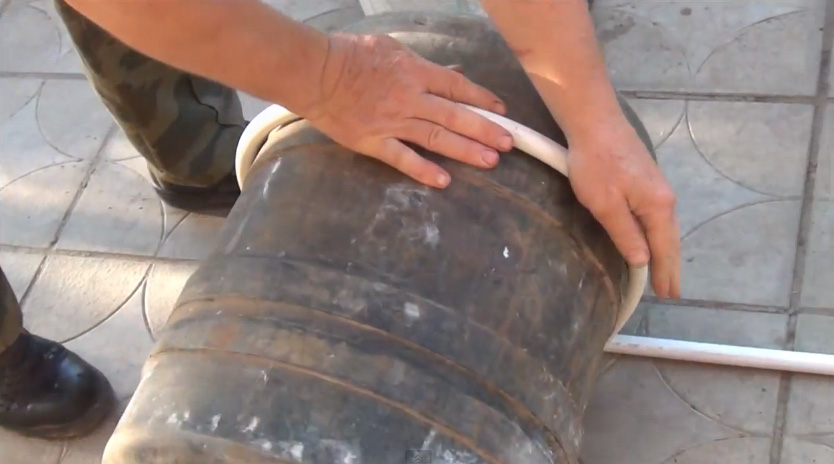
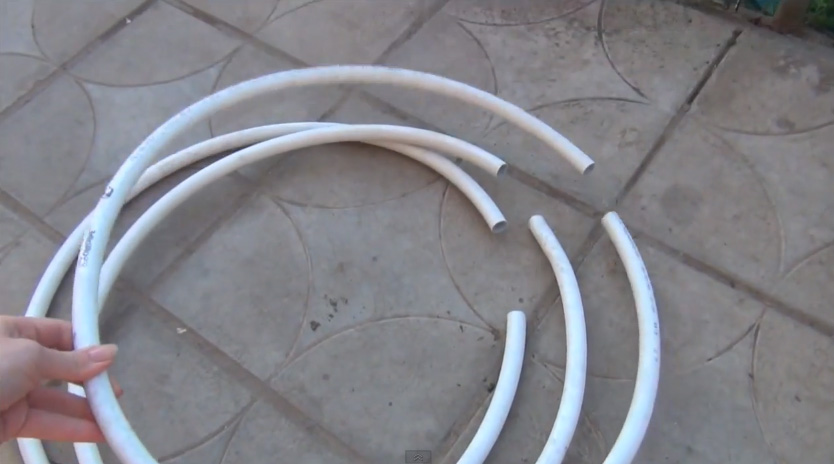
Every household will certainly have an empty water barrel, which is what we will take as the basis of our design. Using it, we twist the metal-plastic water pipe in a spiral so that we get two hoops. We check the photo and move on.
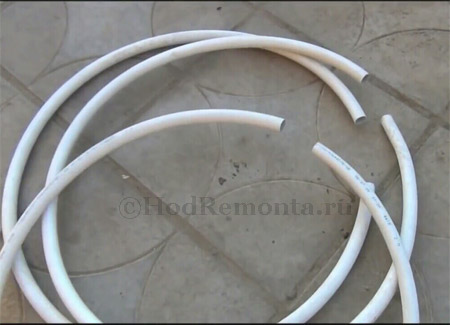
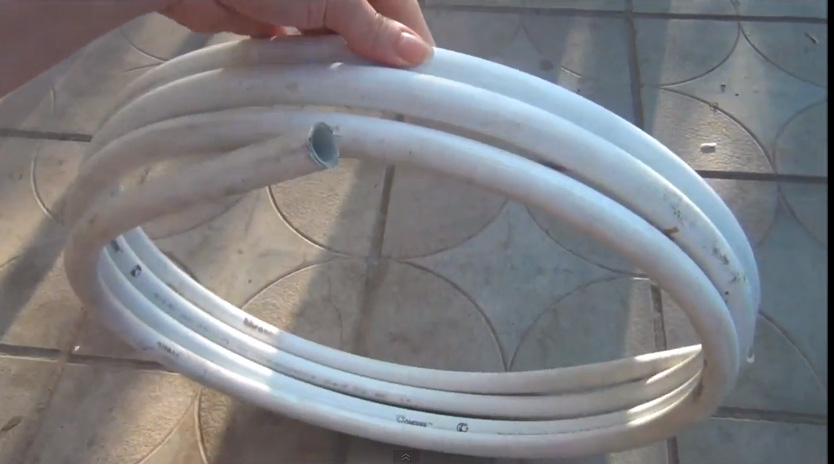
Now we pull our spiral off the barrel and get exactly the same blank as in the next photo, which needs to be cut. As a result, we should get rings like this.
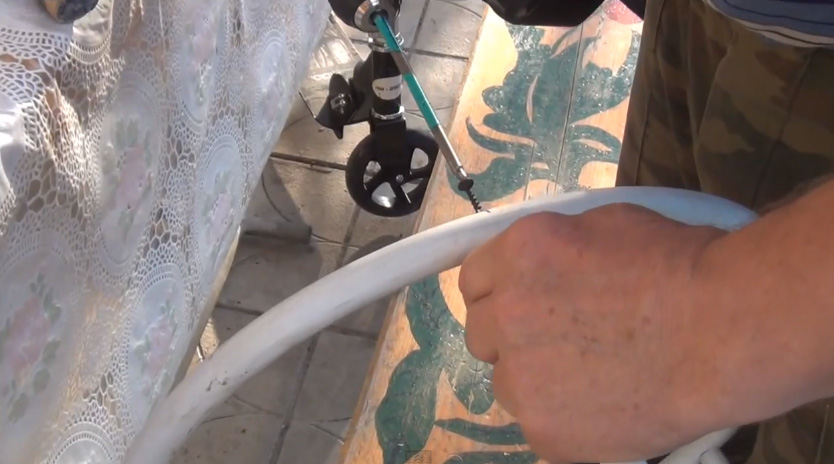
Our next step will be to make three marks on the ring with any writing object at an angle of 120 degrees. Voila, as if by magic, we get from the good old hoop the most authentic Mercedes steering wheel)).
Let's dream and that's enough, don't forget about our flowers. We take the first ring and insert self-tapping screws into these marks. On the second ring we only make marks.
Making legs
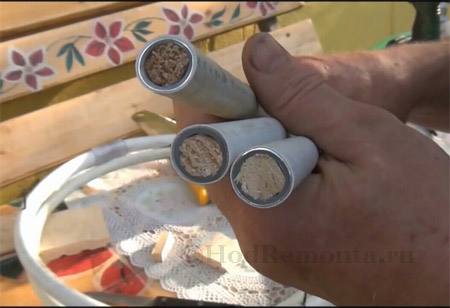
For our design, we will need to make legs. To do this, take the remains of a flat, straight metal-plastic pipe and cut it into 40 cm pieces. We get three tubes. From scraps of clapboard we make neat 3 plugs and completely hammer them into the resulting tubes.
Finally, the legs for the stand are ready, all that remains is to assemble our stand.
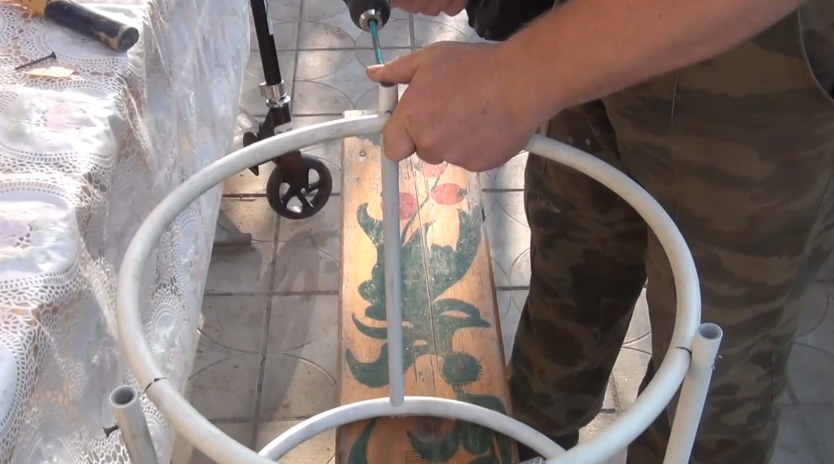
Now let's test your skills in working with the tool. To do this, we take the first ring with mounted screws and fit the tubes under them, screw the ring to the first tube with a screwdriver (exactly to the place where the wooden plug is located, which is necessary to screw the screw into it, which, in turn, ensures the stability of the structure ).
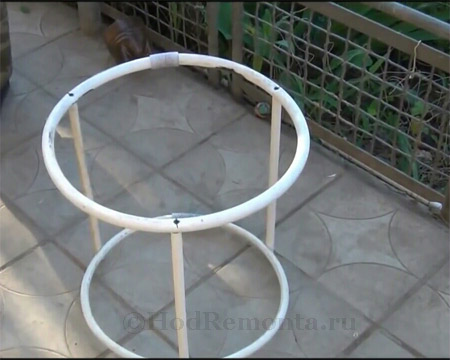
Now we need to repeat this operation with the remaining two legs. After twisting all three tubes, put on the bottom ring. To do this, we turn our structure over so that the top (finished ring) remains at the bottom, resting on the floor. After this, we take our blank, that is, the lower ring with marks, and apply it to the edges of the legs so that they are not inside, but outside the ring.
As a result of doing all the above steps, our stand is ready; if desired, you can paint it any other color. All that remains is to put the resulting structure on a bush of your favorite flowers. To do this correctly, you need to collect a bush and tie it with a string, forming a bouquet. And after that you can easily put it on without damaging the blooming buds.
The stand is necessary not only for aesthetics and improving the design of your garden plot, but also to protect the bushes during bad weather or strong winds. Also, during flowering, the buds become too heavy, and to help the bush not lose its shape, you will need a stand made with your own hands to the delight of yourself and the envy of your neighbors.
Unfortunately, it is not enough just to grow beautiful peonies. Rain, strong winds and hail can significantly damage the opened buds. In order to protect flowers from bad weather, the gardener needs to take care of the structure in advance - this is the so-called support for peonies, which will provide reliable support for the bushes and will not disturb the aesthetic appearance of the garden plot. A stand for peonies is sold in any hardware or gardening store, however, it is much cheaper and easier to make it yourself.
Two simple ways to create a support for peonies with your own hands
A stand for peonies can be made in several different ways; consider two of the simplest, least expensive and most effective options for supporting peonies.
If you have all the necessary materials, the process of creating a support for the bushes will take only 15-20 minutes. Before you start work, you need to prepare everything in advance necessary materials, and also take measurements of the bushes in order to correctly calculate the height of the structure.
To make support for peonies in the first way you will need:
- 1 tape measure;
- 2 tool for cutting reinforcement;
- 3 bay of composite reinforcement, diameter 0.8 cm;
- 4 bay of non-metallic reinforcement, diameter 0.4 cm;
- 5 plastic clamps.
A wide bay is necessary to create the base of the structure, non-metallic reinforcement will be used to provide lateral support, and clamps will help secure the individual rods that will make up the bush holder.
Having taken measurements and prepared all the necessary materials, it is necessary to begin assembling the structure, which will take place in several stages.
Stage 1: cutting reinforcement.
Having determined the desired height of the support using a tape measure, you need to cut the reinforcement with a diameter of 0.8 cm into pieces required size. It is important to remember that it is necessary to determine the size of the rods, taking into account the height to which the reinforcement will be buried in the ground.
Stage 2: securing the main support.
After cutting, the reinforcement bars should be secured next to the plant. The lower the depth is made, the stronger and more reliable the support for peonies will be.
Stage 3: creating a transverse support.
After installing the main support, it is necessary to measure the length of the rods with a cross-section of 0.4 cm to create transverse support. At the discretion of the grower, the support can be made with only one upper ring for support, or 2 rows can be implemented for more reliable strengthening. In order to attach the rods to the main structure, it is necessary to use plastic clamps. Despite their low cost, they perform their task excellently and can withstand even strong gusts of hurricane winds.

As you can see, a do-it-yourself support for peonies is not so difficult to make. The second method is no less simple, and the materials for its implementation can be found on any personal plot. To create a support for peonies in this case you will need:
- 1 metal-plastic water pipe, diameter 1.6 x 0.2 cm;
- 2 ordinary small wooden board or clapboard, size 5 x 7 cm;
- 3 Phillips screwdriver or screwdriver;
- 4 6 self-tapping screws;
- 5 garden hose about 30 cm long or two small pieces of 15 cm each;
- 6 marker;
- 7 barrel/large trash can/tank/deep basin.
When selecting materials, you need to pay attention to the fact that the garden hose should have a diameter slightly larger than the metal-plastic water pipe so that it can be easily threaded into the hose at the assembly stage.
Stage 1: making rings.
In any garden plot there is a container with a large capacity. This could be a barrel or water tank, a large trash can, or a very deep basin for water. You need to find something that has a large circumference and volume and no rectangular or sharp edges. The water pipe must be twisted around this cylindrical container so as to form a spiral consisting of two levels.
And a little about secrets...
Have you ever experienced unbearable joint pain? And you know firsthand what it is:
- inability to move easily and comfortably;
- discomfort when going up and down stairs;
- unpleasant crunching, clicking not of your own accord;
- pain during or after exercise;
- inflammation in the joints and swelling;
- causeless and sometimes unbearable aching pain in the joints...
Now answer the question: are you satisfied with this? Can such pain be tolerated? How much money have you already wasted on ineffective treatment? That's right - it's time to end this! Do you agree? That is why we decided to publish an exclusive interview with Professor Dikul, in which he revealed the secrets of getting rid of joint pain, arthritis and arthrosis.
Peonies are very beautiful flowers, you can’t argue with that. Thanks to good care they will please the eye for a long time, but these huge buds on an overgrown bush are so heavy that they can break it. Therefore, a garter is necessary. The most common version uses sticks and ropes. But this method is not very effective and, moreover, not very aesthetically pleasing. This design was spotted on the channel Yulia Karpova
. It is VERY easy to assemble and should definitely be in every gardener’s arsenal. Once again we are convinced that everything ingenious is simple!First of all, decide on the height of the support. The amount of starting materials will depend on this.
As you can see, it looks very aesthetically pleasing, and such a support can be used many times.
2
. Preparation
We will need:
1. metal-plastic water pipe
2. a piece of wood, in this case clapboard
3. a piece of garden hose with a diameter slightly larger than a water pipe
4. screws
3
. Making blanks
To create round parts, use a cylindrical object the right size, such as a barrel or tank. Screw the pipe around the barrel.
4
. Spiral
You should get at least two rings.
5
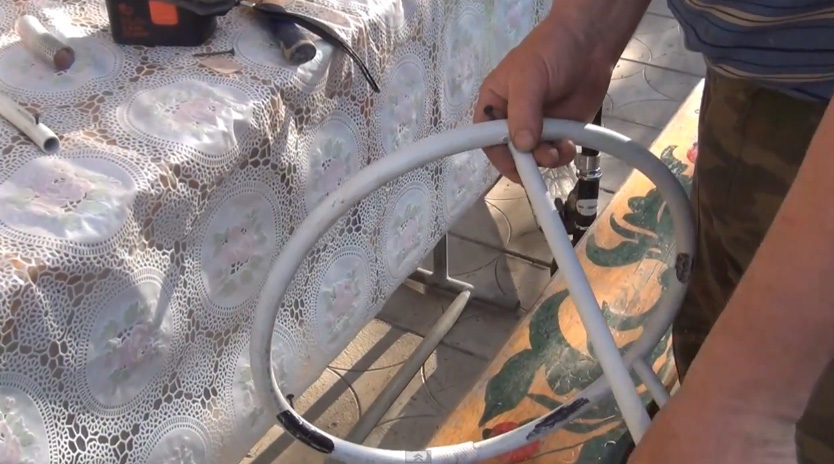
. Cutting rings
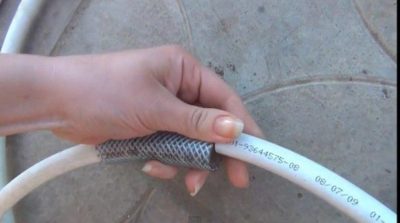
Separate the rings and then connect them using pre-prepared garden hose scraps.
6
. Connecting
Remember the hose diameter? It should act as a tight connector.
11
. Connecting the top
The next step is to connect one of the rings to a straight piece of pipe. Self-tapping screws are screwed into a wooden cap.
12
.
Repeat the operation for all three legs.
13
. Connecting the bottom
The final step is to connect the legs of the structure with the second ring. This time the screws can be screwed in in a horizontal plane. This design will be very stable.
14
. Ready
The stand is ready, all that remains is to put it on the bush. To do this, collect the bush and secure it with twine. Then you can safely put on the stand and remove the string.