Knitting skills allow craftswomen to create exclusive items of clothing. Needlewomen with little experience, who still find it difficult to master the execution of a large product, can hone their skills on accessories that are easy to make. Crocheting flowers for beginners is an opportunity to create bright accents that give an individual look.
Designations in diagrams
Typically the following symbols are used:
- an air loop (v.p.) is designated as a small circle or oval;
- simple single crochet (dc) - like “+”;
- double crochet (dc) - a vertical line with a horizontal or oblique stroke;
- at the end of the row there is a connecting column (conn. st.), in the diagrams it looks like a dot.
Flower with eight petals
A simple, but at the same time very cute flower can be used to decorate a baby’s hat or attach it to a hairpin.
Let's learn how to crochet a flower step by step. For beginners, let's describe the work:
- In a circle of 10 c. p. we knit 23 double crochets, first we need three lifting loops, and at the end - a connection. Art.
- The second row consists of 8 arches. They, in turn, consist of 3 chain stitches and a single crochet stitch, knitted from every third loop.
- First, let's do 3 lifting steps. p. and from the first arch we knit the base for the petal. It consists of 2 double crochets, an air loop, and again 2 double crochets. There should be eight arches.
- In the fourth row we make petals: under the first air loop we make 7 tbsp. s n. The flower is ready.

Flower with convex petals
Needlewomen may find it difficult to make drawings based only on descriptions. For many, circular crocheting of flowers is unusual. For beginners, the diagrams will be a good hint. So, a cute, small flower with convex petals is knitted this way:

Flower with long petals
Crocheting flowers for beginners is an activity that allows you to create cute and unique things. For example, a flower with long petals. Let's look at its diagram:

Relief flower
We don’t stop there and will continue to master crocheting flowers for beginners. Let's complete a task that is more difficult, but undoubtedly interesting. For example, a relief flower. It looks very impressive due to its three rows of petals. To make the diagram presented below more understandable, let’s add to it a description of the operation:
- We knit the base of the flower - 5 air loops, then a chain of 6 v. p. (three for lifting). Work in a circle: double crochet, next 3 in. n. Repeat five times. Thus, there were six arches for the smallest petals.
- Let's start with the 2nd century. p., then follow 4 double crochet stitches under a chain of c. p., repeat 2 v. n. Then you need to knit a single crochet, but insert the hook under the stitch of the first row. That is, you get a raised column, and the petals become convex.
- In the fourth row it is necessary to make arches for larger petals. There should be six of them. Please note that they should be located between the petals of the first row, behind them. So, we perform 3 air loops and a double crochet under the first arch.
- In the fifth row we knit the petals: 2 in. p., then 6 tbsp are needed. with n., then 2 air and a relief column.
- For the last row of petals we make arches of 10 air ones in the same way as the previous ones. The base of the arch is knitted between the six columns of the previous petal.
- Last row of petals: 2 air, followed by 2 regular stitches. with n., then 4 high stitches (double crochet), then repeat the stitches and loops again. The petal should be limited on both sides by raised columns.

A hobby is a great way to escape from worries and spend time productively, especially if you master a skill such as crocheting flowers. For beginners, this is an opportunity to sharpen their skills and gain skills that will be useful in future creativity.
Crochet flowers are used as decoration for clothing, interior items, and brooches. You can make original bouquets from them. You will learn in detail how to crochet a flower in this article.
Hawaiian flower
Such bright, cheerful flowers can be used when creating things using the patchwork technique or as decoration for knitted items.
We will need:
- yarn of different colors;
- hook according to the thickness of the yarn.
We make 8 VPs with the first color of thread and close them into a ring with a connecting post.
We continue our master class step by step:
- 1st row: 1 VP, 12 sc in the ring, SST in the 1st sc. We cut the thread and fasten it;
- 2p.: connect the yarn of the second color to any stbn and perform: 1 ch, 1 stbn in the same stitch, * 1 stbn in the next stitch, 11 ch, 1 stbn in the same loop, 1 stbn in the next st ., 1 VP, 1 sc in the next st. * - from * to * repeat until the end of the p., instead of the last sc, tie a sc in the 1st sc;
- 3rd row: * 18 StS2N in an arch of 11 VP, SS in an arch of 1 VP of the previous row * - from * to * repeat until the end of the row. We complete the row of SST at the beginning of the river. We cut the thread and fasten it;
- 4p.: Next we knit a Hawaiian flower with the third color of yarn. We connect it and perform *9 sc from the center on one side of the petal, 3 ch, 9 sc – return to the center of the flower on the other side, 1 sc in the arch from 1 ch of the 2nd row* – from * to * continue to the end r., SST at its beginning. Let's finish the job.
When knitting the next Hawaiian flower, you can connect it to the already finished one, performing the last r. Sst.
How to crochet a simple flower: video MK
Tulip for decoration
The size of the finished flower is 32cm.
We will need:
- yarn “Iris”, 100% cotton, pink and green – 5g each;
- hook No.0.9.
Description
Flower
For the flower, we crochet 4 VPs and an unfinished StS2N with a pink thread into the first loop of the chain, knit all the loops on the hook together. Then 8 VP and SST in the 1st loop. this chain. It turned out to be a ring.
We continue weaving 3 VP lifts and perform from the 1st to the 14th row of the pattern. We cut the thread and connect it to knit the top of the flower from the 1st row. on the 4th r.
Stem and leaves
We crochet a chain of 4 VPs from green yarn. Then you need to knit 2 DC into the 1st loop. chains.
We continue crocheting on the 23rd row. schemes. In this row we attach a flower in the center (see image of the diagram). To do this, knit: 10 VP, Sst between the lifting loops and StS2H of the base of the flower, 10 VP.
Then we knit with 24 r. for 34 rub. for one piece of paper, and move on to the second. Link to 1p. 11 rubles, complete.
Crochet tulips: video master class
Lilies of the valley
We will need:
- yarn, 100% mercerized cotton, 50g per 240m;
- hook No.1,3;
- wire.
Description and master class for beginners
Flower
Knitting flowers is done in a spiral:
- 2p.: (1 increase)x6 (=12);
- from 4th r. on the 7th row: 18 RLS;
- 9p.: (in the 1st p. - [SC, StSN, StS2N], in the next p. - [StC2N, StSN, Sc])x6.
buds
We knit in a spiral.
Big bud:
- 1st row: 2 ch, 6 sc in 1st stitch (=6);
- 2p.: (1 increase)x6 (=12);
- 3p.: (1 RLS, 1 inc.)x6 (=18);
- from 4th r. on the 6th row: 18 RLS;
- 7p.: (1 sc, 1 decrease)x6 (=12);
- 8 rubles: (1 decrease)x6.
Fill the part with filler and tighten the remaining loops tightly.
Small bud:
- 1st row: 2 ch, 6 sc in 1st stitch (=6);
- 2p.: (1 increase)x6 (=12);
- from 3rd r. on the 5th row: 12 RLS;
- 6 rubles: (1 decrease)x6.
Fill the part with filler and tighten the remaining loops tightly. We produce the required number of flowers, large and small buds. We fix them on the wire. Then we collect the flowers into a twig, guided by the photo. We wrap the wire with green threads.
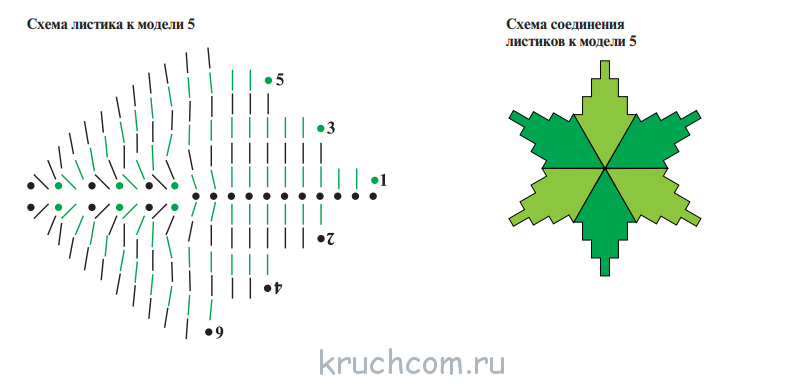
Sheet
We crochet according to the diagram in straight/reverse rows. Each row we begin with 2 VP lifts, replacing StSN. We tie an RLS around the perimeter of the leaf, tying in wire for rigidity. Both ends of the wire should protrude beyond the dimensions of the leaf. We wrap them with green thread. We connect the leaf to the stem.
Knitting lilies of the valley: video MK
Rose
A beautiful lush flower can be used as a decoration for clothing or as a brooch. The Tunisian weaving technique is used for execution.
We will need:
- yarn for the flower - one or two colors close in tone;
- green yarn for leaves and sepals;
- hook according to the thickness of the thread;
- thin wire;
- clasp if the product will be made in the form of a brooch.
Description and master class for beginners
A lush rose flower consists of 3 layers of petals. If you wish, you can make them in one color or in different, but similar in tone. The center of the flower should be more saturated, dark, and the lower petals should be lighter.
We make the petals using the Tunisian technique of stlb b/n. Let's start with a circle. Its scheme is as follows: 7→14→21→28→35.
Knit each of the petals at 6 stitches. bases, leaving a gap of 1 p. between them. The curly profile of the petal is made by adding and subtracting.
The buds consist of a cap with 5 leaves made on wire. Tie the flower petals for the bud in one piece and roll them into a tight tube. The Tunisian technique is used for knitting.
Knit the leaves and base with green yarn using similar weaving. We wrap the wire with green thread.
We tie the finished flower and leaves around the stem using a wire. We collect a lush flower, focusing on the photo. If necessary, sew on a fastener.
Crochet rose: video master class
Butterfly
We will need:
- yarn, 100% cotton, 50g per 220m – yellow and blue;
- yarn, 100% mercerized cotton, 50g per 240m, white;
- yarn containing 55% cotton and 45% acrylic, 50g x 160m, black;
- hooks No.2 and No.2.5.
Description for beginners
We knit according to the image of the pattern. We start each row with 4 high rises, replacing StS2N.
Make a ring with white threads and tie it into it:
- 1st row: (4 tbsp s/2n, 3 v/p)x8. We complete the row of connections. loop and tighten the ring;
- 2p.: connect blue yarn: 3 connections. loop to the arch and tie under the v/p of the 1st row - (5 tbsp s/2n, 6 v/p, 5 tbsp s/2n, 1 v/p), complete the connection. p.;
- 3p.: yellow threads: 4 connections. p. to the arch, we knit under the p. of the 2nd row (9 stb s/2n, 3 ch, 9 stb s/2n), finish by knitting under 1 st of the 2nd row. 1 stlb b/n;
- 4 p.: we tie each wing with yellow threads, 10 stb/n, under 3 v/p of the 3rd r. knit (1 tbsp b/n, 1 half tbsp s/n, 3 tbsp s/n, 1 half tbsp s/n, 1 tbsp b/n), complete 10 tbsp b/n.
For the body of the butterfly, crochet 40 air. p. and tie the chain around the head with two knots, forming the head, torso and mustache. Also tie knots at the ends of the antennae and cut the thread. The butterfly is ready for decoration!
Crochet butterfly: video MK
fantasy flower
Flower diameter 24cm.
We will need:
- yarn, 100% acrylic, pink, light green and dark green - 5g each;
- hook No. 1.5.
Description for beginners
Flower
Using a pink thread, we crochet a chain of 6 chains. p. and close the connection into a ring. stlb. Next, we work on the diagram image or description for beginners.
First layer of petals
- 1st: 1 air. p. under-ma, 14 stlb without/n in the formed ring. We complete the row SS;
- 2p.: 5 air. p. (1 chain stitch in a row + 4 chain stitches), * 1 chain stitch in the 3rd chain stitch in the previous row, 4 chain stitches. p. *, repeat from * to * three times, 5 times in total. We complete the row SS;
- 3rd: 1 air. p. under-ma, 5 columns with / nak in the arch of 4 air. p. of the previous row, 1 stb without/n in the same arch, * 1 stb without/n, 5 stb without/n, 1 stb without/n in the next arch of 4 air. p. *, repeat from * to * three times, 5 times in total. We complete the row with ST. We cut the thread.
Second layer of petals(indicated in pink on the diagram): connect new thread and follow the image of the diagram of the second layer with 1p. 2 rubles each We complete the row with ST. We cut the thread.
Third layer of petals(indicated in blue in the diagram): connect a new thread and knit according to the image of the diagram of the third layer with 1p. 2 rubles each We complete the row with ST. We cut the thread.
Leaf
You need to complete 6 elements: 3 dark green and 3 light green threads.
We collect a chain of 12 air. p. (11 chain stitches of the base + 1 chain stitch of the sub-ma).
1st row: 1 stb without/n in the 3rd air. n. chains, 9 stb b/nak in the next 9 air. n. base of the chain, 2 air. p., 8 stb without/n on the second side of the base of the chain.
Assembly
We connect the leaves together, alternating colors, and sew on a fantasy flower.
Knitting a fantasy flower: video master class
Orchid
We will need:
- yarn, 100% mercerized cotton, 50g by 282m, white and pink colors;
- hook No.1;
- beads for decoration – 3 pcs.
Description and master class
The flower is crocheted using the Tunisian technique.
For beginner knitters, we provide step-by-step illustrations of the technique of knitting some elements.
Connecting loop - see photo below.
How to knit behind the back wall of the loop - see photo.
We begin the master class by knitting the lower petals. We make a sliding loop and knit 6 stitches without / n.
Tighten the ring, make the connection. p. (see explanation for beginners above).
In each stitch we crochet 2 stitches without/n behind the back wall of the loop of the previous row.
We continue the master class with 3 arches of 5 air. pet. We do (5 chain stitches, skip 3 stitches, connect stitches, join in the 4th stitch of the previous row) x3.
We continue the master class with crocheting the lower petals.
We do 4 air. p= 3 air. p. + 1 air. n. under-ma.
We skip the 1st stitch, insert the hook into the 2nd stitch, pull out the loop and leave it on the hook. You will need to knit it only under the purl half-loop. each air p.
We insert the hook into the next air. p., pull out the thread and leave the loop on the hook.
We knit 4 air. p., without turning the row we make 1 loop. under the arch. We have 6 pets in total.
Without turning the knitting, we perform the reverse row, stretching the thread through two stitches.
We repeat the algorithm with pulling out the loop through two loops until we get 1 stitch on the hook.
We continue the master class for beginners. Crochet 1 air. loop 5 pet. under the wrong side half-loop each loop, 1 p. under the arch. Only 7 p.
We close the loops 2 pieces at a time, as described above. Let's continue:
- 3p.: air/p, 6p. under the back half loop. every p., 1 p. under the arch (= 8 p.);
- 4p.: air/p, 7p. under the back half loop. every p., 1 p. under the arch (= 9 p.);
- 5p.: air/p, 8p. under the back half loop. every p., 1 p. under the arch (= 10 p.).
We make decreases by 1 point, making the connection. n. under the back half-loop. bottom p.
We close them in 2 stitches, as we did earlier.
We continue the master class for beginners (we knit all stitches under the purl half-loop):
- 7r.: conn. p., 6p., 1 p. from the arch (= 8p.);
- 8r.: conn. p., 5p., 1 p. from the arch (= 7p.);
- 9r.: conn. p., 4p., 1 p. from the arch (= 6p.).
Let's move on to the connection. n. to the next arch.
We knit 4 chains from it. p. plus 1 air. n. under-ma.
We knit the 2nd petal, repeating the previous master class.
Crochet the third petal in the same way.
You need to make 3 arches from 4 VPs, attaching them in the middle of the petals of the lower tier. We complete the circle. row st-com without/nak. in the 1st arch.
- 1st: v. p., 5 p., 1 p. from the arch (=7);
- 2p.: v. p., 5 p., 1 p. from the arch (=7);
- 3r.: v. p., 6 p., 1 p. from the arch (=8);
- 4p.: v. p., 6 p., 1 p. from the arch (=8);
- 5r.: v. p., 7 p., 1 p. from the arch (=9);
- 6r.: v. p., 7 p., 1 p. from the arch (=9);
- 7r.: v. p., 8 p., 1 p. from the arch (=10);
- 8r.: v. p., 8 p., 1 p. from the arch (=10);
- 9r.: v. p., 8 p., 1 p. from the arch (=10);
- 10 rub.: conn. p., 7 p., 1 p. from the arch (=9);
- 11r.: conn. p., 7 p., 1 p. from the arch (=9);
- 12r.: conn. p., 6 p., 1 p. from the arch (=8);
- 13r.: conn. p., 6 p., 1 p. from the arch (=8);
- 14r.: conn. p., 5 p., 1 p. from the arch (=7);
- 15 rub.: conn. p., 5 p., 1 p. from the arch (=7).


Spring is just around the corner! We have a wonderful master class, thanks to which you will learn how to crochet voluminous flowers. You can use them to make a bright pillow case or a wonderful blanket.

Follow the instructions in the video master class:
I have collected in this article the simplest and most understandable lessons for crocheting flowers. Here you will find a method for knitting narrow petals and flower patterns with oval petals, as well as how to knit a voluminous flower with multi-layered petals and much more. I address this article not only to advanced masters, but also to beginners in this matter.

Crochet flowers

Crocheted flowers can be both small and large. With their help you can decorate absolutely any thing. You can decorate not only a napkin with flowers, but also a curtain tieback, a bag, a hat, a scarf or mittens. With the help of knitted flowers you can add additional beauty to your hairstyle, do it with your children beautiful cards. In a word, use your imagination and create great things!


These wonderful crocheted appliques will be an excellent decoration for both things and the interior. The article contains diagrams of three flowers: dandelion, tulip and tropical flower. All flowers are crocheted from 100% cotton “Iris” yarn No. 0.9.


Knitted flowers have become very popular. We crochet flowers, then decorate clothes, hats, and use them as keychains for a phone or backpack. Very beautiful bouquets can be created as a gift: flowers as decoration will please any girl or woman!
Crochet flowers


You can decorate a hat, beret, Panama hat, scarf, booties, sweater with a crocheted flower. Can be used as an element knitted decoration: necklace or hair ties. Even beginners can handle crocheting this flower. Video master classes will help them with this!


Crochet daisy brooch
Using a crochet hook you can knit not only shawls and blouses. This tool helps you create very elegant jewelry like this brooch in the form of a chamomile with green leaves.
The work is very elegant because a thin hook and thread are used. This allows you to achieve maximum resemblance to a living flower. This impression is complemented by a half-opened bud that looks like a real one. A brooch in the shape of a daisy looks very elegant and stylish.
In the language of flowers, daisy signifies youth and youth, so this brooch is perfect for young girls and those who are young at heart. Among the Slavic tribes, this flower was considered one of the sacred plants. Chamomile gets its name from the Latin “romana”, which translates as Roman. In the Middle Ages, it was often called “Romanova flower,” and in Greek this word translates as “white flower.” There is a beautiful legend that says that in the place where a star fell a daisy grows. And these flowers themselves are very similar to small white stars.


Save so you don't lose

Crocheting flowers is an activity that every representative of the fair sex should try at least once in her life.
Knitting flowers using simple patterns is quite accessible even to a beginner in needlework, so if you want to learn this skill, feel free to start learning the basics of crocheting on flowers. The huge advantage of knitted flowers lies not only in the comparative simplicity of their production, but also in the fact that any resulting result can be used in an interesting way. Exclusive hand-made flowers decorate children's hats and blouses, women's dresses and handbags, and even create home comfort, originally placed in a favorite vase or on interior items (floor lamps, cookie vases, etc.).
Moreover, the production of flowers requires a minimum of raw material, which means that there is no need to buy special threads, because you can always find leftover yarn lying around after knitting clothes.
For those who want to learn how to crochet flowers, we have put together a bright collection of patterns and detailed descriptions, thanks to which you will be able to master the art of knitting such colorful decorative details in no time.
Volumetric flower made using spiral knitting technique

Let's start with, perhaps, the simplest flower, which, with the proper skill, will take no more than 10 minutes to knit. To knit it you need a hook (No. 1-2, depending on the thickness of the yarn), as well as a thread of medium thickness (cotton, acrylic, iris, linen, merino, a mixture of bamboo and cotton).
The voluminous flower is knitted in a spiral manner, for this we will need minimal knowledge in crochet techniques, namely the ability to knit air loops (hereinafter - P), double crochets (hereinafter - s/n), double crochets (hereinafter - dc) s/2n), single crochets (single crochets), as well as connecting columns (hereinafter referred to as SS).
The essence of the spiral is as follows: an openwork strip is knitted, in each row of which the number of loops increases, due to which the fabric twists randomly, taking the shape of a flower.

Knitting a volumetric flower consists of three rows.
To begin with, we collect a base chain of 39 VPs.
Row No. 1: from the first VP we knit a column of s/n, VP and a column of s/n, skip the next VP, repeat everything with the third VP and so on in a circle.
Row No. 2: from the arched VP of the previous row we knit 2 columns of s/n, 3 VP and again 2 columns of s/n. At this stage, the knitted fabric may begin to curl, but do not be alarmed; on the contrary, this means that the knitting corresponds to the spiral type.
Row No. 3 (last): in the arched VP of the second row we knit 9 stitches with / 2n, between the arches we knit a single crochet.
At the end of the third row, the knitting should curl into a spiral into a flower resembling a rose. In order for the flower to keep its shape, it is necessary to secure its shape with a needle and thread; it is best to sew the entire structure with a simple seam so that it certainly does not fall apart. The final stage is decorating the flower (with beads, rhinestones) and decorating the desired item (clothing, bags, etc.). 
This is what our flower looks like on a crocheted summer baby hat. You can get creative with these colors, experimenting with their volume, size or quantity on the cap.
It is worth considering that the texture of the flower is greatly influenced by the type of yarn from which it is knitted. For example, a thin wool thread will help create a fluffy flower, Iris yarn will highlight the clear contours of its petals, and a cotton thread with lurex will add a bright shine to the product.
Delicate pink flower decorated with two-color leaves

Working on such a flower is more difficult, due to the fact that you will have to knit not only the flower petals themselves, but also 6 leaves for it. But its composition looks holistic and can be used in decorating various items of clothing or for interior decoration.
Schematically knitting a flower looks like this:

To begin with, we knit a base chain of 6 VPs, closing the circle with the help of a SS.
Row No. 1: we knit one VP lift, 14 single crochets into the air loops of the base chain, completing the SS row.
Row No. 2: we knit 5 VP (1 VP rise + 4 VP), then repeat the following repeat 5 times: 1 single stitch is knitted into the third single stitch of the previous row from the hook, then 4 VP. We also complete the row with SS.
Row No. 3: we knit 1 VP lifting, then 5 s/n stitches in the arch from 4 VPs of the previous row from the hook and 1 s/n stitch in the same arch. Repeat rapport 5 times: 1 column b/n, 5 columns s/n, 1 column b/n in the next arch of 4 VPs. Complete row SS, cut thread.
The second and third tiers of petals are knitted according to the same principle, according to the above diagram.
Leaf knitting pattern:
We need to knit 6 leaves, preferably in contrasting shades - light green and deep green.
To begin with, we assemble a base of 12 VPs (the last one is a lifting loop).
The first row begins with a single column, knitted into the 3rd VP of the base chain from the hook. Then 9 b/n stitches are knitted into the next 9 VP of the base chain, 2 VP, 8 b/n stitches with reverse side basics. The next 6 rows of leaves are knitted in straight and reverse rows, as shown in the diagram above.
And finally, the final stage is the assembly of the flower and leaves. The leaves are connected to each other according to the connection diagram; to do this, we sew them along the joints using a thread and a needle. We sew a flower onto a base of leaves; if desired, we decorate its center with a bead, and its petals with iridescent rhinestones.
Exquisite flower bouquets for interior decor

To create such a timeless bouquet you will have to work a little, however, the result will not be long in coming - such original decor will be noticeable in any interior. Moreover, a miniature bouquet knitted with your own hands is a wonderful gift for family and friends. So it’s never too late to try knitting such beauty!
So, for knitting we need: 35 grams of cotton yarn in the desired colors, as well as a hook number 1.5.
Bouquet of seven soft white flowers:
The base-core of the flower is knitted with a yellow thread of three VPs, the circle of which is closed with the help of a SS.
Row No. 1: we knit 7 non-woven stitches into the base (yellow thread).
Row No. 2: knit with white thread, repeat the following rapport 6 times: 1 b/n column, 6 VP, 1 b/n column.
Row No. 3: knit 1 b/n stitch, 6 ch, 1 b/n stitch.
We knit 7 white flowers.
To knit leaves from green thread, we knit a base chain of 45 VP. Then we knit into the base chain 30 half-columns, 2 b/n columns, 2 b/n half-columns, 6 b/n columns, 2 b/n half-columns, 2 b/n columns, 3 b/n columns. On the other side of the chain, also knit: 2 columns b/n, 2 half-columns s/n, 6 columns s/n, 2 half-columns s/n, 2 columns b/n. Using this principle, we knit 5 leaves.
We assemble a bouquet: we crochet a circle with a diameter of 6 cm, sew flowers and leaves to it, and decorate it as desired.
Bouquet of violets:
We knit the base-middle of the flower with blue threads - 3 VPs are connected with SS in a circle.
Row No. 1: knit 6 single stitches.
Row No. 2: take a purple thread, in each loop of the first row we knit the following combination: a single stitch, 3 VP, 2 s/n stitches, 3 VP, a single stitch. We repeat the rapport 5 times, as a result we get a violet flower. We knit the desired number of flowers.
To assemble, we knit an oval fabric no more than 4 cm in diameter (single crochet). Sew flowers to the base. From each violet we knit a chain-stem of 35 VPs, along which we finally knit a series of half-columns.
Knitted lilies of the valley in a bouquet

Delicate knitted lilies of the valley look very original both as a decoration for clothes and as an independent decorative element. They are so airy and look almost real! But what’s most pleasing is that creating them doesn’t require a lot of time, and even a beginner can cope with such knitting.
So, for lilies of the valley we will need the remains of pure white and bright green yarn, thin wire and a hook No. 2.5-3.
Knitting flowers:
Using white yarn we knit a base of 3 VPs, connected using a SS to form a ring.
Row No. 1: knit 7 single stitches in the center of the ring.
Rows No. 2-4: knit in single stitches, adding 2 loops.
Rows No. 5-6: knit in single stitches.
Row No. 7: repeat rapport: 3 VP + 2 b/n columns.
We knit 14-15 of these flowers, insert a thin wire pre-wrapped with green thread into the middle.
Knitting leaves:
Take green yarn and knit a base chain of 4 VPs.
Rows No. 1-3: knit in s/n stitches.
Rows No. 4-11: we also knit in s/n stitches, adding one loop to the first and last loop of the row.
Rows No. 12-14: knit in s/n stitches.
Rows No. 15-23: knit in s/n stitches, gradually decreasing one loop in each row from the beginning and end.
We knit 2-3 of these leaves, also attach them to the wrapped wire, collect the bouquet and put it in a vase. Ready!
For clarity, we bring to your attention detailed video lessons from famous crochet craftswomen. In the presented master classes you can familiarize yourself with knitting techniques:
simple little flowers
volumetric roses
chrysanthemums
asters
Don’t forget that handmade crocheted flowers are a real work of art that you want to admire for hours! Take the risk of becoming a creator of such beauty, and you will no longer be able to tear yourself away!
Good afternoon, today I want to show you how you can create flowers with your own hands using the crochet technique. I have collected in this article the simplest and most understandable lessons crochet flowers. Today we will crochet lilies, daisies, poppies, pansies, orchids, and I have also prepared an article on crocheting roses (blooming and in buds). I will show you the knitting method narrow petals, I’ll give you the diagrams branches with oval petals, I'll tell you how to tie voluminous flower with multi-layered petals and much more. I address this article not only to advanced masters, but also to beginners in this matter. So I will explain as detailed and clear as possible even for the most novice crafter.
Here I will consider several ways to create flowers crochet A in . But before I start giving diagrams, descriptions, and instructions - I want Make you fall in LOVE with this idea. I want you to understand how beautiful crocheted flowers can be. I want to show what opportunities will open up for you when you realize that you can crochet any flower and even from a photograph (without a diagram or description) understand what technique it is crocheted in.
So, let's see what prospects the ability to crochet a wide variety of flowers opens up for you.
FOR WHAT PURPOSES are flowers knitted?
(which can be decorated with crocheted flowers)
Knitted flowers can be used as table decorations.
They can be simply placed in the center of each plate (as in the left photo below) or decorated with a crocheted flower on a napkin ring (right photo below),

Knitted small flowers can decorate a greeting card (naturally, the size of the threads and hook needs to be chosen smaller) so that the made flower is suitable in size to ours greeting card. You can also use such knitted flowers decorate gift packaging– tie with a lace and glue a crocheted flower on top.


Your first knitting projects in the simplest colors can be used as a bookmark for the book you are reading.

Knitted flowers can be used as decorative elements for knitted jewelry. For example, in the photo below we see wide crocheted bracelets, decorated with flowers of various sizes and colors.
Once you understand how easy it is to crochet a flower, you will be able to believe in your ability to crochet these bracelets.

Crocheted flowers can decorate a handmade bag (as in the photo below).

And if you knit flowers with small crochet and thin threads, you get jewelry-quality work and such flowers can be used as part crocheted jewelry.

The ability to crochet flowers can also be useful when decorating a wedding. You can make something like this from knitted flowers voluminous flower heart(as in the photo below).

Also wedding bouquet can be crocheted. This is a good alternative to fresh flowers. A bouquet that will never wither and will always be kept by the one who catches it in flight.

Can be done crochet gift bouquets with your own hands for family and friends.

Knitted voluminous flowers are used as decoration on hats and caps for girls.

I liked the idea of decorating not only hats with crocheted flowers, but also caps with a visor. A beautiful bright headdress for a gentle girl.

You can also find a use for the colors you have associated in home decor. For example, decorate sofa cushions with them.

Or you can make this educational mat for your child (or a seat cover for a stool).

You can place knitted flowers in a frame in the form volumetric elegant panel painting. And decorate the living room with them. Below are a few photographs that illustrate this idea in the most convincing way.

Well, now that you have already seen the full potential of the beauty of crocheted flowers, let's begin our work and create your first crocheted flower. We will start with the easiest flowers to make, and then we will make more complex patterns.
So, the simplest crochet petal flower.
HOW TO CONNECT
THE SIMPLE FLOWER
(for beginners)
The most simple circuit flower - this is the MIDDLE(a ring of air loops tied with posts) + PETALS(alternating low and high columns).
That is, to make the petal look like a SEMI-CIRCULAR SHAPE, we knit low stitches along the edges of the petal, and high double crochets in the middle of the petal.

Often in a simple flower the PETALS look like double crochets knitted SEVEN PIECES AT A TIME in one chain stitch of the bottom row (as in the photo below). The end of each petal is a connecting stitch (similar to a single crochet, but with the entire stitch instantly knitted into one loop).

Having learned to knit a FLOWER using THIS PATTERN, you can use this skill to create cute little things for your daughters or nephews. For example, like these knitted sandals for children.

And if we want there to be a HOLE in the middle of each petal... then the petal row needs to start as a SERIES OF ARCHES OF AIR LOOPS connected around the middle circle. (In the diagram below, this hole-forming row is highlighted in red).

This principle is a ROUND MIDDLE + PETAL of high and low columns laid as the BASIS ALL PETAL FLOWERS. And every new scheme crochet flower is a slightly more complicated version of this principle common to all flowers.
In the photo below we have the same principle of tying a flower, but slightly modified (there are teeth added along the edges of the petals). One additional detail to the GENERAL PRINCIPLE OF THE SCHEME - and we get a flower of a different shape.

VOLUME FLOWER crochet
(how to knit multi-layered flowers)
Lots of flowers crocheted have more than one layer of petals - when larger petals peek out from under smaller ones.
In the photo below we see an example of such a voluminous multi-tiered flower.
(front view + rear view)

Here I am attaching a MASTER CLASS in step by step photos. From this lesson you can see exactly how such circular layers of petals are created. Every layer-tier of petals tied with threads different colors, so that it is easy to see how and what needs to be done to knit a voluminous flower.

And now that we understand the basic principles of knitting simple flower, let's start COMPLICATING THE TASK. And let's look at the flowers more interestingly.
Crochet PANSIES.
Simple description
Knitting will be possible for beginners Pansy flower (see photo below).

It is also knitted simply - a round center made of chains (tied with connecting posts). And the petals - with high columns of several crochets.
This flower has knitting in 3 stages.
The first stage is creating the middle (yellow chain, tie with connecting posts). Then tying the middle with dark purple...
Second stage - 2 purple petals are knitted (first 2 arches of air loops - in the upper part of the core) And then over each of the two arches we build up the petal itself (stitches with two crochets on the sides and three crochets in the center of the petal).
Third stage - knit three light petals - usually like other petals (the main thing is to divide the middle circle itself INTO THREE EQUAL PARTS - and tie each part in the shape of a petal.
Pansies can be tied and according to a different scheme - like in the photo below.

Or you can come up with your own design and crochet this flower. (examples in the photo below).

The next simplest flower is the daffodil.
How to tie flowers
crochet daffodils.
In the photo below we see the principle by which the daffodil flower is connected. Knit here first yellow (or orange) CUP... and then petals form from the BOTTOM of this middle.
Each petal is columns with different numbers of crochets... along the edges of the petal there are single crochets - and the closer to the center, the more crochets on the column. And in the very center of the petal there is ONE AIR loop (so that the petal has a sharp corner).

For example, a description of knitting such a petal may look like this - connecting post + st. single crochet + tbsp. double crochet + tbsp. with two double crochets + tbsp. with three yarn overs + one air + st. with three double crochets + tbsp. with two double crochets + tbsp. with one crochet + tbsp. single crochet + connecting stitch. That is, first we go by increasing the number of yarn overs - and after the center of the petal we go by decreasing the number of yarn overs in the column. And we get a pointed, oblong narcissus petal. (from the left photo below).
What if we want to tie daffodils? from the right picture in the photo above, then the description of knitting a petal will look like this:
FIRST HALF OF A PETAL(let's go up)
connecting post + 2 air (for lifting) + st. double crochet + tbsp. with 2 double crochets + tbsp. with 3 double crochets + tbsp. with 4 yarn overs + 2 air stitches (for a tiny corner at the top of the petal)…
SECOND HALF OF THE PETAL(we are going downhill, so it’s the same alternation, but in reverse order)
Art. with 4 double crochets + tbsp. with 3 double crochets + tbsp. with 2 double crochets + treble crochet + connecting
Very funny idea give someone a bouquet of live daffodils, among which voluminous knitted flowers are unobtrusively lost - I think the recipient will not immediately notice that not all flowers are made by the hands of nature.

How to crochet
FLOWERS LILY OF THE LILY
And since we have learned how to knit a central cup for daffodils, we can also knit a bouquet of lilies of the valley - the cups of lily of the valley flowers are knitted in exactly the same way as the cups inside the daffodil. We also knit in the round... and add so many loops so that our circle is not flat, but wrapped in a deep cup.
All that remains is to link wide leaf of lily of the valley. Below in the photo I attach a pattern for knitting a lily of the valley leaf.

And here is another pattern for knitting a lily of the valley flower . Already with a large number of rows in the flower cup, because the threads are thin and the hook size is smaller. But the principle is clear from the photo, without any diagrams - we knit a flower cup and along the edge of the cup we knit small ARCHES OF LACE to create a ruffled border along the edge of the flower(The EDGE is knitted according to the same petal principle of adding and decreasing yarn overs).

How to tie flowers
WITH NARROW PETALS.
In the diagram below we see the principle by which flowers with fringed petals are created. Each petal of such a knitted flower is chain of air loops UP and descent from the connecting posts ACROSS THIS CHAIN DOWN to the middle of the flower.

Chamomile petals They are knitted according to the same principle - only each petal is a double passage of stitches - two rows on each side of the petal.

And as can be seen on photographed master class– the petals are not knitted around the already finished center. But simply into a chain of air loops - AND ONLY THEN this chain is folded into a circle and the petals move apart in a circle like rays.
You yourself can choose the SHAPE of the PETALS, decide how many of these petals should be around the middle, independently determine the LENGTH of the petal...
In any case, you will get a cute daisy... and there is no need to be afraid, that you are knitting differently than in the pattern. You are your own master– try it yourself and see what happens. More petals mean they fit more tightly (picture 2 below). Fewer petals means there will be a distance between them (picture 1 photo below).

And when you learn how to crochet daisies, you can then turn them into elegant coasters - simply by tying them in a circle with contrasting colors green(as in the photo below).

Or you can crochet a flowerpot with daisies. Buy a small flower pot, sew a small voluminous pillow so that it fits tightly inside the flowerpot. Then tie together daisies and green branches and sew them on top of the pillow stuck in the pot. For greater heaviness and stability, you can pour sand into the pillow (a weighted flowerpot will not fall).

They knit according to the same “chamomile” principle. lily petals. Just the beginning of knitting NOT FLAT MIDDLE, and the volumetric middle in the shape of a cup. And then petals are tied around this cup like a chamomile. And we get a lily as in the photo below.

Knitted flowers
WITH WIDE PETALS.
Flowers with wide petals include poppies and orchids. Let's look at how to knit such flowers.
In the photo below you can see that first THREE petals are knitted around the black center. And then the hook goes under them and the NEXT THREE petals are knitted on the back side of the flower (so that they look out from behind the first petals).

But it can be done poppies with flat petals in one row. Like in this photo below (it will still be beautiful).

You can make the petals climbed on top of each other. This overlap of petals on top of each other happens on its own - because each new petal begins its knitting from the middle. First, the middle (central part) of the petal is knitted, and then its edges are knitted around this middle. And that’s why the edges stick out by themselves - overlapping with the neighboring petal. The diagram below shows how such a flower is knitted.


And here is a pattern for knitting wide petals of an orchid flower.

Here are larger white orchid flowers from the photo above.

If you don't have a pattern, but want to knit the right flower, then you need to start with a PAPER PATTERN. First, we cut out the petals of the desired shape from paper, then fold them into paper flower. And if we like the image of this flower - its size and proportions of the petals relative to each other - then we can start knitting.
The orchid in the photo above has 2 lower petals and the central petals are simple ovals (the diagram is in our article).
But the two side petals have the shape of “ears”. They knit easily. You need to look at the photo carefully and then you will understand how it moves master's hand, where is the beginning of mating? where is the continuation, and what does he do at the final stage.

The ear petal is knitted in 3 steps.
1 step (red)- a straight chain of air loops (there is a red line in the picture - I counted 12 air loops in a row)
Step 2 (light green)- around this chain, single crochets are knitted in a circle to make an even oval (in the picture there is a light green line of rows). At the point where our oval turns, we knit 2 stitches into one stitch of the bottom row (there is a diagram of the oval in this article).
Step 3 (green)- now you need the EARS to grow on the left and right of the even oval... that is, the expansion of the orchid petals. First we knit the “lower ear” - see how the dark green line goes to the bottom - and how it zigzags to the left, increasing the rows of this ear to the right.
And then we go upstairs and knit the upper ear - with the same zigzag arrangement of rows...
Finally, we tie the entire petal in a circle so that it has a smooth edge.
RUSH METHOD
For knitting flowers.
If you knit a simple circle - but add in each row a large number of loops...then ours the circle will begin to wrinkle and worry- and we will get a round frilled flower. Like, for example, the voluminous poppy flower in the photo below. It does not have individual petals. This is just a circle - which itself has twisted into waves, due to the excessive addition of columns in each row.

Try it yourself - it's easy any number of columns- for example, three stitches in each loop of the previous row... or four (so that the wave is steeper)... or five stitches in each loop (so that the wave spins very tightly). Here in the photo below is an example of a poppy with a slight waviness on the petals.

Or you can make the waviness of the petals VERY STRONG. According to this principle of strong twisting, waves are knitted voluminous Clove flowers...

First, a wrinkled wavy circle is knitted. Then another circle. And maybe one more. And then these circles are folded together (not on top of each other, but next to each other) - into a wrinkled bunch with the edges UP. This sponge bundle is stuffed inside the sepal - the green calyx of the inflorescence. And it turns out to be a crocheted carnation flower.
FLOWERS CROCHET
with OVAL petals
You can still learn crochet ovals. And then we will be able to knit flowers with oval petals and leaves. For example, these knitted ones tulips or crocuses, or water lilies.


For such oval-petaled flowers, you need to learn how to crochet an oval. It is knitted simply - according to this pattern. The beginning of the diagram is the central row - a chain of air balloons and the first row of columns on it.

That is, first we knit the CENTRAL ROW of the oval... and then the knitting goes in a circle - around this central row.

If we want our oval to NARROW on one side, and on the other side it EXPANDED - then we can knit fewer stitches on the turn on one edge - and more stitches on the other edge of the oval.
This is how it is shown in the diagram below.

Using the same principle, pointed LEAVES are knitted. Let's look at crocheting leaves. Let's look at a master class on knitting a heart-shaped petal.
LEAVES FOR FLOWERS CROCHET
(master class and diagrams for beginners)
Below I am attaching a photo tutorial for crocheting a sharp leaf (it is suitable for lilacs, roses and other crocheted flowers).
Knitting this leaf starts from the center (like the oval) - the row should have an arched shape, so we start knitting with low stitches (single crochet) and in the middle of the row we knit high stitches (with 2 and 3 crochets).

Or such a sharp heart-shaped leaf can be knitted in a circle... that is, first we make a ring of balloons. And then in a circle we alternate single crochets (in the lower part of the leaf) and stitches with a large number of crochets (in the elongated part of the leaf. And then in a circle we make a tie around the entire leaf (to create a green edge-edge.
And below is a diagram of a clover leaf.

I also collected photographs of leaves different forms... where you can see exactly how they are knitted.


The master class below shows how to create one of the complex crocheted leaves.
Here are some ideas for crocheting flowers and leaves. I hope the master classes and patterns posted here will help you understand and feel that crocheting flowers with your own hands is simple, it’s quick, and there’s so much room for imagination.
Fall in love with this idea... Come up with a hat with flowers for your daughter, booties with flowers for your granddaughter. Create something warm and beautiful for your loved ones. And may everything work out for you.
Olga Klishevskaya, especially for the site


