The art of serving and decorating dishes is addressed primarily to the taste and imagination of a particular person, however, for your creation to become a real work of art, it must comply with certain rules. That is why in this field, as in all others, expert advice is always a certain guarantee of success.
The ability to make a dish beautiful is one of the components of cooking. For this purpose, decorations made from a wide variety of products (vegetables, herbs, fruits, etc.) are used. These decorations can themselves be independent dishes: in the first case, these will be appetizers, salads or fruits for dessert, in the second - just decorations that are placed on plates or on the table (dinner or with cold appetizers).
KITCHEN TOOLS
Before you start making the jewelry you have chosen, make sure you have the necessary tools at hand. They are quite simple and will successfully complement a standard set of kitchen utensils.
The most complete set includes sharp knives, scissors, different sizes of noisettes (hemispherical spoons with sharp cutting edges), an egg slicer, a knife for zesting citrus fruits, special tools for notching, for removing the core of an apple, several metal cookie cutters and attachments for a pastry bag. or a syringe, as well as a brush. Do not be confused by this long list - most often we are talking about tools that can be easily purchased at any specialized store.
RULES TO FOLLOW
Finally, you have acquired all the necessary kitchen tools. However, this is still not enough to immediately move into the category of masters in terms of decorating dishes. There are also certain rules, the observance of which will allow your culinary creations to make the right impression on your guests.
The right combination
Remember the main thing: the dish and the decoration that complements it must be combined with each other. In fact, most often it is enough to adhere to the generally accepted combination of certain products, and the originality should be ensured by the decoration itself. So, potatoes - but in the form of mushrooms or buttercups - will perfectly complement meat. Lemon in the shape of a rose or butterfly will decorate fish and seafood dishes.
Simplicity
Very often, to achieve the best effect, you have to limit the number of decorations. Some dishes look much better in their natural form. If the main, “crown” dish is beautifully decorated and looks great, you should not diminish the effect it produces by overloading the rest of the dishes with all kinds of decoration.
Location of individual elements
Carefully consider where and how all decorative elements will be located. Remember that any dish with decoration attracts much more attention than without it. Choose dishes that cannot compete in beauty with the food you have prepared and decorated.
Color harmony
To make your jewelry look more impressive, use contrasting color combinations. To get green, use vegetables such as leeks, cucumbers, parsley or watercress, orange - carrots, red - tomatoes or beet juice, white - hard-boiled eggs or turnips... Your imagination will do the rest. It is also useful to have patrel seasoning in the kitchen: it can be used to turn neutral-colored vegetables, such as potatoes, brown.
Clarity, precision and accuracy
Your jewelry will be attractive if it is done carefully. When cutting out individual pieces of jewelry from products, make sure that the lines of the decorative cutouts are clear and concise, and use different types of cutout shapes if possible. Sharpen your knives regularly. In addition, before serving food, do not forget to wipe the edges of the plates.
Products used
The base foods used to create decorations are not always meant to be eaten. For the manufacture of various decorations and their parts, raw products are very often used, which cannot be subjected to culinary processing, since they then lose their decorative qualities. For example, raw, and therefore hard, potatoes or turnips are used to create white flowers, and red flowers are cut from raw beets. The same applies to carrots, which must be raw and fresh so that they can easily be made into various sculptural forms. Lettuce leaves, bay leaves, mint, scallions, leeks, cucumber or sweet pepper skins can be successfully used to make leaves and stems of culinary flowers. And finally, lemons, oranges, watermelons, and melons are easily transformed into all kinds of baskets, sailboats, and funny animals.
Combination of taste and color
Color, as a rule, serves as one of the means of creating or emphasizing the taste of food. If you need to resort to dyes, use natural products that are pleasant in color and taste. For example, to tint vegetables, saffron and other spices (paprika, curry) are used, and to give the desired color to sauces, for example, mayonnaise (or sour cream), ketchup and tomato paste are added to them. In addition, mayonnaise (or sour cream), which is often served with cold fish, fresh vegetables or hard-boiled eggs, can be colored green using parsley juice or by adding finely chopped spinach leaves.
For hot dishes, decorations are prepared in advance. After all, they need to be placed as quickly as possible before the food gets cold. Otherwise, it will lose most of its taste.
Immediately before serving dishes of fish, meat, grilled or skewered poultry, “walk” over them with a brush lightly dipped in vegetable oil. This will add shine to the fried crust and make the dishes even more appetizing. To enhance the color and shine of cold dishes and snacks, they are coated with a thin layer of edible gelatin.
Orange pomander with cloves
Pomanders are French crafts that have been an integral aromatic decoration for winter festivities for several centuries. The word “pomander” comes from the French “pomme d’ambre”: during the Renaissance, this was the name for aromatic ambergris balls that were produced in Venice and were used to aromatize living spaces.
Over time, the word “pomander” began to be used to describe round bottles made of silver, gold or ivory, which allow the original tart aroma to be preserved for a long time.
Fruit pomanders appeared in France at the beginning of the twentieth century. French women hung pomanders in their linen closets to add a sophisticated scent to their linen.
For this we used ordinary apples, dried with spices in a special way.
Citrus pomanders appeared in England. They were made from oranges, cloves, cinnamon and other spices. This scent has become a symbol of Christmas and New Year.
Pomanders can be made from apples, lemons, oranges and limes.
There is a classic recipe for a spice mixture for a pomander (based on 4 fruits):
– 1/2 cup ground cinnamon
– 1/4 cup ground cloves
– 2-4 teaspoons (heaped) nutmeg
– 2-4 teaspoons ground allspice
– 1/4 cup chopped orris root
Manufacturing:
Take a wooden stick and pierce the peel of the fruit. We insert a clove of cloves into each hole, sprinkle generously with a mixture of spices and place in a beautiful fabric bag. The pomander will gradually dry out and emit aroma throughout the room for about six months.
In a simplified version, we simply stick cloves into the orange and lightly sprinkle with a mixture of spices. For New Year's decor, carnation caps are sometimes tinted with gold paint.
You can hang these fragrant balls around your apartment or give them to your loved ones... They will bring joy and New Year's mood to any home!
Deep-fried "Roses" from potatoes (turnips, beets)

These deep-fried “roses” can be made from potatoes or turnips (“white roses”) or beets (“red roses”). Red roses can also be made from potatoes by coloring them with beet juice. It is advisable to take older potatoes - slices from young potatoes turn out to be quite fragile.
It is convenient to cut the “petals” of the future “rose” with a thickness of 1-1.5 mm from raw potatoes on a special grater for vegetables.
And if you don’t have it, then try to cut it with a sharp knife as thinly and evenly in thickness as possible. The “petals” should be thin and translucent.

We cut one plate thicker (3-4 mm) in order to cut it into long square bars for the central “buds”, around which we will wrap the “petals”.

Then soak the “petals”, “buds” and toothpicks for chopping off the “rose” in a bowl of cold water, to which you must add salt (1 full teaspoon of salt per 1 liter), for 2-3 hours. This will soften the petals by dissolving some of the starch and make them much more pliable when rolling the roses.

Toothpicks need the smallest ones you can find on sale. If you do not first soak them in water for 2-3 hours along with the “petals,” they will burn when frying the roses in hot oil.
Let's start making roses:
Take the central “bud” and wrap it tightly with one petal. Then we take another petal and twist it in the other direction. After this, secure the bud with a piece of toothpick.
Like this:
After this, we wrap the other petals, moving them slightly from above, so that the “rose” turns out to be open, “blooming”.
The rule must be strictly followed: one petal goes clockwise, and the next petal goes counterclockwise.
The larger you want to make the “rose,” the more petals and toothpicks to hold them together.
Then lightly shake the “roses” from the water and set them aside on a napkin to dry for 3-5 minutes. Otherwise, in hot oil, excess water will “explode” and splash. (If you put a wet rose in boiling oil, then you will have to spend a long time and tediously cleaning the entire kitchen from scattered grease.)
While the roses are drying, put a small cauldron with vegetable oil on the fire and heat to the desired temperature.
To check if the oil is hot enough, take one petal from the bowl, dry it with a napkin and drop it into the oil. If it sizzles happily and bubbles appear, then the oil is ready for frying, but if it sizzles weakly, then you need to wait a little longer.
So, the oil has reached the desired temperature.
We lower the rose head down and try not to let it tilt to one side for 1-2 minutes. At this time, all the petals will open. Now carefully turn it over and fry on all sides until golden brown.
When the “rose” acquires a crispy color, it is ready.
Remove it from the cauldron onto a paper napkin to allow excess oil to drain. Lightly sprinkle with salt.
When the “roses” have cooled down a little, remove the toothpicks. It is easier to pull them out if you turn them a little around the longitudinal axis before pulling them out.
The finished “roses” no longer want to fall apart into “petals”, and they can be carefully transferred to a plate and served as a finished separate dish, or as a decoration for dishes.

"Pearls" from balsamic vinegar

You need: -1 glass of odorless vegetable oil, put in the freezer for at least 30 - 60 minutes (the oil should be cold, but not frozen); -150 ml balsamic vinegar; -2 g (vegetable gelatin); -syringe (you can also use a pipette)
Bring balsamic vinegar + agar-agar to a boil, stirring (do not boil), let cool for 5 - 10 minutes.
Fill a syringe and pour the balsamic vein into the cold oil, drop by drop.
Using a slotted spoon, collect the pearls and rinse in a container of cold water. Drain the water and use the pearls in salads.
The answer to the question why all this? This is done in order to surprise your loved ones and guests with a new format of a familiar product. It’s very interesting when the “eggs” burst on the tongue, leaving the taste of the sauce.
New Year's ice for drinks

Pour well-boiled water into a layer of pre-boiled water (to make the ice clear) into ice molds and freeze.
Pour a thin layer of water onto the frozen ice and lay out bright, beautiful berries.
We freeze again so that the berries are thoroughly frozen and cannot float.
Fill the molds to the top with water and place in the freezer until completely frozen.
Sugar roses

We rinse the roses with cold water, carefully shake off drops of water from the flowers and dip them into a slightly warm (but not hot!) jelly solution of one and a half or double concentration (what is written on the gelatin package).
Sprinkle generously with sugar or fructose and place in the refrigerator until the jelly solution has completely cooled (about 2-3 hours).
We use sugar roses to decorate various desserts, cakes, or serve as a decoration for the tea table and sweets.
Cucumber “Christmas tree” for decorating the New Year’s table

You can also make “Christmas trees” from sliced meat and cheese.
Original potatoes for decorating salads and snacks

Using a thin and sharp knife, cut the potatoes into thin, almost transparent slices.
Or use a grater to cut thin chips.
Place a sprig of parsley on the slice.
Cover with another slice and trim around the edges so that both slices are the same size.
Fry in hot vegetable oil on both sides.
Season the fried slices with salt and serve hot.
Potato decoration

New Year's decoration of potato roses.
We cut out stars from sweet peppers (yellow, red, green) and place them on the rosettes after baking before serving.
The New Year's roses in the photo are prepared with double the amount of yolk.
Needed: 0.5 kg potatoes 3 tbsp. l. heavy cream 3 tbsp. l. parmesan, finely grated 1 yolk
Dry the potatoes boiled in salted water a little after they are ready, drain the water at the end of cooking and remove the lid over very low heat.
Then, without allowing it to cool, knead quickly and thoroughly until smooth.
Add the yolk, cream, cheese, season with salt, freshly ground pepper and a pinch of nutmeg.
Mash everything thoroughly again and beat lightly with a spoon.
The puree should not be liquid, homogeneous and without lumps of unmashed potatoes.
Using a pastry bag with a star tip, pipe “roses” onto a baking sheet lined with baking paper (see the previous recipe “Potato roses for decorating dishes” above).
Bake the roses in a preheated oven at 200 degrees. Leave in the oven for about 20-25 minutes until lightly browned.
The finished “roses” can be sprinkled with spices to taste.
New Year's apple

New Year's apple to decorate the festive table.
To prevent the cut from darkening, lubricate it with lemon juice or a solution of citric acid. You can cut a heart from an apple of a different color and insert it into the cut hole.
Cookies with wishes

Ingredients:
cookie dough, shortbread or flavored shortbread, or sweet with soda and sour cream, or gingerbread, or ginger - this is your choice (the dough can be tinted with cocoa or dry berries grated into a fine powder)
sugar-protein glaze (180-200 g of powdered sugar and 1 chicken protein)
food coloring for tinting glaze
pastry bag and tip No. 1 (or a plastic file with a corner cut off)
paper
scissors
satin ribbons
Preparation:
Knead the dough, roll it into a layer about 7-8 mm thick, cut out shaped cookies with die-cuts and make 2 holes in them, as shown in the photo.


It is convenient to make holes with a cocktail straw.
Then we bake our cookies and let them cool completely.
The recipe for icing sugar is quite simple - gradually grind 1 chicken protein thoroughly with 180-200 grams of powdered sugar.

The powder must be of sufficiently high quality to avoid the formation of lumps.
The amount of sugar in the glaze is selected based on the convenience of painting with this glaze - it should not be too thick or too thin.
You can leave the icing white and decorate the cookies painted with it with colored ribbon - it will be very beautiful.
You can add a few drops of food coloring of the desired color to the icing and stir thoroughly.

Use icing to carefully outline the cookies and around the holes for the ribbons.

Then we cover the space inside the outline with icing.

Let the icing on the cookies dry sufficiently - at least 6 hours, preferably 1 day.
Using the dried glaze, you can make various patterns with glaze of a different color and let it dry for another 1 day.
While the glaze dries, we print on paper with a printer or write by hand our wishes, congratulations, and predictions.
The size of the pieces of paper should be close to the size of the cookies.
We roll up the leaves with the inscriptions into rolls and tie them with ribbons to the cookies with well-dried icing.
Options for decorating cookies with congratulations:


Funny snowmen made from eggs

Note: Because 2017 is the year of the Rooster, so you only need to take quail eggs. The result will be not snowmen, but snowmen! 🙂
Ingredients:
hard-boiled eggs (chicken - 8-9 minutes of boiling when placed in cold water; quail - 5 minutes)
carrot
wooden skewers for shish kebab
Preparation:
We cut off the ends of the eggs to make them stable.

To make a snowman's hat, cut two carrot circles of different diameters. Cut a large circle from the thick end and a small circle from the thin end.
We cut a wooden skewer from one end to a length equal to the height of two eggs placed on top of each other. When cutting, make sure that there are no splinters on the cut.
Our prepared skewer has one sharp end and the other blunt end.
Using the sharp end of a skewer, make holes in the centers of the carrot circles.
Then insert the skewer into the circles with the blunt end, as shown in the photo.

Note: You can use wooden toothpicks for quail eggs.
We place two eggs on top of each other and vertically stick a skewer with a carrot hat into them on top.
The snowman is assembled.


All that remains is to decorate it with black peppercorns (these will be the snowman’s eyes and buttons on the stomach) and a wedge cut out of carrots to represent the nose.

Note: If the snowmen are intended for children, cut out the eyes and buttons from black olives or from the crust of black bread.
We insert the peppercorns and carrot nose into the indentations made in the egg whites with the sharp end of, say, a skewer.
Decorate the snowmen with parsley sprigs and serve.
"Love Heart" made from tomatoes

Plum tomatoes are suitable. Cut in half diagonally. Glue a cut-out shape from a white sheet onto the blunt part of a skewer or toothpick.
Cheese baskets

To prepare cheese baskets, grate 200 grams of hard cheese on a fine grater. Mix with a full tablespoon of corn or potato starch, add crushed garlic to taste.
As an option. You can use only grated hard cheese without adding starch and garlic - this is to taste.
In a well-heated frying pan, lightly greased with vegetable oil, or in a dry frying pan with a non-stick coating, spread 2 tablespoons of the resulting mixture over the surface in the form of a pancake... the middle should be denser. As soon as one side has set, remove the pan from the heat, hold for a minute and remove from the pan, placing the pancake on an inverted cup, glass or any other vessel that you want to shape the product.
To prevent the cup from straightening out at the initial moment, you should grab the basket on the cup with a thin rubber band or press it with a napkin until it cools. Place the baskets in the refrigerator for a while...then fill with salad and serve.
"Christmas tree" made from beets

Beetroot Christmas trees will look beautiful and tasty on the table. Boil the beets, cut into even circles about 1 cm, but no thicker. You can make a cream layer as in the photo: 1) Mix cheese with lemon zest, chopped garlic and ground pepper. 2) Remove the avocado pulp with a spoon, add sour cream, ground pepper and mash thoroughly with a fork. Pipe the cream using a pastry bag. Garnish with fresh herbs.
Every housewife knows how important it is to present dishes beautifully, especially when you are preparing to receive guests. And when setting the table, it is important not to forget about salads. The process of preparing salads itself is not so much complicated as it requires time and patience. But you just have to approach it creatively, and your culinary masterpieces will surprise guests not only with their taste, but also with their interesting appearance.
And really, how can you, when decorating a festive table, forget about one of the most important and popular dishes? Don't underestimate them.
It doesn't matter if you're celebrating an important event or just want to have dinner with your family, all you have to do is put on a bright, decorated salad and it will instantly transform an ordinary meal.

And despite the fact that in any cuisine there are holiday and everyday dishes, this is one of those that always fits perfectly into the menu. Many of them don’t even need to be decorated; they themselves display a riot of colors and elegant brightness, while the rest are in no way inferior to their “festive” counterparts, you just have to show your imagination.

Remember how much a housewife has to do before an important feast: buy food in advance, think through all the dishes, prepare it, set the table, and don’t forget about yourself. And how can you present cooked food beautifully at such a frantic pace?
And in this case, salads will come to your aid. Their design will not take much time, especially if you find a couple of options the day before, with photographs and descriptions.

Over time, you will get so used to it that serving even the simplest dish will amaze your guests and your family with its sophistication. And each time it will take less and less time. And then you will definitely have time to do both manicure and makeup before the holiday.
How can you decorate a dish so that even a real gourmet will be interested in your creation? First, stock up on herbs - they will help the dish look fresh.
For decoration, it is better to use those ingredients that are already included in its composition, or those that you are confident in, since everything should be combined with each other not only in color, but also in taste.
But, if with salads without dressing (or seasoned with oils) everything is simple - they do not require additional decoration, then what about others? After all, many others imply the presence of mayonnaise or other sauce that hides the bright color of the products.

Here, use a cutter (also called a round cutter): it will help you serve the appetizer in the shape of a neat ring. Such devices can also be found in a square shape. If you don’t have time to go to the store, don’t despair.
An ordinary cut plastic bottle or baking molds can cope with this task. Just place them on a plate and spoon a portion of the salad inside, pressing it down well with a spoon to prevent it from falling apart. Then remove the “frame” and, voila! – the dish is ready for further serving.
On top you can put a chopped egg, mushrooms, bell peppers, black olives or herbs. With this serving, the dish will look very stylish and neat. Or you can make a basket like the one in the photo.

There are moments when time is so short that there is no time to be distracted even by such simple details. Then again you have to postpone both serving and decoration until next time. But there are options for such cases. They do not require any preparation and are absolutely independent of the composition or dressing.
If you are planning several options at once, then do not decorate them the same, it will be boring. It’s better to diversify the decor, but so that they all look harmonious with each other and the main dishes. Don’t forget that everything is good in moderation: being too keen on decoration will ruin all your efforts, the table will look awkward, and the dishes will be unappetizing.

It wouldn't hurt to remember some tricks. For example, products and colors:
- If you need a burgundy color, take beets;
- red - pomegranate, tomatoes, bell pepper will help you;
- do you need green? Take peppers, canned peas, cucumbers and any greens;
- if you want to add blue, mix the juice of red cabbage with rice or a boiled egg;
- corn, yolk and pepper will give you yellow color;
- cranberry juice – pink;
- missing white? Peeled radishes, cottage cheese, cream, boiled egg and rice will help you;
- If you rub the protein and mix it with beet juice, you will get purple. Such a small mastery of the laws of artistic color mixing right in the kitchen.
If you have enough time and you want to learn the art of table decoration in full, then pay attention to carving. This is a type of decorative decoration of vegetables and fruits, in fact it is artistic carving.

Carving has been riding the wave of popularity for many years; many famous chefs even organize competitions in this discipline. For this you will need a figured knife. Nowadays you can even find special kits with many accessories on sale.
Remember a few tips on what you can cut and from what. For example, cucumbers can be decorated with a spiral (using a special tool from the carving set), serpentine, stripes and ribbons. Large fruits and vegetables can be made into baskets.
Flowers can be cut from tomatoes, eggs, and even radishes! The only thing is, don’t forget to immerse it in cold water first - this will remove the bitterness.
You can add regular lettuce leaves to a “picture” of cut out decorations: line a serving dish with them or add a couple of leaves on top. Mint, lemon balm and basil leaves are also used for decoration.
Seasonings will also help change the color: paprika, curry, parsley, ground black pepper. Even ordinary tomato paste can add a touch of originality to a salad.
This way you can decorate absolutely any vegetable option. But there are a couple of tricks with fruit ones too. Buy a noisette at any tableware store. This is a special spoon for “cutting” balls and hemispheres of different sizes from fruit pulp. It looks like an ordinary spoon, but with metal hemispheres of different diameters along the edges.
You can cut out balls of watermelon and peaches, melon and apples, like ice cream scoops, and serve them in waffle cups, pastry baskets or crystal bowls. Don't forget to decorate the top with berries and mint leaves. It is perfect for dessert and even children will love it.
In addition to all of the above, a few more points can be highlighted:
- Firstly, the main point, of course, is the compatibility of products with each other. Usually there is no question about this; the main thing is not to use incompatible components, such as, say, meat and kiwi. It is better to pay attention to lemons, olives, eggs and bright vegetables.
- Secondly, design requires no less a sense of style than any other art. It is important to clearly think through the composition, choose accents, and determine the center.
- If you decide to decorate your dishes, then you should choose suitable dishes that will not distract attention from the main elements. For example, bright dishes in combination with complex decor will turn your dish into a fractional and tacky something.
Don’t forget that the final appearance of the dish depends only on you, so it’s worth practicing. Give preference to clear lines and even cubes. Use well-sharpened knives. Your accuracy in cutting vegetables and fruits is already 50% of success.

Don't forget about color balance. You, like an artist, must see and feel the most winning combinations. Add a little contrast for light options with tomatoes and bright bell peppers, and for dark ones use greens and cucumbers. You can even use colored zest from citrus fruits like orange or lemon.
Make sure that the decor does not divert attention from the main dish, but only complements it. It’s better not to get carried away with excessive decoration, let everything be modest, but tasteful.

If you need to use any non-edible ingredients, be sure to let your guests know, especially if you need wooden skewers or toothpicks for canapés and holding decorations together.
You can also use raw vegetables. But you should still strive to ensure that the entire decor is not only beautiful, but also edible.
Beautiful jewelry video
We should also talk about table decoration for children's parties. Any children's holiday, especially if it is a birthday, requires careful preparation from parents. You must create such a cheerful and joyful atmosphere that the holiday will be remembered not only by the hero of the occasion, but also by all his invited friends.

It would seem that there is no place for salads on the table here, because most children do not eat them. But be that as it may! If you show originality and prepare delicious options with an unusual design, then children will definitely appreciate them. It all depends only on your imagination: you can create entire plot compositions on plates! The childlike joy and wonder is definitely worth the effort.

In addition to decor, pay attention to the following points:
- Avoid spicy, salty and fatty foods. Fried, smoked and snacks with mayonnaise and lots of spices have no place on the children's table.
- Avoid bold experiments: do not replace your child’s usual products and add something new. Give preference to traditional dishes, choosing ingredients that children will definitely not refuse.
- If there is a holiday with the participation of very young children, then exclude citrus fruits, as well as bright fruits and vegetables. Remember, they can cause an allergy attack!
- The same attention should be paid to any fish if you plan to put it on the table or add it to dishes. There shouldn't be any bones in it.
- Take a couple of canapé recipes into service. Children eat them with great pleasure: they are small and on convenient skewers. To prepare them, give preference to neutral fruits and vegetables, berries, cheeses, eggs and mushrooms.
Examples of decorating children's salads


Decoration for a children's birthday party: beautiful, fun and edible!
Little tricks
Any home celebration creates an upbeat and joyful mood, immersing everyone in an atmosphere of genuine fun. Especially if you don’t have to spend a lot of time preparing dishes and setting the table.

And any housewife wants not only to demonstrate her culinary abilities, but also to surprise her guests with a beautifully decorated table. And here salads will come to your aid again. Easy to decorate, they will become a bright highlight that will certainly be remembered.

Table decoration for the holiday
We are especially careful when choosing what we will prepare for the holiday table. We review the recipes in advance, decide on the final menu option, and draw up a list of necessary products.
And, undoubtedly, every housewife has a couple of recipes that must be prepared for a gala dinner. But even if these are the most ordinary Olivier and vinaigrette, you don’t need to give up the idea of preparing them if you decide to amaze everyone with an original presentation.

You just need to slightly decorate them, and you can be sure that your guests will definitely appreciate even these familiar dishes.
To make them not only tasty, but also spectacular, show imagination and ingenuity. Don't forget to be careful! Registration will not take much time, which will definitely work to your advantage. If you have enough time, you can try more complex decoration methods.

Such decorations can take more than twenty minutes the first time, so it is better to test them in advance and get used to them, especially if you are planning a complex composition. After several workouts, even complex elements will not take you more than ten minutes.
Pay attention to recipes with carved flowers and other figures made from the pulp of fruits and vegetables. Creating them will require some preparation, but the result is worth it.

You can give preference to simpler methods:
- You can even make a voluminous “rosette” from bacon or ham;
- for fruit dishes, use figuratively chopped kiwi or removed citrus zest;
- Another way to effectively serve salads is to focus not on the top decorations, but on the ingredients themselves. So, if it does not require stirring, then you can experiment with this.

For example, vegetable dishes will look advantageous if they are laid out in layers. The dressing can be placed nearby in a separate gravy boat or coated on top and sides of the formed dish. Use not only mayonnaise for this; sour cream and unsweetened yoghurts are also great.
On top the composition can be completed with almonds, hazelnuts or pine nuts.

If nuts don’t suit your dish at all, then pomegranate seeds are an excellent substitute.

Or you can do without them by adding carved flowers from vegetables to the dish or laying out an edible design. Using parsley sprigs, radishes and chopped olives, you can create a fish and penguin, as in the following photo.

You can also experiment with volumetric molding. For example, winter dishes can be served in the form of forest cones, and seafood in the form of fish.
All of the above methods of decorating dishes are not the limit. It all depends only on your imagination!
Get creative and you'll come up with a variety of designs for the same salad, but for different occasions. Change shapes and come up with new unique recipes for decorating New Year's and everyday dishes. Each housewife will have all this differently, because everyone has their own vision of beauty.

One thing remains unchanged - the festive atmosphere and the good mood that beautifully decorated dishes bring. Whether you use these skills in everyday life or just on holidays is up to you.

Learning how to decorate not only salads, but also other foods in interesting and unusual ways is not at all difficult: just be patient and spend a little free time. Coupled with a great desire, this will be enough. Having mastered even the simplest elements, you will be able to combine them in different ways and create many bright compositions.

There is no “ceiling” in this art; even after learning how to perform the most complex things, you can continue to move forward, improve your skills and come up with new original ways to serve both salads and all other dishes for any occasion.

And you can pamper your family every day with a spectacular serving of a regular dinner, bringing the mood of celebration and magic into everyday life!


Salad decoration is an important part of the entire serving. You can decorate dishes not only with the usual herbs, but also with a variety of cuts, mayonnaise designs, and figurines. Dishes that received proper attention during presentation are always much tastier and more beautiful than the rest.
“Shuba” salad is one of our people’s favorite salads because it consists of simple and affordable ingredients, and their combination gives a unique and delicate taste. “Shuba” is often prepared for the New Year and Christmas holidays, and it always evokes a feeling of triumph and joy in a person, even on the most ordinary everyday day.
Herring under a fur coat got its name only because the fish is covered with many “fluffy” vegetable and mayonnaise layers with which it is covered on a serving dish. But how boring the same salad bowl with this dish can look at every holiday. Nowadays, it is popular and relevant to create an unusual and original presentation for everything, and “fur coat” is no exception.
The most common and “boring” serving of herring salad “Shuba”
Original serving of the standard salad “Herring under a fur coat”:
- One of the methods involves giving the salad the shape of a fish; it is not necessary to imitate the herring itself, but the shape of a funny, even slightly childish fish can provoke joy and a smile in everyone
- To do this, the salad should be laid out on a plate in advance in a specific shape: an oval with a tail
- All the details that are characteristic of a fish can be created from scrap materials: scraps of vegetables, olives, herbs, onion rings, mayonnaise designs
 original presentation of the “herring under a fur coat” salad in the shape of a fish
 Unusual presentation of the salad “Herring under a fur coat”:
- One of the most unusual variations of serving “shuba” salad on the table is serving it in the form of a roll.
- This salad contains a set of standard ingredients, which differ only in that all layers are placed on cling film and in reverse order: beets, carrots, egg, fish, onions, potatoes (depend on your recipe)
- Then all the contents are carefully rolled up using film and a roll is formed.
- The roll should be put in the refrigerator to harden and only after a sufficient amount of time has passed, when the mayonnaise has held all the layers together, carefully place it on a plate.
 unusual presentation of “shuba” salad in the form of a roll
 You can decorate the “shuba” salad roll with bright greens and a mayonnaise “mesh” pattern.
Beautiful presentation of the salad “Herring under a fur coat”:
- This serving involves arranging the salad in the shape of a ring.
- To do this you will need a special hard or silicone baking dish.
- In order for the salad to keep its shape, all layers must be laid out slightly compacted and pressed tightly against each other.
- The salad in the form is placed in the refrigerator for several hours to “set”
- After the time has passed, you need to cover the mold with a serving plate, sharply turn the mold with the plate upside down and tap the mold a little so that the salad comes away from it.
- Decorate the finished salad with herbs and chopped vegetables

 beautiful presentation of salad “herring under a fur coat”
 Decorating the Olivier salad, original ideas for serving a familiar dish
“Olivier” is the most popular and most common dish on holiday tables. Like “Shuba”, they love to cook it for New Year and Christmas, and the taste of this salad will certainly evoke pleasant associations for everyone. But no matter how tasty and beloved this salad is, its standard and usual presentation in the form of a “heap” can be boring and uninteresting.
An original and non-standard presentation of a familiar dish will help to correct the situation and decorate, as well as diversify the table. There are several winning variations for this.
 Regular and standard serving of Olivier salad on the table
 Original serving of Olivier salad:
- The original Olivier salad should contain pickled chopped cucumber
- Not everyone knows the delicious and very balanced combination of pickled salted and fresh cucumber
- Try decorating the salad with slices of fresh cucumber, which will not only make the dish festive, but also make it more “fresh” and juicy
- In order to do this beautifully, you should use either a wide, well-sharpened knife, or a special vegetable peeler (which is much more convenient, faster and easier)
- Cucumber slices should be cut lengthwise. You can lay them out in the form of a fan, in the form of ruffles or curls.
- If you wish, you can decorate the salad with potato chips (this is important, since the recipe itself also contains potatoes)

 original presentation of the usual Olivier salad, decorated with fresh cucumber and potato chips
 An unusual presentation of the standard Olivier salad:
- The unusual presentation of the usual Olivier salad involves a little “game” with the ingredients of the dish
- In order to give it a beautiful shape, you will need to use either a special salad mold or any round jar
- Prepare the salad as you usually do, the only condition is not to add peas
- Place the salad tightly in the mold so that it holds its shape.
- Blend the peas without liquid in a blender until a paste forms.
- Place the resulting paste in an even layer on top of the salad, level with a knife
- Remove the mold. Place the decoration on top of the green cap: a boiled quail egg, cut in half and a spoonful of red caviar
- Be sure that such a dish will sparkle in a new way and give you a completely different taste sensation.
 unusual presentation of Olivier salad on the table
 Beautiful presentation of Olivier salad on a festive table:
- As mentioned earlier, “Olivier” is a real New Year’s dish
- A beautiful presentation involves decorating this salad in the shape of a New Year tree and this is not at all difficult to do
- For this design you will need a two-liter plastic bottle
- Cut the bottle in half and place the salad in dense layers in its narrow part (where the neck is).
- Let the salad sit in the refrigerator for several hours
- After this, cover the salad with a plate and turn it over, pull the bottle up, the salad will remain on the plate
- The resulting “slide” should be decorated with sprigs of dill; pomegranate seeds can be toys

 beautiful presentation of the usual Olivier salad on the festive table
 Mimosa salad is one of the simplest dishes for a holiday or everyday table. It can always be prepared from inexpensive ingredients, because its highlight is canned sardines. Salad is always eaten with pleasure: both at lunch and on holidays. Its unusual design can distinguish it from other dishes and make it your “calling card” on the table.

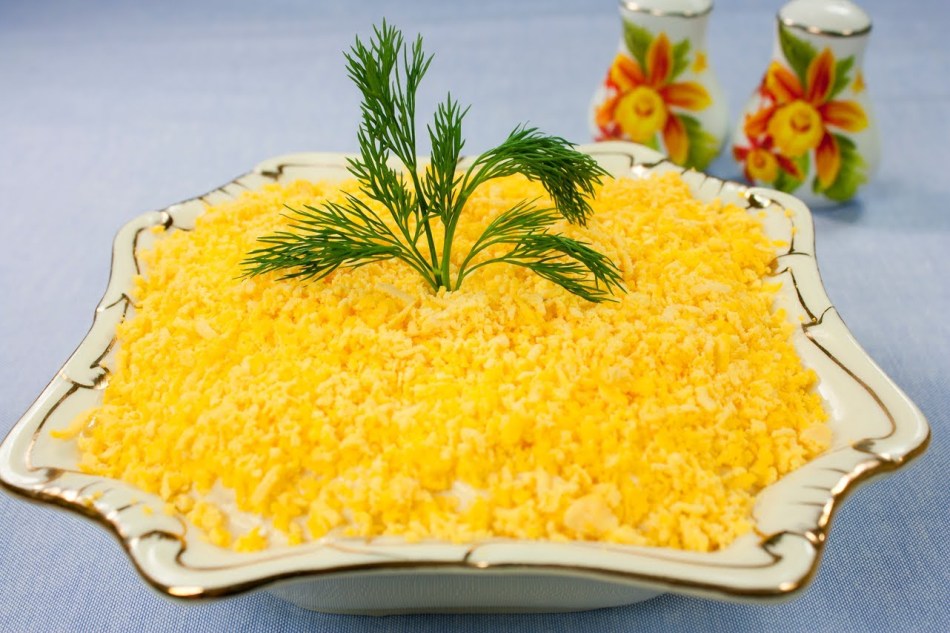 usual serving of traditional sardine Mimosa salad
 Original serving of Mimosa salad:
- An original presentation of Mimosa in a humorous style will help surprise guests and delight everyone at the festive table.
- You can create decorations for a beautiful presentation using the ingredients themselves: boiled eggs that will become “mice”
- In principle, creating such a feed is not at all labor-intensive, but it requires patience and accuracy
- The salad should be prepared in the standard way - in a “slide”, a bit like a ball of cheese.
- Garnish the salad with grated yolk, which will add color and brightness.
- Three boiled eggs should be decorated with cheese, olives and sprigs of herbs, forming ears, eyes, nose and antennae
- The mice should be evenly distributed over the entire area of the “head of cheese”

 original decoration for Mimosa salad for the holidays
 Unusual serving of Mimosa salad:
- This serving involves serving salad in portions.
- It looks like several unique mounds, each of which can be taken and placed on its own plate
- We can say that these are several small Mimosa salads at once.
- This salad is prepared traditionally, each layer is laid out after the other and at the end sprinkled with yolk or yellow cheese
- You can place such mounds on lettuce leaves that line the bottom of the serving dish.
- Such a “hilly” serving will distract from the standard and arouse guests’ interest in trying the dish
- Garnish the mounds with parsley sprigs and black olives

 an unusual presentation of Mimosa salad on a festive table
 Beautiful presentation of Mimosa salad:
- One of the simplest, but nevertheless beautiful ways to serve a salad is the image of the mimosa flower itself.
- The salad got its name due to the fact that its top layer of yolk is very reminiscent of a fluffy mimosa bloom.
- That is why you can decorate the salad by “drawing” twigs, the basis of which will be dill tassels
- The salad should be decorated in this way just before serving because the greens may “weather” and lose their decent appearance during the time spent in the refrigerator.
- For the background, it is proposed to lay out a layer of grated egg white, and make flowers and a frame from the yolk

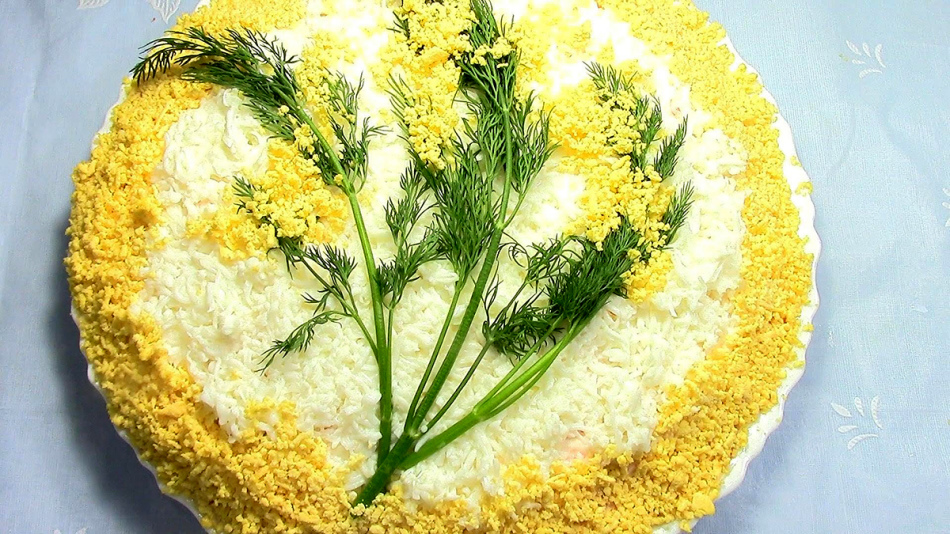 beautiful presentation of Mimosa salad with the image of a blooming mimosa
 Garnishing salad with pepper? How to beautifully decorate a salad with bell peppers?
Bell peppers are a fairly suitable material for decorating salads and other dishes. It has a good color palette: yellow, orange, red, light green, green. Its elasticity is also important, thanks to which you can set the desired shape and contour of the pattern.
There are several most popular ways to decorate a salad with bell peppers:
One way suggests you create a certain figure, for example, a dragon. This is especially true in the Year of the Dragon according to the eastern calendar or for a party in a certain medieval style. It is easy to cut out the shape of a dragon's face, its spines on its back, wings and legs from bell peppers. Eyes and some fine details can be carved from olives.

 decorating salads with bell peppers, creating figures with bell peppers
 In another case, bell pepper - An excellent form for serving the salad itself. You can use absolutely any salad. The pepper is carefully cut in half and cleared of seeds. A salad is placed in the lower part from the remains of the pepper and a boat sail is formed with skewers. It should be remembered that for serving you need a perfectly smooth pepper without external damage.

 original serving of salad and decoration of salads with pepper
 An easier way is stuff the peppers with a certain salad. This is a neat and beautiful way to serve a salad that brings out the wonderful, light flavor of the peppers.

 peppers stuffed with salad for serving
 The color palette of pepper allows give your any salad a certain color, therefore, this vegetable gives you huge scope for creativity and decorating salads like fruits, flowers and other interesting objects. To do this, just chop the pepper very finely and lay it out in an even layer.
 how to decorate a salad with bell peppers?
 Smooth and beautiful bell pepper rings can be a beautiful decoration for any salad, no matter how you place them, the main thing is to do it with taste and soul.
 salad decoration with pepper. How to decorate a salad with pepper?
 How to decorate a salad with pineapples? Pineapple salad garnishes
Pineapple is one of the most popular salad garnishes in modern salads. Sweet canned pineapple goes well with meat, chicken and mushrooms. Pineapple jewelry is always original and unusual.
Most often you can find a decoration that symbolizes an open flower. As a rule, it is complemented by other elements: currants or pomegranates, greens.
 standard and traditional salad decoration with canned pineapple
 You can also decorate the salad with simple cubes of canned pineapple mixed with bell peppers and cranberries: sweet, sour and fresh taste will be mixed at the same time, which will give the dish a special impression and exclusivity.
 salad decoration with canned pineapple cubes
 Canned pineapple rings can be easily transformed into flowering carnations, you just need to be diligent and careful.

 salad decoration with canned pineapple rings
 Don’t forget about the regular pineapple, half of which can become not only a decoration, but also a form for a salad.

 salad decoration with pineapple, beautifully served in half a fresh pineapple
 Salad decorated with tomatoes. How to decorate a salad with tomatoes?
Tomato is one of the best “materials” for decorating and decorating any salad. You can cut out various figures of various shapes from an elastic vegetable:
- mugs
- hearts
- stripes and much more
The tomato can be blanched (peeled) or used as usual. When decorating a salad with a tomato, remember that you will only need the soft part of it; the seeds should be completely removed.
The easiest way to give your salad an interesting look is to create a ladybug. To do this, you will also need black olives to create spots and faces.
 decorating any salad with a tomato in the shape of a ladybug
 An unusual and rather complex way to decorate a salad is to make tulips out of tomatoes. To do this, you need to observe some subtleties:
- You should choose and buy only elastic, elongated tomatoes.
- Each tomato is carefully cleaned of seeds
- To remove seeds and the inside of a tomato, you need to cut it into four petals; if it doesn’t work out, don’t worry. You can always hide the “bad” side by placing it on a plate, and reveal the beautiful side to your eyes
- Each tulip is stuffed with lettuce, be careful: the lettuce must be finely grated or chopped so as to “keep its shape” and not make the flower crumpled
- The flower stem can be made from greenery or green onion feathers

 how to decorate a salad with tomatoes? unusual ways to decorate tomato salad
 If you cut the skin of a tomato thinly and carefully enough lengthwise with a sharp knife, then you can make a beautiful rose from the resulting “ribbon.”
how to decorate a tomato salad in an unusual, original and beautiful way?You can decorate cherry tomato salad in a unique way. To do this, slightly oblong tomatoes need to be cut slightly diagonally and the two halves of two tomatoes should be combined in the shape of a heart.

 How to beautifully and unusually decorate a salad with tomatoes?
 The standard and traditional way to decorate a salad with tomatoes is to stuff them with lettuce. Olives and mayonnaise will help create a certain pattern.

 decorating salads with tomato figurines
 Salad decorated with cucumber, how to beautifully decorate a salad with cucumber?
Just like the tomato, the cucumber is an excellent material for decorating absolutely any salads. Thinly sliced cucumbers can always become a flower, where each piece imitates a separate petal. Moreover, you can use both fresh and pickled vegetables.
 original and unusual decoration of salads with cucumber
 You can always cut leaves of any plant of various shapes from the skin and center of a cucumber. Decorating salads with such leaves is a pleasure.

 decorating salad with cucumber, creating patterns and “leaves” from cucumber
  salad decoration with pickled cucumber
 In order to create figures and patterns from a cucumber, it must be sliced very thinly using a wide sharp knife, a vegetable peeler, or a special cucumber cutter that makes a spring out of it.
How to decorate a salad with an egg? Egg Salad Decorations
Eggs are not only beautiful, but also delicious decorations for salads. You can use ordinary chicken eggs for salad, or you can use quail eggs, which, due to their miniature size, are neat and aesthetically pleasing. The salad should be decorated exclusively with boiled eggs.
One of the most common methods involves cutting flower petals from egg whites and creating a center using grated yolk. These flowers can be used to decorate Mimosa and any other salad that contains eggs.

 How to decorate a salad with an egg in a beautiful and original way?
 Even just quail eggs cut into halves can give any salad a festive and very “tasty” look. To do this, place the halves throughout the dish or lay them along the edge, repeating a certain pattern. Quail eggs can be decorated with a “bead” of red caviar if it is a fish salad and with a ring of black olive for any other salad.
Small halves of quail eggs also perfectly embody the petals of a flower, for example, a daisy. From the larger halves you can make boats, animal faces, the image of a snowman or Santa Claus for certain holidays.
 salad decorated with quail eggs stuffed with yolk and mayonnaise
 Easter salad decorated with halves of quail eggs painted with food coloring
  salad decorated with flowers made from egg white; salad can be decorated with mushroom-shaped eggs, the other half of the mushroom is painted with onion skins
 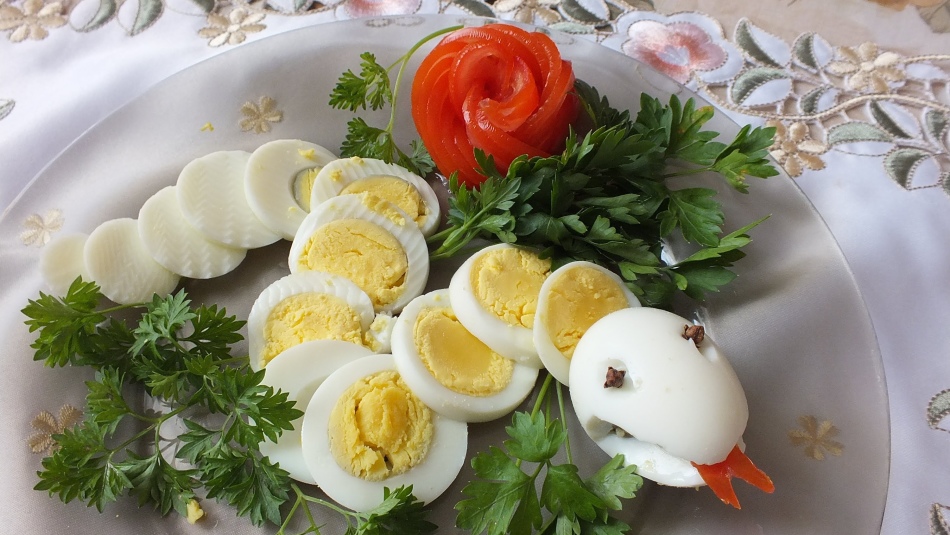 You can decorate the salad with a snake made from egg rings
 How to decorate a salad with mayonnaise?
Mayonnaise is the easiest way to quickly and beautifully decorate any salad. Mayonnaise is included in almost every salad and therefore decoration and designs from it are always relevant. Mayonnaise decoration is drawings on the salad with a thin stream of sauce. You can apply them in three ways:
- making a small hole in the sauce packet and squeezing it onto the surface of the dish carefully
- placing the sauce in a plastic bag (forming it into a bag similar to a pastry bag) and making a small hole in it
- Place the sauce in a pastry bag or syringe
There are several ways to decorate a salad with mayonnaise:
- drawing a neat mesh on it
- by drawing lace or curls from a mayonnaise stream on it
- by drawing certain details of the figures on the salad and vegetable figurines
There are several rules for decorating a salad with mayonnaise:
- for decoration, purchase mayonnaise only with the highest percentage of fat content so that it “keeps its shape”
- Apply the mayonnaise pattern right before serving the salad to prevent the sauce from darkening, turning yellow, running and spoiling.
- do everything with special care and then your work will not go unnoticed

 simple traditional salad decoration with mayonnaise
  “mesh” of mayonnaise - a simple and unusual salad decoration with mayonnaise
 How to beautifully decorate salads with herbs?
Greens are a good and practical material for decorating salads. As a rule, you can always create patterns from greenery that replicate vegetation:
- twigs
- bushes
- trees
- grass
- leaves
Absolutely any greenery can be suitable for decoration, which just needs to be used creatively. Most often, chopped greens are used to create a green background on which you can plant fungi from an egg, ladybugs from a tomato, or simply make the green part of the watermelon rind in the Watermelon Slice salad.

 Salad "Violet" - an unusual decoration for a salad made from thinly sliced radishes and green basil leaves
  Herringbone salad, where the shape and color of the tree can be made from chopped parsley
 “Mushroom Glade” salad, where chopped greens are laid out as a background - grass in a meadow where mushrooms grow
 How to decorate a salad with dill?
Dill, due to its small branches, becomes an excellent decoration for salad. Especially if you chop it finely. It can be conveniently distributed over the entire area of the layer; it will create a uniform and non-transparent background. It is often used to “paint” spruce branches on your salad. This is relevant when preparing festive New Year and Christmas salads.
Before you decorate your salad with dill, try to follow a few important rules:
- choose only fresh, rich green dill for decoration
- garnish the salad with dill right before serving so that it does not lose its appearance during long-term storage
- by choosing fresh dill you guarantee not only the color, but also the taste of your dish

 Christmas wreath salad decorated with dill on the festive table
 Ideas for decorating holiday salads for holidays and every day
Decorating salads is a noble cause. So, you get incredible aesthetic pleasure from the dish without even tasting it. Ordinary everyday and especially holiday salads for the New Year, Birthday and even March 8 require decorations.
How much time and effort you spend on decorating the salad affects the overall perception of the dish and even how long the salad will stay on the table. Don’t be afraid to experiment and try to decorate the salad with any edible details at hand:
- sliced vegetables
- sliced from different types of cheese
- sliced smoked and dried meats
- black olives
- green olives
- pickled and boiled vegetables
- boiled chicken and quail eggs
- red caviar
- regular and leafy greens
 decorating a holiday salad with grated boiled vegetables and a boiled egg
  garnishing the salad with boiled egg halves and carrot slices
  salad decoration with herbs and orange peels
 Unusual edible decoration for children's salads made from figurines
Children are real gourmets; they often eat only what suits them. But not much suits them. It is for this reason that caring mothers are increasingly having to invent unusual decorations from edible materials so that their children show interest in food. Boiled eggs and vegetables, herbs, cheese and meat are used.
Creating a beautiful and even voluminous design on a salad or snack for your baby is not difficult. However, you should show a lot of perseverance, be patient and be careful.
 children's bunny salad made from boiled egg
 children's salad "Tiger Cub", made from boiled egg, boiled carrots and sausage
  children's salad "Strawberry" decorated with chopped tomato and cucumber
 Original design and decoration of snacks for the festive table
The appetizer is the first thing guests try at the holiday table. It should always be distinguished by its special delicate taste and external aesthetic appearance in order to attract everyone. The snack usually consists of boiled eggs, vegetables, olives, sausage and cheese. It’s not uncommon for appetizers to include delicious seafood.
You can beautifully decorate any appetizer - fish or meat - with the help of halves of boiled quail eggs filled with a variety of dressings - red, black, capelin.

 garnishing the appetizer with boiled quail eggs
  salad decoration with shrimps and swan-shaped tomato mats
 garnishing the appetizer with thinly sliced vegetables
 Video: " How to decorate salads and appetizers for the holiday table in an original way?”
The products with which you decorate the dish should not conflict with the main components, but only complement them and enrich the taste. Today we will talk about decorating dishes not only for the holiday table with our own hands, but also about everyday dishes.
The main points of decorating holiday table dishes with your own hands
The first dish is best decorated with greens - finely chopped parsley, cilantro, green onions will give it a summer aroma and, most importantly, enrich it with vitamins.
The second course, decorated with vegetables in bright, contrasting colors, looks attractive. For example, a chop or rump steak can be served in a wide plate, decorated with a handful of green peas, radish semicircles, sauerkraut, and a sprig of herbs. As a side dish, potatoes cut into strips and deep-fried look appetizing.


Vegetable plate decoration
In spring and summer, lettuce, celery, and various types of cabbage, both whole and chopped, are an excellent decoration for dishes. 

Tomatoes and cucumbers look beautiful when sliced and placed on plates covered with large green lettuce leaves.


Vegetable slicing - decoration at home
The first dish will look like a crumbled meadow if you cut the carrots into flowers and sprinkle the soup with chopped green onions. Take medium-sized carrots, peel, wash and cut crosswise into 3-4 pieces. From the resulting blocks of different diameters, cut out, not reaching the core of the sector, from the narrowest part - three sectors, from the next - four, etc. As a result, at the end of the block you will get “flowers” with a different number of “petals”. 

Tomatoes will decorate your table in an original way if you remove the core and fill it with cubes of unpeeled cucumbers or green peas.


It’s very fun to see fly agarics made from eggs and tomatoes, especially loved by children, on the table - “fly agarics in the clearing.” Boil the eggs hard, peel them and cut off the blunt part of the egg for stability on the plate. Place chopped herbs, green onions or lettuce leaves on a plate and add eggs. Then take a tomato, cut off a segment and scoop out a little pulp with a knife, just enough so that you can put the “cap” on the “leg”. Once all the mushrooms are collected, place white sour cream dots on the caps.


Vegetables can be decorated decoratively for a festive table. When decorating a dish, it is good to use both fresh and canned vegetables. Natural cucumbers can be cut into fans, feathers and thin long strips that are easily rolled into cones and petals.


 If you take care of pickled cabbage in a timely manner in the fall, then all winter you will have not only excellent pickles, but also an excellent decoration for any meat dish.
Finely chopped red cabbage adds a special flavor to the whole table.


Beautiful decoration of main courses and snacks with your own hands
If rice is a side dish for the second course, you can color it in different colors: with tomato - pink, saffron - yellow, and if you mix rice with finely chopped dill - green.


Fish dishes can be decorated with lemon slices, cutting out corners from their zest, resulting in gear wheels of different diameters.


A beautiful contrast to lemons and oranges when decorating meat and fish dishes are whole fruits of pickled plums, gooseberries, olives and pickled apples. 

If you have some kind of savory snack in a small quantity, then it is convenient to distribute it in portions. For this purpose, you can take boiled eggs, cut them in half lengthwise, remove the yolk, which will be useful as a decoration for another dish or for a salad, and fill the white with a “heap” of black, red caviar, pollock caviar, herring mince, etc.


Try decorating the fish as follows. Take a beautiful sprig of parsley or cilantro, green peas, a carrot “flower,” a cogwheel of lemon or radish, a circle of hard-boiled egg and fill the dish with jelly made from the broth (based on the proportion: 5 g of swollen gelatin per 100 g of heated broth). An excellent addition to fish is kefir jelly with chopped herbs and horseradish.

An effective background for a salad or cold cuts can be the leaves of beet tops or red cabbage. For the egg, an unpeeled cucumber, slanted and often cut on one side and fanned out.
You can make a chrysanthemum from an ordinary bulb if you cut it often into sectors, not reaching the base, and put it in cold water overnight. Multicolor is also possible here. If you tint the water with beet juice or saffron infusion, then by the morning a pink, white, or yellow “flower” will “bloom”.
You want to serve a delicious and beautifully decorated dish on any holiday table. Today we will show you how easily and simply, using the simplest products and your imagination, you can create decorations for your holiday table with your own hands. For clarity, we will attach a photo so that you can understand more clearly how to beautifully decorate a plate at home and give it a restaurant look, elegant and attractive.
Ordinary cold cuts can be served in such a way that you want to stand and admire the culinary masterpiece. If you just cut the fish and serve it on the table, it will not be at all festive and everyday, but if you show a little imagination, decorate it with lemon, add herbs, then a simple meal turns into a festive dish.
How to decorate a fish dish

When serving herring, you can complement the dish with boiled shrimp, add herbs and lemon slices. For example, like in this photo, the process of laying out the products is as follows: (herring and shrimp)
- 2 herrings
- 400 g shrimp
- Purple lettuce and some regular green lettuce
- 8 eggs
- Black caviar, if you have it, you can do without it
As you can see, there are a lot of products, but you can reduce them, it all depends on how many guests will be present at the festive table. Place salad green leaves in the center of the dish and curly purple leaves around the edges. You should always start forming the dish from the center. Place the chopped herring and place a peeled shrimp with a tail on top between each piece.
The next round will be halves of eggs. If you have caviar, place half a teaspoon on each egg. Now you need to lay out two circles of shrimp, placing them tightly next to each other, with their backs up and tails facing the boiled eggs. Lettuce leaves must be visible. It turned out to be a very beautiful dish, look carefully at the photo and everything will immediately become clear to you.
Festive decoration of dishes with photos that you will find on this page will help you arrange and decorate salads, you will learn how to beautifully serve fruits, how to serve prepared dishes for a children's party, how to decorate them so that children are interested and happy.
Beautiful presentation of dishes does not require special knowledge; you do not have to be a professional to surprise guests with beautifully decorated dishes. A little effort and desire to surprise guests, that’s all. Here, for example, is how you can simply and beautifully serve tomatoes with soft cheese:
We begin to lay out the food from a small circle, alternating tomato slices and cheese mugs. Then we lay out a larger circle, a third, and finally a circle of cherry tomatoes. Place a rosette cut from a tomato in the center of the dish; it’s not at all difficult to make; garnish with fresh basil leaves. That's all. How beautiful and appetizing the most ordinary tomatoes look.
Decorating children's dishes

All mothers cook the most delicious things for their children's birthdays; dishes for a children's party should not only be tasty, but also beautiful. The food itself is not very attractive to children, but if it is served bright, colorful, with children's characters, then the children will certainly sit and enjoy it at the table.
A “fruit palm” made from fruits can be an excellent decoration for children’s dishes, because we all know that it is difficult for many children to get them to eat. But fruits cut and served in this way will definitely attract the attention of the little ones. They will happily consume the “trunk” or “crown” of a palm tree.
Fruit slicing can be done like this:
- Cut two bananas into small pieces, cut off the spouts and bend one slightly to the left and the other to the right to create the appearance of a palm tree trunk.
- Instead of sand, peel a couple of tangerines and place the slices under the trees.
- Peel and cut the kiwi, place it on top, they will replace the green crown of palm trees. What a beauty it turned out to be, the kids will be delighted.
And this is how you can decorate a fish under a fur coat for a children's party.

The salad is laid out in the shape of a fish and decorated as follows:
in the first photo they use carrots and beets for decoration, which act as scales. Cut out the beets and make a tail, whole olives will be the eyes, and cut into strips will be the eyelashes. That's all.
In the second option, instead of scales, cut a pickled cucumber and place it, placing one piece on top of another, to make a fish tail and fins from dill. Not a salad, just a picture.
Decoration of cucumber and tomato salad
The simplest salad can be turned into a chic dish if you skillfully decorate it. Many housewives who prepare wonderful treats do not want to decorate the dishes, citing inability. Believe me, there is nothing complicated, just a little imagination and desire and everything will work out. See the photo, and we will tell you in detail how to decorate the salad.
Option 1: tomato, cucumber, greens

You will need one large cucumber, one tomato, parsley leaves, that's probably all. Place sprigs or leaves of parsley on any salad with mayonnaise. Thinly slice the cucumber into slightly oblong pieces. Cut the tomato into not very thin slices. Place a chamomile-shaped cucumber on one side and a tomato on the other side. Place the edge of a tomato in the center of the cucumbers, and the edge of the cucumber next to the tomatoes. Wonderful.
Option 2: “Bouquet of tulips”

Another beautiful dish of cucumbers and tomatoes, easy to prepare.
To prepare it, you will need very few ingredients, your imagination and a little time.
- Bunch of green onion
- A dozen fresh cream tomatoes
- 60 g cottage cheese
- 2 cloves garlic
- 2 fresh cucumbers
- Spoon of canned peas
- Make two shallow cuts on top of the tomatoes, crosswise.
- Mix cottage cheese with crushed garlic, add salt and place a teaspoon into the cut on the tomatoes.
- Cut the cucumbers into thin oblong pieces and place halfway on the bottom of the dish.
- Place a bunch of green onions with the white side down, tie it with one arrow, spread the greens over the entire oval dish on top.
- Lay out the tomatoes, as if creating the appearance of tulips. Sprinkle a spoonful of peas casually.
A beautiful bouquet, it will even be a pity to eat it.
Option 3: tomatoes, olives, parsley

- We will need a small tomato, a few sprigs of parsley and a couple of black olives. Let's make a "ladybug" salad, this salad turns out very cute and can easily be served at a children's party. The little one will be delighted.
- Cut a small tomato into two parts, cut off the top part, and make a small cut on the bottom. Looking at the photo, you will understand how to do it correctly.
- Place sprigs of parsley in different directions in the corners, make several punctures on the back of the tomato and stick small pieces of chopped olives.
- Use one-fourth of the olive as the head of a bug, and cut into small strips to replace the legs. That's all.
Beautiful dishes and their design with photos will help you turn the most ordinary salad into something very beautiful. For example, Olivier salad, the most common dish that everyone always prepares for any holiday table. But if you decorate it a little differently, you will get a very attractive and festive salad.
How to decorate Olivier salad

Place the salad in a small mound in the center of the plate, cover the empty edges of the plate with finely chopped parsley.
- Cut the red and yellow bell peppers into thin rings and place them around the salad mound, alternating colors and lightly laying one on top of the other.
- Where the salad ends, place sliced olives in a ring, and place sliced cucumber slices in the top ring.
Place a few olives on top of the salad. That's all, just a peek.


