What cute little dogs! And they are very easy to knit, because they consist of only two pieces! Sometimes you are too lazy to knit ordinary amigurumi, where you need to knit the head, body and arms and legs separately. This toy is a godsend for lazy knitting projects.
Materials:
Yarn of any thickness and a suitable hook. The thicker the yarn, the larger the dog will be.
Filler
Yarn needle
Ribbon for decoration
Knitting density: not important

Note:
The numbers at the beginning of the sentences do not indicate a row, but a certain stage of knitting.
The dog is knitted forward and backward mainly using single crochets. The work begins with the ears, then the head is knitted. Next, the back and tail are done. Each subsequent row of the body is attached to the head, forming a neck. Knitting goes from the back down to the tummy, then the back leg is done, and at the very end - the front leg.
You will need to knit 2 parts and sew them together, not forgetting to stuff them with filler. One piece can be used as an applique. There are several options for connecting parts. It will be better if a small dog is sewn with a needle and thread; other sizes can be crocheted.
A small dog is the size of a key chain, and a very large dog is the size of a pillow.
For a small dog you will need very little yarn, for a medium dog - a little more. For a large dog, 100 grams of thick yarn was used (100 m in 100 g) with a knitting density of 15 sc = 10 cm. For a very large dog, 500 m of yarn was used with a knitting density of 20 sc = 10 cm.
All dogs are knitted according to the same principle, only the number of loops and rows differs.
Small size Scottie dog.

1. 3 ch, start with the 2nd loop from the hook, 1 SS, 1 sc in next. v.p. (= ear).
2. 7 ch, start with the 2nd loop from the hook, 6 sc, avoiding twisting, 1 sc above the outermost sc of the eye, 1 sc in the very first ch. (= 1 row = 8 sc). 1 ch, turn.
3. Knit 4 more rows of sc.
4. Ch 13, start with the 2nd loop from the hook, 1 sl in each next stitch. 2 ch, 2 sc in next. vp, 1 sc in each of the next. 9 ch, avoiding twisting, 1 sc in last row. Sc in head, 1 sl in next. RLS (= back and tail). 1 ch, turn.
5. 1 sl st in sl st, 1 sc in each next. 10 RLS. 1 ch, turn.
6. 1 sc in each of the next. 10 sc, 1 sc in sl, 1 sc in next. Sc in head, 1 sl in next. RLS. 1 ch, turn.
7. 2 sc together (first sc and next sc), sc to end of row. 1 ch, turn.
8. 2 sc in first sc, 1 sc in each stitch to end of row (= 13 sc). 1 ch, turn.
9. 2 sc together, sc to end of row. 1 ch, turn.
10. For the back leg: 1 sc in each of the tracks. 2 sc, 2 sc together.
For the front leg: skip 4 sc, attach the thread from the second skein of yarn to the next. Sc (= 4th sc, counting from the end of this row). 2 sc together, 1 sc in each of the next. 2 sc.
Rows 11-14 knit for each leg:
11. 1 ch, turn. Sc to end of row (= 3 sc).
12. 1 ch, turn. Sc to end of row. 2 ch, turn.
13. start with the 2nd loop from the hook, 2 sc in the 2nd ch. from the hook, avoiding twisting, knit 1 sc in each of the traces. 3 sc (= 5 sc). 1 ch, turn.
14. 1 sc in each of the next. 4 RLS, 1 SS in last row. RLS.
Repeat rows 1-14 for the other half of the dog. Fold the pieces and sew them together, stuffing them tightly with filling when a small hole remains.
Hide the ends of the threads.
Tie a bow around your neck.
Small dog crochet pattern:

Medium dog:

1. 5 ch, start with the 2nd loop from the hook, 1 SS, 1 sc in the next. v.p., 1 PS in the next. ch, 1 dc in last. v.p. (= ear).
2. 10 ch, start with the 2nd loop from the hook, 1 sc in each of the next. 9 ch, avoiding twisting, 2 sc above the outermost dc of the ear, 1 sc in the very first ch. (= 1 row = 12 RLS). 1 ch, turn.
3. Knit 6 more rows of sc.
4. 21 ch, start with the 2nd loop from the hook, 1 sc in each of the next. 3 vp, 1 p. in each of the following. 3 v.p., 2 p. in the next. vp, 1 sc in each of the next. 13 ch, avoiding twisting, 1 sc in last row. Sc in head, 1 sl in next. RLS (= back and tail). 1 ch, turn.
5. 1 sl st in sl st, 1 sc in each next row. 14 RLS. 1 ch, turn.
6. 1 sc in each of the next. 14 sc, 1 sc in sl, 1 sc in next. Sc in head, 1 sl in next. RLS. 1 ch, turn.
7. 1 sl st in sl st, 1 sc in each next. 16 RLS. 1 ch, turn.
8. 1 sc in each of the next. 16 sc, 1 sc in sl, 1 sc in next. Sc in head, 1 sl in next. RLS. 1 ch, turn.
9. 2 sc together (SS and next sc), sc to end of row. 1 ch, turn.
10. 2 sc in first sc, 1 sc in each stitch to end of row (= 19 sc). 1 ch, turn.
11. 2 sc together, sc to end of row. 1 ch, turn.
12. For the back leg: 1 sc in each of the tracks. 3 sc, 2 sc together.
For the front leg: skip 8 sc, attach the thread from the 2nd ball to the next. Sc (= 5th stitch, counting from the end of this row). 2 sc together, 1 sc in each of the next. 3 sc.
Knit rows 13-17 for each leg:
13. 1 ch, turn. Sc to end of row (= 4 sc).
14. Knit 2 more rows of sc. 1 ch, turn.
15. 1 sc in each of the next. 3 sc, 2 sc in next. RLS (= 5 RLS). 2 ch, turn.
16. start with the 2nd loop from the hook, 2 sc in the 2nd ch. from the hook, 1 sc in each of the traces. 5 sc (= 7 sc). 1 ch, turn.
17. Knit 2 more rows of sc.
Cut the thread, leaving a long end for stitching.
Repeat rows 1-17 for the other half of the dog. Fold the parts and tie the sc together, inserting the hook into both parts at the same time. Fill tightly with filling when a small hole remains.
Hide the ends of the threads.
Tie a bow around your neck.
Medium crochet dog pattern:

Big dog:
1. 2 ch, start with the 2nd loop from the hook, 1 sc, 1 ch, turn.
4. 1 sc in each of the next. 2 sc, 2 sc in last row. RLS (= 4 RLS). 1 ch, turn.
6. Sc to the end of the row.
7. Ch 14, start with the 2nd loop from the hook, 1 sc in each next stitch. 13 ch, avoiding twisting, 1 sc above each sc in ear (= 1 row = 18 sc). 1 ch, turn.
8. Knit another 10 rows of sc.
9. 35 ch, start with the 2nd loop from the hook, 1 sc in each of the next. 2 vp, 1 p. in each of the following. 3 ch, 1 dc in each of the next. 4 ch, (1 dc, 1 st) in next. vp, 1 sc in each of the next. 24 ch, avoiding twisting, 1 sc in last row. Sc in head, 1 sl in next. RLS (= back and tail). 1 ch, turn.
10. 1 sl st in sl st, 1 sc in each next. 25 RLS, 1 SS in PS. 1 ch, turn.
11. 2 RLS together (SS and next RLS), 1 RLS in each next. 24 sc, 1 sc in sl, 1 sc in next. Sc in head, 1 sl in next. RLS. 1 ch, turn.
12. 1 sl st in sl st, 1 sc in each next. 25 sc, 2 sc together. 1 ch, turn.
13. 1 sc in each of the next. 26 sc, 1 sc in sl, 1 sc in next. Sc in head, 1 sl in next. RLS. 1 ch, turn.
14. 1 sl st in sl st, sc to end of row. 1 ch, turn.
15. 1 sc in each of the next. 28 sc, 1 sc in sl, 1 sc in next. Sc in head, 1 sl in next. RLS. 1 ch, turn.
16. 2 sc together (SS and next sc), sc to end of row. 1 ch, turn.
17. Sc to last two stitches, 2 sc together. 1 ch, turn.
18. 2 sc together, sc to end of row. 1 ch, turn.
19. Sc to last two stitches, 2 sc together. 1 ch, turn.
20. 2 sc together, sc to end of row. 1 ch, turn.
21. 2 sc in first sc, 1 sc in each stitch to end of row (= 27 sc). 1 ch, turn.
22. 2 sc together, sc to end of row. 1 ch, turn.
23. For the back leg:
A) 1 sc in each of the next. 6 sc, 2 sc together. 1 ch, turn.
B) RLS to the end of the row (= 7 RLS). 1 ch, turn.
B) 1 sc in each of the next. 5 sc, 2 sc together. 1 ch, turn.
For the front leg:
A): skip 10 sc, attach the thread from the 2nd ball to the next. Sc (= 8th stitch from end of this row). 2 sc together, 1 sc in each of the next. 6 sc.
B): sc to end of row (= 7 sc). 1 ch, turn.
B): 2 sc together, 1 sc in the next row. 5 sc. 1 ch, turn.
Knit rows 24-29 for each leg:
24. Sc to end of row (= 6 sc). 1 ch, turn.
25. Knit 4 more rows of sc. 1 ch, turn.
26. 1 sc in each of the next. 5 sc, 2 sc in next. RLS (= 7 RLS). 2 ch, turn.
27. start with the 2nd loop from the hook, 2 sc in the 2nd ch. from the hook, 1 sc in each of the traces. 7 RLS (= 9 RLS). 1 ch, turn.
28. Knit 2 more rows of sc. 1 ch, turn.
29. 1 sc in each of the next. 8 RLS, 1 SS in last row. RLS.
Cut the thread from one of the legs, do not cut the thread from the other leg.
Tie the entire dog in one row with sc. Cut the thread.
Work rows 1-29 for the second half of the dog.
Ch 1, tie the entire dog in one row of sc. Do not cut the thread.
Place both pieces together and sl st together, inserting the hook into both halves.
Fill tightly with filling when a small hole remains.
Hide the ends of the threads.
Tie a bow around your neck.
Very large dog:
1. 2 ch, 1 sc, 1 ch, turn.
2. 2 sc in sc (= 2 sc). 1 ch, turn.
3. 2 sc in the first sc, 1 sc in the next one. RLS (= 3 RLS). 1 ch, turn.
4. 1 sc in each of the next. 2 sc, 2 sc in last row. RLS (= 4 RLS). 1 ch, turn.
5. 2 sc in the first sc, 1 sc in each of the next. 3 sc (= 5 sc). 1 ch, turn.
6. 1 sc in each of the next. 4 sc, 2 sc in first sc (= 6 sc). 1 ch, turn.
7. 2 sc in the first sc, 1 sc in each of the next. 5 sc (= 7 sc). 1 ch, turn.
8. 1 sc in each of the next. 6 sc, 2 sc in last row. RLS (= 8 RLS). 1 ch, turn.
9. 2 sc in the first sc, 1 sc in each of the next. 7 sc (= 9 sc). 1 ch, turn.
10. 1 sc in each of the next. 8 sc, 2 sc in first sc (= 10 sc). 1 ch, turn.
11. 2 sc in the first sc, 1 sc in each of the next. 9 sc (= 11 sc). 1 ch, turn.
12. Sc to the end of the row.
13. 25 ch, start with the 2nd loop from the hook, 1 sc in each ch. to the end of the row, avoiding twisting, 1 sc above each sc for the ear (= 1 row = 35 sc). 1 ch, turn.
14. RLS, without tying the 1st loop to the end, 2 RLS in the last one. RLS (= 36 RLS). 1 ch, turn.
15. 2 sc in first sc, 1 sc in each sc to end of row (= 37 sc). 1 ch, turn.
16. Knit another 19 rows of sc. 1 ch, turn.
17. 1 sc in each of the next. 35 RLS, 2 RLS together (= 36 RLS). 1 ch, turn.
18. 2 sc together, 1 sc in each of the next. 34 RLS (= 35 RLS).
19. 81 ch, start with the 2nd loop from the hook, 1 sc in each of the next. 6 ch, 2 sc in next. vp, 3 times, 1 sc in each vp. to the end of the row, avoiding twisting, 1 sc in the last row. Sc in head, 1 sl in next. RLS (= back and tail). 1 ch, turn.
20. 1 sl st in sl st, 1 sc in each next. 83 RLS, 2 RLS last. RLS. 1 ch, turn.
21. 1 sc in each of the next. 85 RLS, 1 RLS in the next row. SS, 1 sc in next. Sc in head, 1 sl in next. RLS. 1 ch, turn.
22. 1 sl st in sl st, 1 sc in each next. 87 sc (= to end of row), 1 dc in last row. RLS. 1 ch, turn.
23. 1 sc in SS, 1 sc in each next. 8 sc, 2 sc in next. RLS, 3 times, 1 RLS in each next row. 63 RLS, 1 RLS in the next row. SS, 1 sc in next. Sc in head, 1 sl in next. RLS. 1 ch, turn.
24. 1 sl st in sl st, 1 sc in each next. 91 sc (= to last 2 stitches of row), 2 sc together. 1 ch, turn.
25. 1 dc in 2 sc, knitted together, 1 dc in each next. 3 sc, 1 sc in each of the next. 88 sc, 1 sc in sl, 1 sc in next. Sc in head, 1 sl in next. RLS. 1 ch, turn.
26. 1 sl st in sl st, 1 sc in each next. 67 RLS, 3 times, 1 SS next. RLS. 1 ch, turn.
27. 1 SS in SS, 1 SS in each of the next. 5 sc, 1 sc in each of the next. 73 sc, 1 sc in sl, 1 sc in next. Sc in head, 1 sl in next. RLS. 1 ch, turn.
28. 1 sl st in sl st, 1 sc in each next. 67 RLS, 2 RLS together. 1 ch, turn. (The tail is ready.)
29. 2 sc together, 1 sc in each of the next. 66 sc, 1 sc in sl, 1 sc in next. Sc in head, 1 sl in next. RLS. 1 ch, turn.
30. 1 sl st in sl st, 1 sc in each next. 67 RLS, 2 RLS together. 1 ch, turn.
31. 2 sc together, 1 sc in each of the next. 66 sc, 1 sc in sl, 1 sc in next. Sc in head, 1 sl in next. RLS. 1 ch, turn.
32. 1 sl st in sl st, 1 sc in each next. 69 RLS (= to the end of the row). 1 ch, turn.
33. 2 sc together, 1 sc in each of the next. 67 sc, 1 sc in sl, 1 sc in next. Sc in head, 1 sl in next. RLS. 1 ch, turn.
34. 1 sl st in sl st, 1 sc in each next. 70 sc (= to end of row). 1 ch, turn.
35. 2 sc together, 1 sc in each of the next. 68 sc, 1 sc in sl, 1 sc in next. Sc in head, 1 sl in next. RLS. 1 ch, turn.
36. 2 sc together (first sc and next sc), 1 sc in each next. 70 sc (= to end of row). 1 ch, turn.
37. 1 sc in each of the next. 69 sc (= up to two stitches to end of row), 2 sc together. 1 ch, turn.
38. 2 sc together, 1 sc in each of the next. 68 sc (= to end of row). 1 ch, turn.
39. 1 sc in each of the next. 67 sc (= up to two stitches to end of row), 2 sc together. 1 ch, turn.
40. 2 sc together, 1 sc in each of the next. 64 sc (= up to two stitches to end of row), 2 sc together. 1 ch, turn.
41. 1 sc in each of the next. 64 sc (= up to two stitches to end of row), 2 sc together. 1 ch, turn.
42. 2 sc together, 1 sc in each of the next. 63 sc (= to the end of the row). 1 ch, turn.
43. 1 sc in each of the next. 62 sc (= up to two stitches to end of row), 2 sc together. 1 ch, turn.
44. 2 sc together, 1 sc in each of the next. 61 sc (= to the end of the row). 1 ch, turn.
Greetings! One day I received an order for scarf snood for dog cocker spaniel breed. At that moment, I didn’t really think about why they put clothes on pets and how they sew or knit them.
And I was very surprised when the girl who ordered such a scarf from me said that on one of the “dog” sites there was a queue for several months in advance for the craftswoman who knits them.
I had to knit for this beauty named Foxy.
This is an American Cocker Spaniel. The dog is small, and the ears, as you can see, are long. On the street, naturally, they collect all the garbage on themselves while walking. So, as I understood from the words of her owner, after each walk the dog has to patiently endure the process of combing.
In addition, during feeding, these beautiful ears strive to get into the cup of food)) And the scarf holds them in place perfectly, without interfering with the meal)
Therefore, dressing dogs, in many cases, is a forced necessity, and not a whim of their owners.
Note: I knitted the same scarf for Bertha, a lovely Russian Spaniel dog.
Well, I accepted the order, I need to fulfill it. I started looking for information on the Internet about how and what yarn to knit for dogs. It turned out that most often they use pure acrylic or mixed with another thread.
Regarding the threads that I selected for the snood scarf, I wrote in detail earlier on my page on LiRu, when I made a short announcement. You can read below^

Before I started knitting, I looked on the Internet for descriptions of a snood scarf for dogs. And I was disappointed to discover that only ordinary long scarves for dogs are described, which are not difficult to knit anyway.
Namely, for some reason there was nothing about a circular scarf. I had to independently calculate the dimensions, select the pattern, threads, etc. I prepared a short description, with photographs - in the process of work. I think it might be useful for those who are faced with the need to knit a circular scarf for a dog.
The result is a snood scarf. According to the size they asked to knit 13-15 cm wide, 15-17 high, i.e. the circumference was about 35-40 cm.

Description of crocheting a dog snood scarf
- yarn “MAGIC” (Germany), 100% microfiber, 50g/152m, color 8412 (dark blue);
- and “ALIZE” DIVA STRETCH (Turkey), 8% elastic, 92% microfiber/acrylic, 100gr/352m, color 57 (burgundy);
- Hook No. 3
The girl showed a couple of photos as an example; it was clear that the scarves were knitted “ fillet mesh" It felt like the mesh in the middle of the scarf was expanding. Therefore, I decided to choose some motif that has the effect of expansion, i.e. “fans”.
It took me a long time to select the pattern, because I needed the little ears to not fall out through the holes. And, at the same time, the mesh should be soft and elastic. I knitted the samples three times using different patterns until I chose the appropriate one, this one, its pattern below.

I knitted it in the round according to the pattern, starting with blue threads. I dialed the chain to the desired length. I didn’t guess the size right away and had to undo it. The second time it was more accurate.
— The first row was done in single crochets.
— To get an extension in the middle, I knitted four rows with a “loin net” like this: sc, skipped one loop, sc.
— I continued according to the scheme.

— In the center of the snood scarf, I changed the threads by color.
— I finished it “mirror” to the beginning, that is, with a fillet mesh. Before this, I measured the height of the rows to the red thread in order to repeat the same on the other side.

Shown here closer

When the snood scarf was completely ready, I checked the dimensions and made sure that the scarf had a cone-shaped shape, that is, it expanded in the central part.

Finally, I threaded an elastic band through the first and last rows of the mesh so that it could be adjusted on the head and neck after the first try on.

Tried it on our dog Belka. Easy to put on, no pressure.

I checked how the scarf dries after hand washing. After all, you will have to wash it often after walks. It turned out to be very good and fast. They gave it to the owner, or rather, her mistress, and received a grateful and kind review that everything was perfect. And now, after walks and meals, Foxy’s ears are clean))

Afterword
When I posted last photo on social networks, in Odnoklassniki, they wrote that the dog is very sad in this scarf-snood, that we need to stop tormenting it, etc. In fact, I want to say again that the scarf is very soft, the yarn is silky. And the desire of the owners to put it on the animal is caused not by a desire to decorate, but by care.
And I just fell in love with this dog at first sight) That’s why I didn’t refuse the order, although it arrived at the height of the season. And at that moment I knew for sure that to complete it I would have to spend a lot of time looking for patterns, etc. But how can I refuse to knit for such a cutie))
Best regards, Saule Vagapova
Seal
Cat hat "My blue kitten" + MK /by Marina Piskulina/
A funny and fluffy cat hat for autumn/spring. The hat is warm, double, with ears. But her special charm lies elsewhere - my child is now at the age when such things and toys seem alive and when he saw the finished version, the child’s delight knew no bounds - after all, she is so fluffy, just real. My heart rejoiced with her
Material Semenovskaya yarn Olga (wool 50%, acrylic 50%, ultra white color) 50 gr. and Lanoso ANGORAS (60% mohair, 40% acrylic, blue-white melange ) 200 gr., hook No. 2


Side view

And the view from above)

I’m not giving any patterns for the hat, there simply aren’t any, because it was knitted entirely from my head, but I took photographs as I knitted it and now I’ll try to give a small master class. Honestly, this will be my first master class, not the most specific, but quite understandable. I will not show how the simplest loops are knitted, but will only show what parts the hat consists of, how to put them all together and the stages of knitting it.
When choosing threads for the inner layer of the cap, you need to take into account that the resulting fabric is not thorny. For this I used Olga Semenovskaya yarn, it is soft, does not prick, pleasant to the body and warm.
Let's get started :-)
Cast on a chain of chain stitches equal to the volume of the child’s head and knit the hat with double crochets, from bottom to top, without increasing or decreasing. We get such a cylinder - this is the inner layer of the future hat

The same thing, top view, we leave the loops open for now and move to the opposite end of our cap (to where we started, to the chain of chain loops)

From here, using a thread of a different color, we begin to knit the outer layer of the hat. Its volume should be larger, so after tying the thread and starting to knit the first row, we immediately make increases every 10 stitches.

After the first row of the outer layer is knitted, we knit 10 rows with a 2x2 rib. When the elastic is ready, we continue and knit the most labor-intensive stage of the whole work - the fluffy edge with elongated loops. Detailed description how to knit with elongated loops, see here http://www.magiya.com.ua/master_class/mk_hook/7.html We determine the number of fluffy rows by eye or by trying them on a child, but we don’t knit the whole hat with them to the end, but make funny ears on top of the head. To do this, continuing to knit with elongated loops, closer to the end of the hat we replace them with single crochets, thus knitting the middle of the hat with elongated loops, and its sides with single crochets.
We get this design (unfolded)

We connect the two sides of the outer layer of the cap from the inside with connecting posts.

Turn the hat inside out and place the inner (white) layer of the hat into the outer (blue-white) layer. It becomes obvious that the open sides of the inner layer (the loops that we left open) also need to be sewn together

Separately, we make ears for the hat, knit the details - 4 pieces in total (2 white and 2 of a different color).


The first 5 rows of ears are knitted with single crochets, straight, without decreases or increases. And we knit the remaining rows with double crochets, decreasing 1 stitch at the end of each row.
Connecting with inside two ear parts

But we sew (or knit with connecting columns) not completely, but only halfway. From the narrow end of the hat we drag (thread) yarn cut into separate threads into the inside of the ears. I managed to pull 45 threads through like this.

We tie the threads inside the ears into knots.

We braid the long ends of the threads from the outside into a pigtail, and also make a knot at the end. We sew our ear to the end, leaving the widest edge unsewn, which will be attached to the cap. We get it like this (from the inside)

We knit the second ear in the same way. We turn the ears right side out and sew them to the hat with a needle and the same thread.

This photo clearly shows the location of the ears.

The hat is ready! If desired, you can sew toy eyes on it.
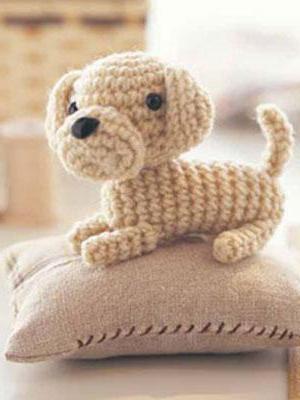
Knitting is coming back into fashion, and this is not surprising: isn’t it wonderful when skilled craftswomen, with a skein of thread and a hook, create simply amazing masterpieces? Take, for example, dog toys, the diagrams and descriptions of which you will find in the article.
soft friend
A homemade toy always has many advantages, ranging from personal preferences to the quality of the products included in the composition. This is an excellent solution for allergy sufferers who are highly sensitive to a variety of synthetic odors. In addition, such homemade animals are several times cheaper than purchased options.
So, today our hero will be a knitted one, which we will analyze in detail. We will pay great attention to all the details, difficulties and features of the work so that this lesson is clear even for beginners.
For worry-free work
To begin the knitting process, you need to prepare necessary materials. Since this is, first of all, a knitted dog (crocheted), the diagram and description of which will be discussed by us later, it follows special attention give to the filler.
Currently, there is a choice on the market, and the variety is so great that you instantly get lost in the desired idea. Therefore, you need to determine in advance what qualities crocheted dogs should have with diagrams and descriptions.
For example, if you want a product to have relaxing effects, then polystyrene balls would be an ideal option. In another case, synthetic fluff, holofiber and synthetic padding will add softness and lightness. And if you are trying to create an organically clean toy, then sawdust and shavings will help you perfectly in this matter.
Warm threads
You can also talk about yarn for a very long time. With all its diversity, first of all, base it on your preferences. So, if you don't want to knitted product covered with pellets, fluffy and electrified, then yarn with a high content of synthetic fibers will suit you perfectly. Conversely, if you need to crocheted the dog, the diagram and description of which we will describe a little later, had air fluff, then choose mohair or threads with a large percentage of natural wool.
In addition, before the process of making a toy, you should not run to the store for new skeins of yarn. Due to the fact that the product is knitted using a special technique, we will need a small amount of thread, trimmings and remnants of which you will definitely find at home.
What is amigurumi

You should not be afraid of such a name when you hear it for the first time, since the difficulty of pronunciation and memorization of the word is not at all justified in practice. So, amigurumi is the Japanese art of crochet. different toys. These can be almost invisible animals, as well as large-scale pillows, hats and other elements containing many details.
Since this is an eastern current, it is accompanied by very cute faces, colors and shapes of toys. In addition, the silhouette of amigurumi is its main feature, thanks to which it is so recognizable throughout the world. Rounded shapes, slightly bulky heads, a huge number of tiny details: all this emphasizes the individuality of this knitting style. These will be our knitted dogs, the description of which we will consider in detail right now.
A little more necessary
When listing, we did not name all the necessary components that the toy will consist of. You can find all additional materials in stores for creativity, handicrafts or sewing.
- Hook. IN in this case We cannot say for sure which exact hook size will suit you. Therefore, the choice is yours, since it directly depends on the thickness of the yarn. In addition, when buying a tool, pay attention to the handle and its connection with the metal part, because this is the main point of failure, even for a new thing.
- Beads or ready-made eyes to create a muzzle.
- Floss threads. They will also help us add individual characteristics the face of the toy.
Special signs
Also, while making a crocheted dog (with diagrams and descriptions), we will introduce you to special abbreviations that are often used in knitting circles. We will also use them in our work, but for faster understanding and memorization, their transcript will also be nearby.
- KA - amigurumi ring. It is a kind of basis for any toy and is done in just a couple of seconds.
- RLS - single crochet. This is the second most used “pattern” in the amigurumi technique, since it is very small and neat, and the canvas of the finished product looks very solid.
- UB is the usual process of decreasing stitches.
- PR is the reverse process of adding loops.
- VP - air loop- the basis of any crochet product.
Crocheted dogs: patterns and description of the process

It's time to start making the toy. To make everything clear and avoid any questions, we will describe all the steps step by step in as much detail as possible. This will not only simplify the process of perceiving information, but also speed up the work process.
- First, let's knit the upper legs: to do this, use threads of the color of the future toy dog to make an amigurumi ring (KA) and knit 6 single crochets into it (SC). Tighten the ring a little to give it a neat shape. Now in the new row in each single crochet (SC) we make two of the same loops: in total there will be 12 finished loops in the row.
- Now we increase every second single crochet (SC) to get 18 loops in the row. In this way, we gradually increase the handle, then knitting two stitches (RS) in every third element. If you count, you should end up with 24 loops.
- Now we change the color of the thread, as the sleeve of the blouse begins. You choose its color yourself, and we will take light green. We knit the first row with a thread of a new color, and then make a decrease (UB). To do this, you need to knit every 3 and 4 loops together. As a result, you will be left with 18 single crochets (SC).
- Now from the seventh to twenty-fourth rows we simply knit all single crochets (RS). As a result, we get a long green “pipe”. When all the rows are ready, we stuff the foot, leaving a little empty space, fold the pipe hole in half and carefully knit the loops together, getting the finished part. We also make the second foot.
- We move on to making the hind legs: we knit a heel from dark yarn, casting on a chain of 10 air loops (VP). Now, starting from the second loop, we knit 8 single crochets (SC), in the 9th loop we make an increase (PR) of five stitches and again 8 single crochets (SC). We make the 1st stitch (RS) in the new row, in the 2nd we make an increase (PR), knit 6 more loops, in the next two columns we make the 1st increase (PR), and then we create 2 more single crochets ( SBZ).
- We knit the next half in a mirror order, as we knitted the first part, getting 28 loops at the end of the row. In the new row we make 10 single crochets (SC), in the next 9 loops we make 1 increase each, and then again 10 loops. In total, you get 38 columns that complete the heel.
- Now we take a thread the color of our dog’s fur with a crochet stitch, the diagrams and descriptions of which we are gradually becoming familiar with, and knit all 38 stitches. In the new row we knit 10 loops, and the next 12 we make decreases (UB), completing the row again with 10 stitches. Then we knit 12 loops, 5 decrease stitches and again 12 loops. We start the row with 8 single crochets, make 6 decrease stitches, turning them into 3 stitches, and completing the row with 9 stitches. There are 23 columns in total.

Change the thread to dark color, depicting pants, we knit the first 23 single crochets (RS). We knit in this way from the 10th to the 23rd rows. We cut the thread of the first leg, carefully tucking it into the fabric, and leave the thread of the second leg untouched. Don't forget to add filler.
Soft tummy
Now that the legs and arms are ready, let's start making the body. It was not in vain that we left the thread on one of the lower legs, since it is from it that we will continue to knit the body of the toy.
- In the 23rd row we knit all the loops along the leg, then we cast on 10 chain loops and again 23 stitches near the second leg. We knit the resulting 56 loops over the next 3 rows. And in the 4th row we decrease, getting 50 single crochets. This way we knit 4 rows.
- In the 5th row, reduce the total number of loops by 7 parts, change the thread to green sweaters and knit 43 loops for 3 rows. Again we decrease by 6 loops, but we already make 11 rows of 36 stitches, again we decrease by 6 loops and knit 2 rows. In the next row we decrease by another 6 loops, make one row and leave the thread for further fastening.
- We knit the head according to the pattern below, cast on 60 stitches, make 9 rows, and then go to decrease, filling it in advance with padding polyester.
Mustache, lips and tail
We knit the ears and muzzle according to the same pattern, but different colors, making an amigurumi ring, putting stitches into it and knitting rows. In the end, we should get a “cup” from which we will make ears, fold them in half, knit the muzzle, and fill the blank with padding polyester.

Now you can put everything together: sew the ears, muzzle, eyes to the head, outline the nose and mouth, sew the head and limbs to the body.
As a decoration, we will tie a long scarf and straps onto the pants, which we will fasten with buttons. You can add a dark spot to the head, like real dogs, a forelock of protruding hair. Now that we can handle crocheted dogs with descriptions and patterns, you can safely delight yourself and your loved ones with homemade toys!
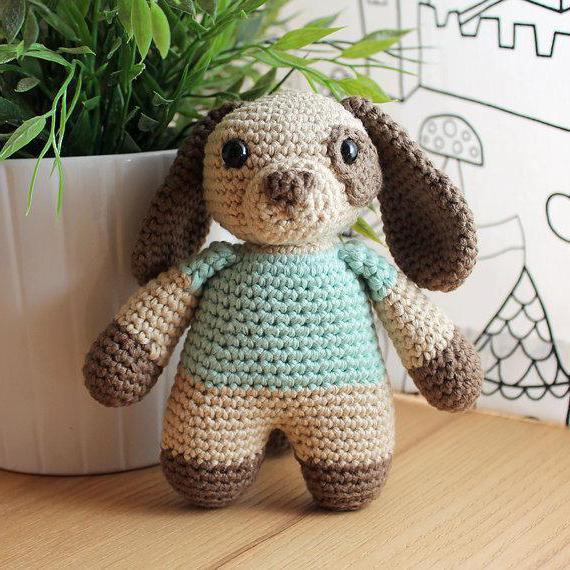
With the advent of small children in the family, many needlewomen begin to knit more and more things for their kids - blouses, skirts, dresses... Not the least place on this list is occupied by hand-made children's toys. In today’s master class we will look in detail at an example of how to crochet dog toys, so even if you have just recently mastered the crochet hook, don’t be afraid to try it!
For work we need:
- beige yarn for the body, head and paws, lilac for the ears, tail and nose, remnants of black and white for finishing;
- hook;
- holofiber;
- a little felt;
- needle;
- scissors.
Job Description
We will knit in a spiral with single crochets (hereinafter s. without n.) for both half-loops.
Important! We knit the first 2-3 rows counterclockwise, after which we turn the knitting inside out and continue working clockwise, leaving the tail of the thread inside.
Head
We crochet with beige thread.
12-15 pp.: p. without n. = 66 s. without n..
17 r.: p. without n. = 64 s. without n..
18 p.: *30 s. without n., ub.*, x 2 = 62 s. without n..
19 r.: p. without n. = 62 s. without n..
20 r.: *29 p. without n., dec.*, x 2 = 60 s. without n..
21 r.: p. without n. = 60 s. without n..
22 p.: *28 p. without n., ub.*, x 2 = 58 s. without n..
23 r.: p. without n. = 58 s. without n..
24 p.: *27 p. without n., ub.*, x 2 = 56 s. without n..
25 r.: *12 s. without n., ub.*, x 4 = 52 s. without n..
26 rubles: *11 s. without n., ub.*, x 4 = 48 s. without n..
27 r.: *6 p. without n., ub.*, x 6 = 42 s. without n..
28 r.: *5 s. without n., ub.*, x 6 = 36 s. without n..
29-34 pp.: p. without n. = 36 s. without n..
We stuff the dog’s face with holofiber and continue according to the diagram:
35 rub.: *5 s. without n., ex.*, x 6 = 42 s. without n..
36 rubles: *6 s. without n., ex.*, x 6 = 48 s. without n..
37-41 pp.: p. without n. = 48 s. without n..
42 rub.: *dec., 6 p. without n.*, x 6 = 42 s. without n..
43 rub.: *dec., 5 s. without n.*, x 6 = 36 s. without n..
44 rubles: *dec., 4 s. without n.*, x 6 = 30 s. without n..
45 rub.: *dec., 3 p. without n.*, x 6 = 24 s. without n..
46 rub.: *dec., 2 p. without n.*, x 6 = 18 s. without n..
47 rub.: *dec., 1 p. without n.*, x 6 = 12 s. without n..
48 rub.: ub. x 6 = 6 s. without n..
We completely stuff the toy part.
Eyes
We knit 6 s with black yarn. without n. into an amigurumi ring and tighten the thread, leaving a small tail for sewing together the parts of the toy. We make two such blanks - these will be the pupils of the eyes.
After this, we crochet the whites of the eyes with white thread according to the diagram:
1 p.: 6 s. without n. in an amigurumi ring.
2 p.: pr. x 6 = 12 s. without n..
3 p.: *ex., 1 p. without n.*, x 6 = 18 s. without n..
5 rubles: *dec., 1 s. without n.*, x 6 = 12 s. without n..
We knit two eyelids with beige threads.
1 p.: 6 s. without n. in an amigurumi ring.
2 p.: 6 inc. = 12 s. without n..
3 p.: *1 pr., 1 s. without n.*, x 6 = 18 s. without n..
4 p.: *1 pr., 2 s. without n.*, x 6 = 24 s. without n..
Tighten the thread, leaving a little for sewing together the parts of the dog.
We sew the eyelids to the head, add just a little holofiber inside, after which we sew on the whites of the eyes and then the pupils.
Spout
1 p.: 4 s. without n. into an amigurumi ring, leave a long tail and continue according to the diagram:
2 p.: *1 pr., 1 s. without n.*, x 2 = 6 s. without n..
3 p.: *1 pr., 2 s. without n.*, x 2 = 8 s. without n..
4 p.: *1 pr., 3 s. without n.*, x 2 = 10 s. without n..
5 p.: *1 pr., 4 s. without n.*, x 2 = 12 s. without n..
6 p.: *1 pr., 5 s. without n.*, x 2 = 14 s. without n..
7 p.: *1 ave., 6 p. without n.*, x 2 = 16 s. without n..
8 p.: *1 ave., 7 p. without n.*, x 2 = 18 s. without n..
9 p.: *1 ave., 8 p. without n.*, x 2 = 20 s. without n..
Tighten the thread, leaving a little for sewing together the parts of the dog.
We flatten the resulting cap into a triangle and sew the nose onto the face of the toy. We embroider the mouth with a tail thread.
Ears
We use lilac thread.
1 p.: 6 s. without n. in an amigurumi ring.
2 p.: 6 inc. = 12 s. without n..
3 p.: *1 pr., 1 s. without n.*, x 6 = 18 s. without n..
4 rubles: p. without n. = 18 s. without n..
5 p.: *1 pr., 2 s. without n.*, x 6 = 24 s. without n..
6-10 pp.: p. without n. = 24 s. without n..
11 p.: *1 kill, 10 s. without n.*, x 2 = 22 s. without n..
12-14 pp.: p. without n. = 22 s. without n..
15 rubles: *1 kill, 9 p. without n.*, x 2 = 20 s. without n..
16-18 pp.: p. without n. = 20 s. without n..
19 rubles: *1 kill, 8 s. without n.*, x 2 = 18 s. without n..
20-22 pp.: p. without n. = 18 s. without n..
23 rubles: *1 kill, 7 s. without n.*, x 2 = 16 s. without n..
24-26 pp.: p. without n. = 16 s. without n..
27 rubles: *1 kill, 6 s. without n.*, x 2 = 14 s. without n..
28 rubles: *1 kill, 5 s. without n.*, x 2 = 12 s. without n..
29 rub.: 6 ub. = 6 s. without n..
Tighten the thread, leaving a little for sewing together the parts of the dog. We do the second ear in exactly the same way.
Torso
We continue crocheting with beige thread.
1 p.: 6 s. without n. in an amigurumi ring.
2 p.: 6 inc. = 12 s. without n..
3 p.: *1 pr., 1 s. without n.*, x 6 = 18 s. without n..
4 p.: *1 pr., 2 s. without n.*, x 6 = 24s. without n..
5 p.: *1 pr., 3 s. without n.*, x 6 = 30 s. without n..
6 p.: *1 ave., 4 s. without n.*, x 6 = 36 s. without n..
7 p.: *1 pr., 5 s. without n.*, x 6 = 42 s. without n..
8 p.: *1 ave., 6 p. without n.*, x 6 = 48 s. without n..
9 p.: *1 ave., 7 p. without n.*, x 6 = 54 s. without n..
10 p.: *1 ave., 8 p. without n.*, x 6 = 60 s. without n..
11 p.: *1 ave., 9 p. without n.*, x 6 = 66 s. without n..
12-14 pp.: p. without n. = 66 s. without n..
15 p.: *31 p. without n., ub.*, x 2 = 64 s. without n..
16 r.: p. without n. = 64 s. without n..
17 p.: *14 p. without n., dec.*, x 4 = 60 s. without n..
18 r.: p. without n. = 60 s. without n..
19 p.: *13 p. without n., ub.*, x 4 = 56 s. without n..
20 r.: p. without n. = 56 s. without n..
21 r.: *12 s. without n., ub.*, x 4 = 52 s. without n..
22 r.: p. without n. = 52 s. without n..
23 r.: *11 p. without n., ub.*, x 4 = 48 s. without n..
24 r.: p. without n. = 48 s. without n..
25 rubles: *10 s. without n., ub.*, x 4 = 44 s. without n..
26 r.: p. without n. = 44 s. without n..
27 r.: *9 p. without n., dec.*, x 4 = 40 s. without n..
28 r.: p. without n. = 40 s. without n..
29 r.: *18 p. without n., ub.*, x 2 = 38 s. without n..
30 rub.: p. without n. = 38 s. without n..
21 r.: *17 p. without n., ub.*, x 2 = 36 s. without n..
32 r.: p. without n. = 36 s. without n..
33 r.: *16 p. without n., ub.*, x 2 = 34 s. without n..
34 r.: p. without n. = 34 s. without n..
35 rub.: *15 s. without n., ub.*, x 2 = 32 s. without n..
36 r.: p. without n. = 32 s. without n..
37 r.: *14 s. without n., dec.*, x 2 = 30 s. without n..
38 r.: p. without n. = 30 s. without n..
RUR 39: *13 p. without n., ub.*, x 2 = 28 s. without n..
40 rub.: *12 s. without n., ub.*, x 2 = 28 s. without n..
41 r.:*11 p. without n., ub.*, x 2 = 24 s. without n..
42 rub.: 12 ub. = 12 s. without n..
43 rub.: 6 ub. = 6 s. without n..
Tighten the thread, leaving a little for sewing together the parts of the dog. We stuff the body with holofiber.
Forepaws
Crochet with beige thread.
1 p.: 6 s. without n. in an amigurumi ring.
2 p.: 6 inc. = 12 s. without n..
3 p.: *1 pr., 1 s. without n.*, x 6 = 18 s. without n..
4 p.: *1 pr., 2 s. without n.*, x 6 = 24 s. without n..
5 p.: *1 pr., 3 s. without n.*, x 6 = 30 s. without n..
6 p.: *1 pr., 1 s. without n.*, x 6 = 18 s. without n..
7 p.: *1 ave., 17 p. without n.*, x 2 = 38 s. without n..
8 p.: *1 ave., 18 p. without n.*, x 2 = 40 s. without n..
9 p.: *1 ave., 19 p. without n.*, x 2 = 42 s. without n..
10 p.: *1 ave., 13 p. without n.*, x 3 = 45 s. without n..
11 p.: *1 ave., 14 p. without n.*, x 3 = 48 s. without n..
12-14 pp.: p. without n. = 48 s. without n..
15 r.: *10 s. without n., ub.*, x 4 = 44 s. without n..
16 r.: p. without n. = 44 s. without n..
17 p.: *9 p. without n., dec.*, x 4 = 40 s. without n..
18 r.: p. without n. = 40 s. without n..
19 r.: *8 p. without n., ub.*, x 4 = 36 s. without n..
20 r.: p. without n. = 36 s. without n..
21 r.: *2 s. without n., ub.*, x 9 = 27 s. without n..
22-41 pp.: p. without n. = 27 s. without n..
42 r.: *7 p. without n., ub.*, x 3 = 24 s. without n..
43 rubles: *2 s. without n., ub.*, x 6 = 18 s. without n..
44 rub.: *1 p. without n., ub.*, x 6 = 12 s. without n..
Tighten and cut the thread as usual, leaving a tail. We do the second leg in the same way.
Hind legs
We continue knitting with the same beige thread.
1 p.: 6 s. without n. in an amigurumi ring.
2 p.: 6 inc. = 12 s. without n..
3 p.: *1 pr., 1 s. without n.*, x 6 = 18 s. without n..
4 p.: *1 pr., 2 s. without n.*, x 6 = 24 s. without n..
5 p.: *1 pr., 3 s. without n.*, x 6 = 30 s. without n..
6 p.: *1 ave., 4 s. without n.*, x 6 = 36 s. without n..
7 p.: *1 pr., 5 s. without n.*, x 6 = 42 s. without n..
8 p.: *1 ave., 6 p. without n.*, x 6 = 48 s. without n..
9 p.: *1 ave., 7 p. without n.*, x 6 = 54 s. without n..
10 p.: *1 ave., 8 p. without n.*, x 6 = 60 s. without n..
11 p.: 60 s. without n. we crochet the back half-loop to form a “cuff” when moving from the sole to the foot.
12-14 pp.: 60 s. without n. in the usual way.
15 p.: 18 p. without n., ub., 20 s. without n., ub., 18 p. without n. = 58 s. without n..
16 p.: 17 p. without n., ub., 20 s. without n., ub., 17 p. without n. = 56 s. without n..
17 p.: 16 p. without n., ub., 20 s. without n., ub., 16 p. without n. = 54 s. without n..
18 p.: 15 p. without n., ub., 20 s. without n., ub., 15 p. without n. = 52 s. without n..
19 p.: 14 p. without n., ub., 20 s. without n., ub., 14 p. without n. = 50 s. without n..
20 r.: 13 s. without n., ub., 8 p. without n., 2 dec., 8 s. without n., ub., 13 p. without n. = 46 s. without n..
21 r.: 12 s. without n., ub., 7 p. without n., 2 dec., 7 s. without n., ub., 12 p. without n. = 42 s. without n..
22 r.: 12 s. without n., *ub., 1 p. without n.* repeat ** x 6, 12 s. without n = 36 s. without n..
23 r.: *dec., 4 s. without n.*, x 6 = 30 s. without n..
24-43: p. without n. = 30 s. without n..
44 rub.: *dec., 3 p. without n.*, x 6 = 24 s. without n..
45 rub.: *dec., 2 p. without n.*, x 6 = 18 s. without n..
46 rub.: *dec., 1 p. without n.*, x 6 = 12 s. without n..
We tighten the thread and cut it, leaving a long end for sewing the toy together. We crochet the second leg in the same way, after which we stuff both parts of the toy with holofiber.
Ponytail
We use lilac thread.
1 p.: 6 s. without n. in an amigurumi ring
2 p.: *ex., 2 p. without n.*, x 2 = 8 s. without n..
3 rubles: p. without n. = 8 s. without n..
4 p.: *ex., 3 s. without n.*, x 2 = 10 s. without n..
5 rubles: p. without n. = 8 s. without n..
6 p.: *ex., 4 p. without n.*, x 2 = 12 s. without n..
7 p.: p. without n. = 12 s. without n..
8 p.: *ex., 5 p. without n.*, x 2 = 14 s. without n..
9 r.: p. without n. = 14 s. without n..
10 p.: *ex., 6 p. without n.*, x 2 = 16 s. without n..
11-15 pp.: p. without n. = 16 s. without n..
Tighten the thread and cut it, leaving a long piece for sewing the tail to the dog’s body.
Collar
Using lilac yarn, we crochet a chain of 30 sts. p. and knit all the loops with double crochets.
Assembly
We sew the head of the dog to the body, wrap the collar around the neck and sew it together. After this, you need to sew the ears to the dog’s head, and the paws and tail to the toy’s body. If desired, you can embroider the toes on the paws with a contrasting thread and sew on felt circles that will serve as pads on the hind paws. Knitting the toy is finished!
We hope our lesson will be useful for you. Happy knitting!
Crochet puppy: video master class
Selection of schemes


