Preparing a child for school is not only stressful for the future carpenter, but also for his parents, and, first of all, for their wallet. Pens, pencils, rulers, notebooks, copybooks - a considerable list is typed, the result of which is a number with three zeros. But you can save on some little things, for example, making a cup for pencils with your own hands. This is a functional element that must be on the desk of preschoolers and schoolchildren. He organizes the child and teaches him order, that everything should be in its place. Most of the techniques for creating a pencil cup are very simple, so you can learn them together with your child, or you can completely entrust him with the creative process. A glass made by yourself will be valued much higher than store-bought ones.
There are quite a few ways to create pencil cups. They range from the simplest, which even a child can do, to more complex ones, requiring certain skills and skill levels. This article provides examples of just some simple methods.
From a toilet paper roll
Making a cup like this couldn’t be easier. This activity can be entrusted even to a younger preschooler. The process will fascinate him greatly, and the 100% guarantee of a good result will please him beyond words.
You will need:
- toilet paper roll;
- corrugated paper;
- colored cardboard;
- scissors and glue.

- Cut out a rectangle from paper. The height of the rectangle is equal to the width of the sleeve, and its width is equal to the circumference of the sleeve. To do this, it is not necessary to carry out complex mathematical calculations. Simply wrap a sheet of corrugated paper around the sleeve and make notches at the cut points.
- Using glue, the sleeve is covered with corrugated paper and set aside to dry.
- You need to cut out flowers of any shape and quantity from cardboard.
- At the last stage, cardboard flowers are attached to corrugated paper using glue.
You can stop here and get a very nice glass, or go further. You can add additional decor from scrap materials, such as ribbons or paper clips. And by adding a little imagination, it’s quite possible to get a funny caterpillar from several of these cups.

From a tin can
Not every household waste needs to be thrown away immediately. Some of them may acquire a second, completely uncharacteristic life for them. For example, you can make an original pencil cup from a used tin can.

You will need:
- empty tin can;
- a piece of linen or canvas fabric;
- transparent PVA glue;
- decorative tape;
- decorative element (flower, accessories, etc.).
- Rinse the can and remove the paper label if there is one.
- Using a file, sand down the sharp edges where the can was opened.
- Take a piece of linen fabric or decorative canvas tape and cover the jar with clear PVA glue.
- Glue decorative tape to the top of the jar over the base fabric.
- Glue a flower to the center of the front of the jar.
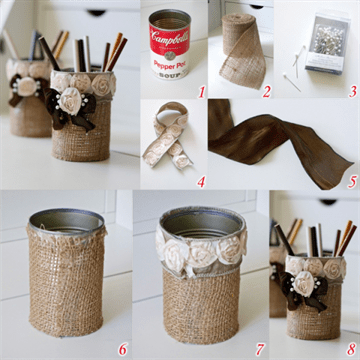
This is just an approximate working algorithm. Using various materials, you can create absolutely unique cups.
Using origami technique
There is a way in which you only need paper to create a pencil cup. This method is called modular origami. The technique is simple, but requires perseverance and patience.

You will need:
- sheets of paper;
- scissors;
- sheets of cardboard;
- PVA glue;
- simple pencil.

- You need to cut out 176 rectangles from paper.
- Fold them as shown in the picture.

- To assemble the first level you will need 24 modules. They need to be folded in this way: 2 modules are inserted with sharp edges into the third, which will be located between them.

- Using the same principle, 8 levels are connected upward.
- Next, we seal the bottom of the product. To do this, you need to turn it upside down and reinforce the first row with another row of modules.
- A circle with a diameter equal to the diameter of the cup is cut out of cardboard and glued to the bottom. This will be the bottom of the cup.
The glass using the origami technique is ready.
If you wish and acquire a certain level of skill, you can create cups from several colors, as well as create colored patterns from paper modules.

If you are unable to master such a technique, you can simplify the task. To do this, just glue the paper modules together. In this case, they will no longer fall apart, and working with the product will be much easier. After making the first few cups, you will gain steadiness in your hand and in the future you will be able to work without glue, creating not only cups, but also more complex products.
We all periodically want updates, and updates in almost everything: in clothes, in the house and even in work.
An original, creative glass for pens and pencils can easily update the look of your desktop, and, of course, lift your spirits. I propose to make this cute and useful little thing using a minimum of materials that can be found in everyone’s home.
To work you need to prepare:
1. Cardboard cylinder from foil or film;
2. Peas (split into halves);
3. PVA glue and pencil glue;
4. Sheet of cardboard;
5. Compass;
6. Simple pencil;
7. Green corrugated paper;
8. Scissors;
9. Yellow acrylic paint;
10. Ladybugs for decoration.

First, we cut off a part from the cylinder equal to the desired height of the future cup. This part will be the basis of our glass.

In order to make the bottom of the cup, on a small sheet of cardboard using a compass we draw one circle, the diameter of which is equal to the diameter of the cylinder, and around it we draw another circle, the diameter of which will be 1.5-2 cm larger than the previous one.

We draw the distance between the circles into equal sectors. 
We cut out the circle along the contour and cut the sectors to the beginning of the smaller circle. 
Now you need to bend the resulting segments and glue them to the outside of the glass. 
The bottom of the future corn cup is ready.
It's time to start decorating the cup. Lubricate a small section of the cylinder with PVA glue 
and glue peas on it in a circle. 
We try to glue the peas of the next row strictly above the peas of the previous row. 
In this sequence, cover the entire surface of the cup with peas. 


When the glue is completely dry, take a brush and yellow paint and paint the entire pea cup, 
so that it finally looks like an ear of corn. 
We make corn leaves for the cup from green corrugated paper or regular office double-sided paper. If you used corrugated paper, then stretch the leaves a little in width.

Glue the finished leaves to the bottom of the cup. 
To glue corrugated paper, it is best to use pencil glue; it prevents the thin paper from getting wet and does not deform it. 
Also, to hide the seams between the leaves, glue a small piece of corrugated paper folded in half to the bottom of the cup. 

This is what the glass should look like. 
If you wish, you can slightly decorate our corn cup by sticking a couple of bright ladybugs on it. 
I hope you had a lot of fun and good mood in the process of creating this unusual cup for pens and pencils. Now your writing and drawing supplies will always be in perfect order. And you can always give such an original handmade craft to your friends - classmates and even your favorite teachers! Good luck to everyone and success in achieving new creative heights!
Making a pencil holder. Master class with step-by-step photos.
Minaeva Elena Vitalievna, teacher of additional education, MAOU DO "DCC", Severodvinsk.
Description: The master class is intended for additional education teachers, educators, primary school teachers, primary school children, and parents.
Purpose: for organizing and decorating your workplace, as a gift.
Target: making a pencil holder using the parallel beading technique.
Tasks:
teach the basic stages of making and decorating the base of a pencil holder made of cardboard and paper;
teach the basic techniques of parallel threading with beads;
promote attentiveness, observation, and hard work;
develop a sense of color, logical thinking, imagination, fine motor skills.
At all times, people highly valued the outstanding external qualities of beads. Everyone has seen that beads are a very beautiful, durable and resistant material.
Working with beads is extremely popular. Many craftswomen create real miracles from it - magnificent paintings, luxurious jewelry, elegant household items.
In this master class we will try to touch the art of beading using the example of making a pencil holder. Let's feel the limitless possibilities of its use in the design of interior items.
Introduction to materials and tools.
Thick cardboard, white or light beige paper, a sheet of colored cardboard, beads No. 8 of different colors, beading wire, acrylic paint, a bristle brush, a piece of foam rubber, an acrylic outline, a pencil, a ruler, a glue pencil, transparent glue "Contact" or " Moment", scissors, rubber bands.

Safety precautions when working with scissors and glue:
While working, keep the ends of the scissors away from you;
pass the scissors closed with the rings away from you;
do not leave them open, place them on the table with the sharp end facing away from you;
Do not put glue in your mouth; if it gets into your eyes, rinse with plenty of water;
maintain order in the workplace.
Sequence of making a pencil holder.
1. We will make a pencil case from a piece of thick cardboard.
It is necessary to determine the size of the rectangle from which we will make the base of the pencil holder: in this case, the height is 10 cm, the length is 19 cm. The length of the rectangle depends on the diameter of the product (can, bottle, etc.), around which we will lay well-moistened cardboard.
Secure the cardboard with rubber bands. Dry.


If there is no thick cardboard, then you can use any ready-made cardboard tubes as a base.

The diameter of the bottom of the pencil holder is approximately 4 cm larger than the diameter of the base.
We cut it out of the same cardboard.


We glue the joint of the base of the pencil holder and additionally glue it around with a strip of paper.


We cut out rectangles from white paper, slightly larger than the height and length of the rectangle of the base of the pencil holder and the diameter of the bottom. We crumple the paper well and then smooth it out.


We cover the bottom of the pencil holder and its base with crumpled paper. We glue the allowances to the wrong side, first making notches at a distance of 1 cm from each other.


The pencil holder is ready!
2. We make pencils from beads using the parallel threading technique.
Choose bead colors for pencils (green, red, yellow, orange, blue).
We string 3 beads onto the wire: 1 green, 2 white. We close the wire into a ring and, with the opposite end, stretch it through 2 white beads. Tighten the wire in the middle.


We string 3 white beads onto one end of the wire. We pull the second end of the wire through these beads in the opposite direction. We tighten it.


Similarly, we make the next row of 4 white beads.

Subsequent rows are made similarly from colored beads. There are 4 beads in each row.

In the last row, the ends of the wire are connected, twisted tightly, cut (leaving a tail of 5 mm) and bent to the wrong side.


Schematic representation of the sequence of making a pencil from beads using the parallel threading technique.

The number of pencils and their length is determined by the size of the pencil holder.
In this case:
5 multi-colored pencils, which have 9 colored rows of beads (wire length 30 cm);
5 multi-colored pencils, which have 14 colored rows of beads (wire length 40 cm);
5 multi-colored pencils, which have 19 colored rows of beads (wire length 55 cm)

3. Decorate the pencil holder.
Choose acrylic paint of a suitable color.
Using a fairly wide bristle brush, pick up some paint and leave any excess on a piece of paper. Using an almost dry brush, we move vertically along the base and bottom of the pencil holder.


We paint all the edges with acrylic paint using foam rubber.


From colored cardboard of a suitable color, cut out a rectangle 9.5 cm by 20 cm.

We paste this rectangle over the inside of the pencil holder.
Glue the bottom of the pencil holder to the base.


The pencil holder can be decorated with an acrylic outline.

We choose the sequence of arrangement of pencils on the pencil holder.

We string beaded pencils onto the wire in the chosen order (pull the wire into the sixth row from the bottom). We collect beads between pencils to fill the space between them. The number of beads is determined individually.
From the most ordinary and unnecessary things you can make the necessary glass for pens, brushes and pencils, which creative people accumulate in mountains.
As your imagination dictates, to decorate such a glass you can use: an unnecessary tea box, coffee cans, paper spools from tape and paper towels, tin cans, jars of chips.
In my arsenal I had a paper tea can and paper babin on hand. And for decoration you can use a cotton clothesline or any thick thread; decor made from raw threads looks very original. Today it is very fashionable and healthy to wear clothes made from natural fibers; for example, a fluffy knitted linen skirt looks stylish, original and emphasizes female beauty.
You can also combine different colors, or you can use, like I did, only white thread. You will also need PVA glue or Dragon glue and unnecessary colored markers or colored pencils.
The whole job consists of coating a jar with glue and carefully winding a white thread around it, as you can see in the photo below. And then, when the glue dries a little, you can further decorate the glass. You can take unnecessary old colored pencils, cut them to the length of the glass (I sharpened them a little more) and glue them to the jar. Or you can stick on anything you want, everything you have at hand: flowers from postcards and old hairpins, colored buttons, beads, sequins, etc.

In the same way, you can make a glass from a paper spool, but before you glue it with thread, you need to make the bottom out of cardboard and masking tape, see photo below.


The cups can be glued together for ease of use, or you can put an unnecessary hair tie or rubber band on them. And your own cups are in no way inferior in design and convenience to store-bought stationery sets.
Create yourself, create with pleasure with your children and create beauty and comfort in your home!!!
Proper organization of objects on a child’s desk is a requirement not only of school teachers, but also of pediatricians. Not all parents know the interesting fact that the type of workplace significantly affects the process of consolidation of educational material by the child. Not only should there be general order on the desk, but each accessory should have its own permanent place and be located at a convenient distance from the children. A pencil stand, which is easy to make with your own hands, can help you organize your space.
What to pay attention to when making stands
All requirements are determined by several sciences.

Since writing instruments are the most frequently in demand, great attention should be paid to their storage and placement. By the way, coasters can be made not only for children, but also for adults; they can be used as a decorative item or as a pleasant memory of spending time with children (if they were made together). Remember that children will be very reluctant to use objects when they don’t like them for one reason or another.
Material of manufacture
Coasters can be made from almost all materials: paper and cardboard, wood and plastic, clay and plasticine, metal cans and plastic containers. But in all cases, several factors must be taken into account.
- Environmental friendliness. It is strictly forbidden to make crafts from toxic plastics. This refers to packaging and containers used for technical liquids, except food products. The stands are placed in close proximity to the child; harmful fumes of chemical elements have an extremely negative effect on the child’s health.
- Safety. Children often play with coasters, and there is a risk of injury. Make crafts from durable and lightweight materials; finished items cannot have sharp corners.
- Strength. If the pencil holder consists of several elements, then all of them must be firmly connected to each other. Especially when the material can break and injure the child.
Designer look
As mentioned above, children will not use objects that they do not like. With pencil holders, your writing utensils will always be scattered on your desk rather than stacked in the holder.
Practical advice. Before making a final decision on the type of stand, consult with your children.
Better yet, choose models together with them and create them with your own hands. This process allows the child to feel his importance and the importance of the decisions made.
Dimensions
The stand should not only accommodate all the pencils and pens the child has, but also have enough space for the future. Items should be easy to put in and take out and not create difficulties during use. And at the same time, the stand should be compact and not take up much space on the child’s desk. Of course, the size is directly influenced by the design features of the product. You should always make informed decisions and take into account as many individual factors as possible.

Options for making pencil stands
There are a huge number of options for making pencil holders; it is not even theoretically possible to talk about them all. We offer for consideration only a few of the most successful solutions, in our opinion; you will have to choose the one that is acceptable for yourself. At the same time, you should always keep in mind that the best pencil stand in all respects is the one that the performer likes.
Table. Varieties of pencil holders.
| Type of stand | Brief description of manufacturing technology |
|---|---|
| The pencil case is made from old, but still good, items. It could be an army cooking pot, an old handbag, a wooden box, etc. There is no need to repair anything; on the contrary, the more noticeable the signs of the times are, the better the model corresponds to its name. | |
| Today, flower pots are made so beautiful that you can easily make a beautiful pencil holder out of them. Flowerpots are made of ceramics; the side surfaces are decorated with various stucco patterns. It is recommended to paint them with new paints and add original drawings or inscriptions. | |
| You can saw off a small piece of wood; it is advisable to choose linden, it has a very soft core. Remove it with a chisel and chisel. Surfaces are varnished or left untouched. If the pencil holder does not hold its vertical position well, you can fix it on a large wooden stand. |
| Clean, dry containers are painted and decorated with rope made from natural materials. In addition, small pebbles can be glued. The type of decor is chosen by the manufacturer, making the stand absolutely exclusive. |
| The most striking example is a stand made from an old kitchen grater. Holes for pencils may not be drilled; they can easily be punched into thin metal with a punch. The surface can be artificially aged and covered with clear or colored varnish. | |
| The sections can remain at construction sites after installation of heated floors. Circles are cut out of balsa wood and glued together. Next, you need to make holes for pencils and use them as an original stand. |
| If there are quite a lot of different objects accumulated near the computer that are a pity to throw away and have nowhere to be used, combine several used floppy disks into one structure, you will get an excellent container for storing pencils and pens. |


Even this small list gives an idea of how many different options there are. But you can add your own individual and completely exclusive one to them.

Prices for different types of pencil holders
Pencil holder
Making a stand from a metal can
This craft can be made in just a few hours, there are many options for decorations, we will look at one of the simplest, but very beautiful.
To work, you will need a clean metal can, universal glue, white paint, various ribbons, laces, buttons and other small items. To straighten the sharp edges of a metal can, you need pliers, glue is applied with a small brush, and the ribbons are cut with scissors. We offer options for choosing decor; it is not necessary to have a complete list of elements; choose as many as you see fit. Colors and textures also depend on your preferences.

Step 1. Use pliers to bend the sharp edges away from the lid, they can seriously injure your hands. Take the tool in your right hand and hold the metal can with your left. Turn it slowly and at the same time use pliers to smooth out the sharp edges. Work carefully, try not to let the edging on the front side of the can become too deformed. Although it will later be covered with decorative elements, large recesses may remain noticeable, and this has a negative impact on the overall design appearance of the product.

Step 2. Paint the inside of the jar with white paint. We used this finishing option, you can come up with another one: use colored paints, draw simple ornaments inside, etc. Currently, exclusive handmade products are very popular. There is no need to achieve perfect symmetry and visible professionalism. Let it be immediately noticeable that your pencil holder is handmade and not assembled. Such things are not only prestigious, but also very expensive. Give the paint time to dry.

Practical advice. If you know how to knit, then it is recommended to make a special small case with an elastic band - one knit stitch and one purl loop.
The case can be made in one color or multi-colored, the surfaces can be decorated with additional decor or not. You can take design examples from the Internet; there are a lot of different original solutions on the Internet. But you should always remember one axiom - none of the professional designers live in your apartment and will see the results of their advice every day. Hence, do only what you personally like, use advice only for general development and broadening your horizons. The only good reason for making one or another version of a pencil holder is that you liked this solution.

Step 3. Tie the cover with white and gray threads; the height should correspond to the size of the jar. There is no need to make the diameter very small; the knitted fabric will stretch and the outside of the can will be visible. In our example, one half of the cover is white and the other half is gray.

Step 4. Place the prepared blank on the jar, correct the position, align it along the perimeter of the container. If the elastic band is seated tightly, then the surface of the jar does not need to be coated with glue. If it is too large, slips and falls, then it will have to be fixed at the top.

Step 5. Start decorating the stand. Glue white and gray buttons, wrap the upper part with a rope, it can be colored or plain from natural linen.
Practical advice. Metal jars have one drawback - they are very light and tall, and the bottom area is small. If you put a lot of pencils in it, there is a risk of it tipping over.
There are two ways to solve the problem.
- Screw the jar onto a larger wooden or plastic stand. Due to this, the stability of the structure will significantly increase.
- Place a piece of iron or other heavy object at the bottom of the jar. It should be as close to the bottom as possible - the center of gravity lowers and stability increases. The disadvantage of this method is that the internal dimensions of the can are reduced.
Instead of a knitted case, the outer surfaces can be trimmed with various pieces of ribbon. Carefully coat the jar with strong glue and glue the pieces of ribbon one by one.
Next, the surfaces of the stand are decorated with any decorative elements. You can select them by topic depending on the upcoming holidays. Use ready-made store-bought decorations or make them yourself.
Instructions for making a corn stand
This is a very original craft. It is recommended to work with children; they can not only perform simple work, but also take part in a discussion of the type and components of the stand. Spending time together is extremely necessary for all children; this is the most effective way of education; it instills in children love for their parents, and teaches the latter to respect the children’s opinions.

This craft is a great solution for spending time together with your child.
Prices for different types of glue guns
Glue gun
Making the stand body
To make a stand you will need:
- plastic bottle with a capacity of 0.5 l;
- thin double-sided tape;
- a glass of white beans;
- pieces of green felt for sheets and a template for cutting them out;
- a glass of water and some yellow paint;
- scissors, glue gun and brush.
Step 1. Mark the height of the corn head. In order for the stand to look more natural, you need to respect the proportions. For a bottle of this diameter, the length should be approximately 20 cm. Using a felt-tip pen, draw a circular line for the height of the future head of corn.
Step 2. Using a sharp mounting knife, carefully cut off the excess part of the bottle. If the cut is uneven, use scissors to straighten its edges. Make sure that the circle line is strictly horizontal.
Step 3. Use double-sided tape to completely seal the bottle. The second surface of the tape should be covered with special paper; it is removed just before gluing the beans and petals. You must always remember that the sticky surface of the tape gets dirty very quickly; not only dirt, but also grease from your fingers sticks to it. In this state, the tape sharply reduces adhesion indicators; the glued elements will certainly fall over time. The result is that the craft, instead of being pleasing to the eye, will look very ugly.
Step 4. Glue small squares of tape to the bottom of the bottle; they are installed on special protrusions along the perimeter of the bottom. As a rule, there are five such protrusions on the bottle.

Step 5. Remove the protective paper tape from all pieces of tape. We have already mentioned that you need to work carefully and not touch the adhesive surface of the tape. Glue beans around the perimeter of the bottle. Make the first row above the cutting line, it covers all possible defects. Gluing beans is the longest and most important operation; it requires perseverance and attentiveness. Press the beans firmly against the tape; this is the only way to increase adhesion.
Important. Leave the last circle of tape and square pieces free, the beans will not stick to them.
Step 6. Take yellow paint, water, a brush and paint all the beans yellow. Now you can see for yourself how your craft begins to resemble real corn. Leave the bottle until the paint is completely dry, during which time you can prepare the leaves of the cabbage head.

Making leaves
Step 1. Spread a cloth on the table; it is needed so that the surface of the tabletop does not get scratched or dirty. Place a piece of felt and a leaf template on the fabric. Combine them in such a way as to reduce waste while ensuring full dimensions of the elements.

Step 2. Hold the felt template with one hand and carefully cut out the piece with the other. If for some reason it is difficult for you to do this, then you can first outline the template along the contour, then start cutting without it. Just keep in mind that the lines may be noticeable; it is prohibited to use felt-tip pens. There is a very simple and reliable grandmother’s method of drawing on patterns - using pieces of soap. The line is drawn with an edge, due to this its thickness is reduced. Removing soap marks after cutting out the leaves is not a problem. Prepare five completely identical leaves.
Step 3. Check whether the paint has had time to dry during this time. Touch it gently with the back of your finger. If everything is normal, then you can continue work on making the stand.

Step 4. Glue leaves around the bottom of the bottle. Previously, tape was specially left for this; it was not used for gluing beans. Fold back the leaves and the pencil holder is ready for use.
- Making coasters with your own hands is a creative activity, and such work cannot be completely planned in advance. Already during the production process, changes are often made not only to the composition, but also to the manufacturing technology of the stand. Advice - do all the work as carefully as possible, do not hope that the marriage will improve later. The fact is that no one knows the final version, and marriage can interfere with beautiful changes.
- Use only serviceable tools and keep the work area clean, clear and level. Remember that the result of your work can be spoiled very quickly, and it takes a lot of time to restore the stand to its previous condition.
- It is always advisable to have in advance not only one plan of action, but also several backup options.
- Do not try to completely copy factory products. Firstly, it will never be possible to repeat them exactly; this applies not only to appearance, but also to quality. Secondly, exclusive products made by human hands are much more valued; soul and skill are put into them.
Conclusion
The above materials are used to make a large number of crafts, and not just stand options. Don't be shy, show and develop your abilities. But pay the main attention to the development and upbringing of children. Let them make their own with a variety of crafts, not just pencil holders. Always praise, do not pay attention to appearance, the main thing is the child’s effort.
Video -
DIY pencil supplies are so easy to make that you can do these projects with your kids. Having mastered the initial skills of crafts, move on to a more complex level - children need to constantly develop, for this they should change tasks. Invite them to make a craft house together. Detailed instructions are on the pages, study them, involve the children and start working together.


