Hello everyone!
If your son or sweet daughter is in 1st grade, then wait, they will soon give you the task of making your favorite letter. Or have you already been asked and have already answered? We haven't been asked yet, but we are ready. We have not just one craft, My Favorite Letter, but 6!
Why so many?
Firstly, favorite letters are a dime a dozen, and secondly, inspiration struck)
Now we’ll show you what we did with the children, maybe you’ll like our ideas, and you’ll also want to bring them to life.
Lesson plan:
Rough, heroic, proud letter “G”
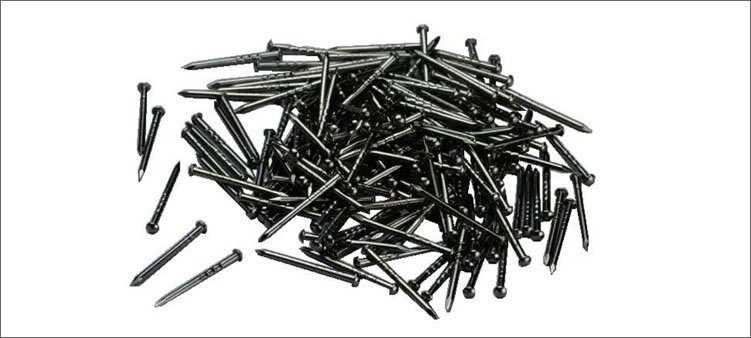
We decided to make the letter “G” from nails! Or rather, from carnations.
This idea prompted us, go in, read and understand what’s what.
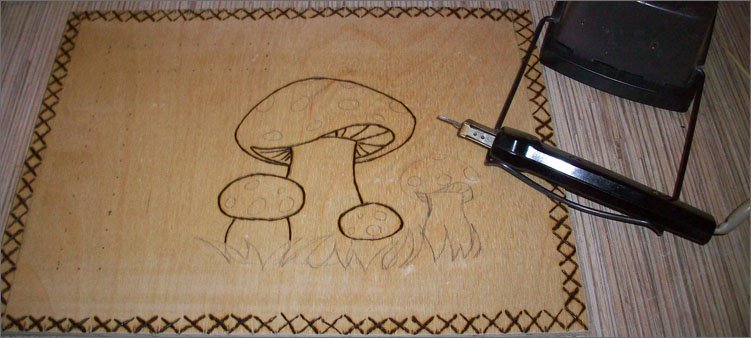
We sawed off a piece of plywood A4 size. How we sawed... you should have seen)))
Using our burner we made a frame in the form of small crosses. We also drew mushrooms with a pencil and then burned them on the plywood.
We outlined the profile of the letter “g” with a pencil and hammered small nails along this profile.

At the same time, we found out that working with a hammer is much easier than using a saw. The result is like this.

Unusual! Don't you find it?
Separately, we need to say about our burner. Guess how old he is?
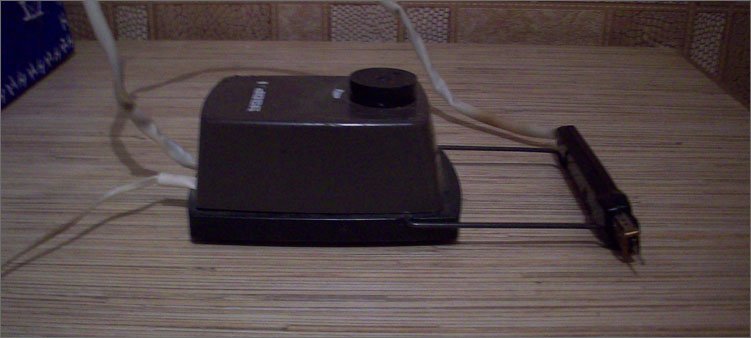
Judging by the passport and markings on the box, this device was manufactured in March 1983. Can you imagine? Still alive. On the warranty card, which is also carefully stored in the box along with the burner, it is written: “The manufacturer guarantees the proper operation of the device for 18 months from the date of purchase.” And 34 years have already passed!!! Works fine. And in 1983 it cost as much as 7 rubles! Expensive little thing.
This is our family rarity.
Let's get back to the letters?
Cute, soft, fur letter "M"
We cut out the silhouette of the letter “m” from a piece of foam plastic, although thick cardboard could also be used for these purposes.

And we still had pieces of fur from last year. We made Santa Claus out of it. So we decided to make the “m” soft and furry.
Using hot glue, we glued the fur to the foam, and that’s the whole master class.
And it turned out to be such a cute, furry miracle.

“K” and “L” from Klimkovich Artem
These letters are the simplest and fastest to make. Entirely and completely Artemkin’s idea. He made them from his favorite Lego set. And again it fits:
- "K" from the constructor;
- "L" from Lego.
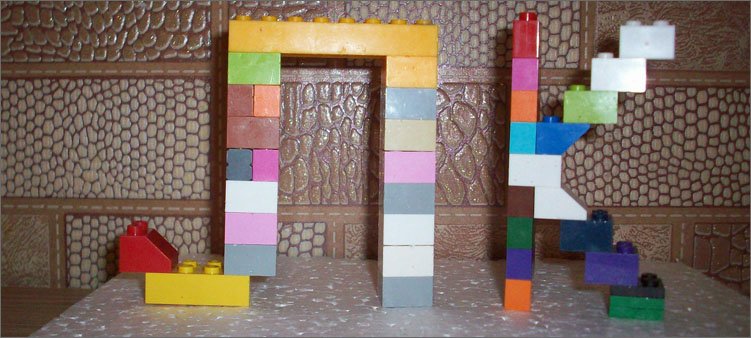
You can use this idea if you are short on time, and the craft was due yesterday.
Handkerchief-button letter “P” on a hoop
If you have a hoop in your home, consider yourself lucky! You can make an unusual, girly letter “P”.
We tucked a square piece of white fabric into the hoop.

There was also a beautiful silver braid in the closet. And buttons.

We bought this colored button set a long time ago at a craft store. And so he waited in the wings.
We finished the edges of the fabric with ribbon. And in the hoop they sewed buttons in the shape of the letter “p”. Well, we also added buttons to the edges of the scarf to make it more fun.
It turned out like this.

“P” - hoop, scarf, buttons, linen. Everything fits!
We did not remove the hoop; they serve as a decorative element of our craft.
Tightly threaded letter "H"
We made the letter “H” based on foam plastic, A4 size. Where do we get so much foam? And we took it away from our neighbors. They bought household appliances, unpacked. And they wanted to throw away the foam. And we caught them at the entrance and took the foam away (peacefully).
The foam was painted with blue acrylic paint.

Use a pencil to outline the silhouette of the letter. And then we went over this silhouette with pins and carnations. Like this.
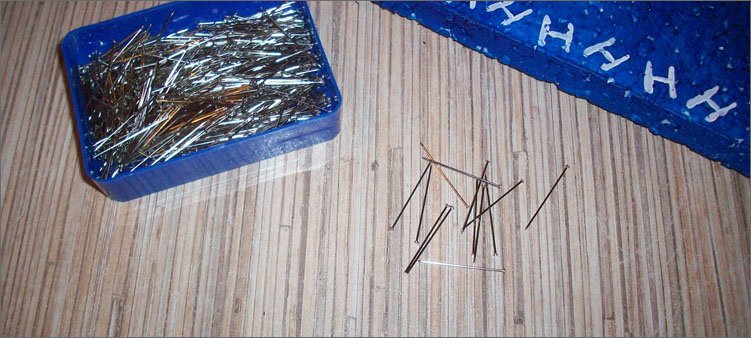
They just stuck them into the foam. The result is the letter “n” from needles. (they forgot this moment when the needles are already in place, but the threads have not yet been photographed)

And only then we took the threads and wound them on the needles. Like this.

Moreover, in the middle (inside) there are ordinary sewing threads. And along the contour, to better highlight it, we used white woolen threads.
A painting without a frame is not a painting! We didn't bother much with the frame. We simply painted slightly slanted "n's" around the edge of our blue foam canvas.
It turned out like this.

Just “Yo” is mine
Well, how simple... This little letter is already five years old.
![]()
Together with Sashulya we made her ours with my own hands when she was in 1st grade. Now the girl has already moved to the fifth. But the letter is still alive and feeling great.
We built it from an old children's book. We took the book apart into pages and left two. We cut out the silhouette of the letter E, almost breaking all our fingers in the process, since the cardboard was very thick.
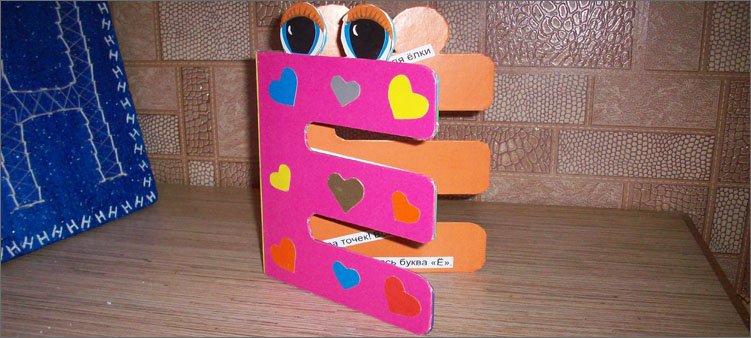
We decorated the letter with eyes and glued hearts on the front side. She's my favorite)
And this is what’s inside our letter-book.
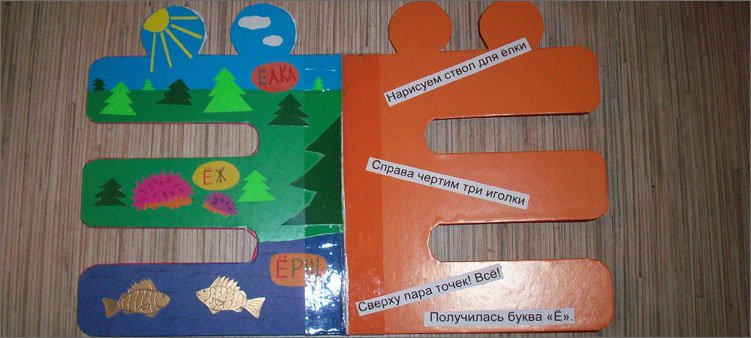
On the left are Christmas trees, hedgehogs and pipe cleaners, and on the right are strips with a short poem about this letter.
Well, that seems to be the whole photo tour of our work! How are you doing with ideas? It would be very interesting to know what you come up with. Share your thoughts in the comments. Thank you very much in advance.
Happy creativity!
Come visit again, you are always welcome here)
It is best to make letters from thick paper that holds its shape. This is the most affordable and quite plastic material. For example, you can choose rough watercolor paper, Japanese rice paper, or matte photo paper. You can also use craft wrapping paper for decoration. But you can experiment with technology. Choose simple fonts, without complex curls and squiggles, otherwise they will lose their appearance under a layer of decor. We draw the pattern of the future figure by hand or use stencils. We decide on the purpose of the letters and their location, and begin to create an original alphabet:
- Flat.
- Volume.
- For postcards.
- Using quilling technique.
- Using origami technique.
Flat letters
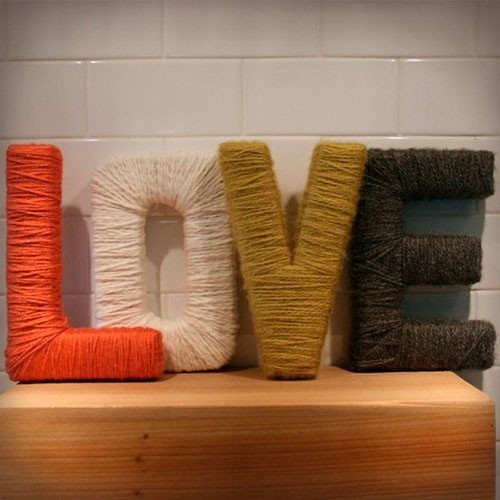
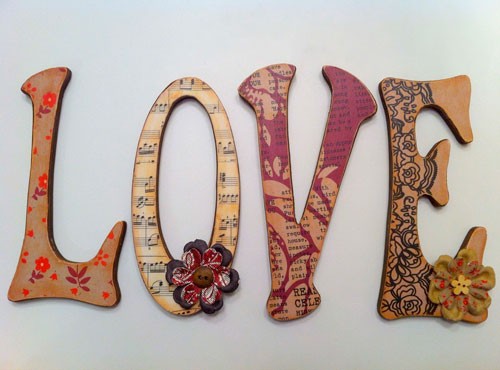
In the first case, we make letters based on flat figures(you can glue the paper in several layers). For example, the layout is wrapped fluffy yarn, multi-colored ribbons, leather or lace stripes, and the top is decorated with sequins, beads, buttons or natural material. We put this decor on glue and fix it with transparent varnish. Individual elements we put them into words and place them on wooden signs, these touching pictures in the shabby chic style will remind you of the most important things (“love”, “happiness”, family”).
Wallpaper with 60s-style patterns can be used to make large flat panels in the shape of letters. And the scraps can be used creatively; we use them to glue multi-colored collages onto a dense base. They will add refreshing accents to the interior. We make greetings from collages, for example, “Welcome.” Such welcoming images can be hung in the hallway.
You can make cupcake toppers using small letters folded in two layers and glued to toothpicks. And large figures will make heroes for a puppet theater. You just need to fix them on wooden sticks and draw faces. Preschoolers will certainly enjoy this entertainment, and staging fairy tales about the life of letters will help them learn the alphabet.
Volumetric
Some craftsmen make three-dimensional letters in Photoshop. The results are flat images with a 3D effect. Sun Design Studio did the opposite. From plywood, cardboard and paper elements they assembled 4 letters of the name of the city of Ghent. The designer's creation is very interesting to look at. Something happens on every letter. Cars “drive” along the roads, forests grow and rivers flow. Among the trees you can see cows grazing peacefully and cyclists passing by. Gradually, the rural landscape turns into a built-up city. The height of each letter is about a meter. The structure was suspended by cables on a powerful metal crossbar. This provided the layouts with mobility and the photographers with ease of shooting.
We assemble volumetric products from two identical parts of the letter and side elements glued between them. In order for the figures to stand vertically, their legs must be without curves. We draw and cut out allowances on the front and back sides. We make the side ribs 4-5 cm thick for a figure with a height of about 30 cm. At smooth turns, we fit these parts, cutting the allowances, and on the folds we draw shallow grooves with a knife. Use a metal ruler for this. The cut must be made along the outside of the sides so that when folded, the top layer of paper will separate and the bottom one will remain intact. To prevent the sides from getting damaged by the glue, you can use double-sided tape or secure a thin wire frame inside the letter in advance. You can add LED lighting to such structures, and they will turn into cozy lamps.
We keep the paper theme in the decor, cover the surface with newspaper clippings or napkins for decoupage, paint with thick gouache, felt-tip pens or pencils (liquid paints will not work, the surface will go in waves).
For postcards
I love the idea of cut out letters in cards. They are very interestingly made, I dream of trying them all myself. The card consists of two layers: the top - the cover, on which the reason for congratulations is written or to whom it is intended, and the inner, from which the figures are cut out.
We fold the inner sheet of thick paper (for example, whatman paper) in half, unbend it and draw the markings of the letters. You can immediately draw a center on a flat sheet of paper, and then draw the markings of the letters from there. The fold of the card will be horizontal. Therefore, we measure 1-2 cm from the center down - this is the distance at which the letters will move away from the surface. Draw a parallel line. From the center up, measure the height of the letters (5-7 cm), draw a line, plus measure the same thickness as below (1-2 cm). This way the letters will “move away” from the surface when opened.

Now we draw the letters, they can be printed, but in a mirror image (after all, we are working with the wrong side, lines and markings should not be visible on the face). We choose a “square” alphabet so that the legs and tops are smooth, without curves.
Before cutting, we draw the parts that will be removed (so that we get the effect of a shadow from the inscription). Using a paper knife or scalpel, cut out the letters along the contour, leaving the bottom and top connections. Now we bend the shapes first along the bottom line, and then along the top ones, so that the letters extend in the form of the letter G (our postcard is in the form of a J). Then we cut out the cover of the card in a contrasting color; it should be 5 mm larger than the inside on all sides. Bend and carefully glue so that the lines of the central folds coincide.
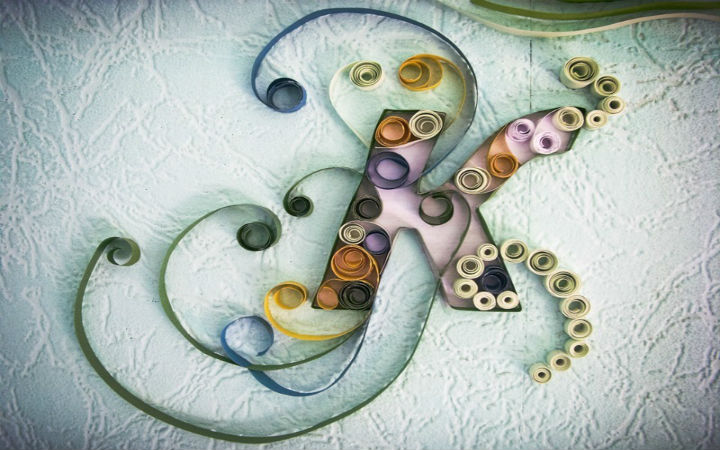
Using quilling technique
The cover of a postcard, photo album, or gift wrapped in paper can be decorated with letters using the quilling technique. In our work we will need pins, scissors, PVA glue, sheets of paper or quilling blanks and a cork or foam backing. To ensure that all the figures are the same size, we print out the templates and apply the letters to the standard as we go. We start by securing the printout to the foam surface. We stick a pin in the corners of the letters. Paper strip We create the outline of the figure by going around the pins from the outside. Now empty interior space fill with quilling parts, lay them end to end, as many as will fit. It’s convenient to do this with tweezers, and lubricate the sides of the elements with glue. You can create a natural pattern of flowers, leaves and curls, or simply lay out an abstract pattern. We leave the figurine to dry, and then remove it from the needles.
The festive table and wedding photographs will be decorated with letters made of paper flowers. They can be cut out, like flowers from fabric, or you can cut the sheet into squares, round the corners to make a circle, and cut in a spiral. Leave a patch in the center for gluing. We twist the spiral into a flower and attach it to the middle with PVA glue. We choose shades of flowers according to the theme of the holiday; for a wedding we make white elements in combination with pastel colors. We attach the finished decor with double-sided tape to capital letters made of thick paper or cardboard.
Using origami technique
Exclusive corrugated letters can be made from paper using the origami technique. Detailed instructions We look in specialized books or watch accessible videos on making crafts. One figure takes on average from 6 to 12 minutes. So in 3 hours you can collect the entire alphabet, and if you involve your family in creativity, it will be much faster. All letters are rolled up from rectangular blanks, the length of which is twice the width, for example 20x10 cm.
Increasingly, you can see unusual decorative elements in the interior - letters or entire inscriptions from them. Naturally, many construction and design firms immediately picked up this idea and began producing similar jewelry. But those decorative accessories that are made independently are considered more interesting, valuable and significant, and they are not so difficult to make.
Naturally, it is impossible to make jewelry from metal or plastic without equipment, but there are many materials that are quite affordable and easy to process. What and how to make a three-dimensional letter with your own hands, so that it is unique and inimitable, and therefore distinguishes your home, we will tell you below.
Textile
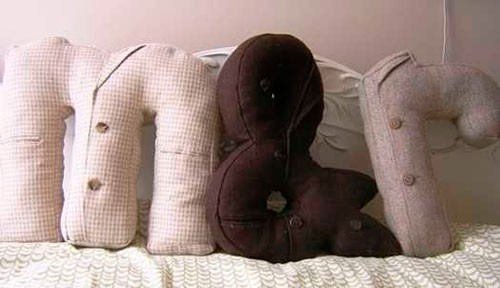
The most common way to do three-dimensional letters with your own hands, it is considered to be made from fabric and filler. For those who are at least a little familiar with sewing machine or even with thread and needle, it won’t be much of a problem to make soft letters. They can be small in size, when for decoration they are strung on a thread or fishing line and words are formed, or large in size when they are used as floor pillows. But the most popular size of such products is considered to be medium size, like regular sofa pillows.
To make three-dimensional letters from textiles with your own hands, you need:
- choose a fabric that matches the overall style of the room,
- make a stencil of the required letters,
- transfer the stencil onto the fabric using cardboard,
- cut out two blanks (note that on one side the stencil should be applied directly, and on the other - in a mirror image, i.e. upside down),
- sew them together in the most primitive way.
This can be done by hand or by machine, depending on your sewing skills. As the letter is stitched, the free space in it is filled with scraps of fabric, foam rubber, padding polyester or cotton wool. It is worth choosing fabric and threads that are strong enough so that such a letter does not need to be repaired frequently.
You can join the fabric with any type of seams, leaving them outside or inside, turning the letter inside out at the same time. You can decorate such pads in different ways: sew on buttons, lace, glue on various butterflies, pebbles or flowers. For children, you can “revive” these letters by gluing eyes, nose, tongue, hair to them and designating arms and legs using threads. Decorating a finished pillow gives you complete freedom to your imagination.

Cardboard
There are various ways you can make letters out of cardboard with your own hands. To do this, you will also need a stencil with a letter of the exact font that you would like to see on your shelf or wall. As a tip for beginners, it is worth noting that it is better to choose a simple font in a classic sans serif style. Once this becomes easy to achieve, you can move on to decorative or serif fonts.
After making a stencil, it is used to transfer the image onto thick thick paper, regular or corrugated cardboard. And then the manufacturing technology may differ.
The first method is somewhat simpler: to make three-dimensional letters from cardboard with your own hands, just wrap them with wool or other thick threads. Then you can decorate such accessories using flowers knitted from the same threads, shells, pebbles or beads.
The second option is somewhat more complicated, but the result is not soft, but real classic letters that will decorate both classic and minimalist interiors. To do this, you also need to prepare letter stencils and cut out two parts. If the letters have holes, they need to be cut with a utility knife and then cut out with scissors. For the edge of the product, you need to cut a strip of cardboard, which should be three to four centimeters thicker than the thickness of the product. Using a pen where the ink has run out, we press through the fold lines with which the parts will be connected. Next you need to bend the cardboard along these lines. Then one part is glued to the edge of the product (to make gluing more convenient, in the part of the letter where the lines are smooth, the fold of the edge should often be cut with scissors). After connecting the first part of the letter to the edge, the second part is glued in the same way. The entire product is placed under a press for some time (a couple of hours is enough).
After making a letter from cardboard with your own hands, you need to decorate it. You can cover the top of the cardboard with white paper - such a letter will fit into a minimalist design. Or you can make the letter brighter: sprinkle glitter on top of a layer of glue, use beads, shells, bows, gift ribbons, wrapping paper, etc. To make a letter fit a certain interior style or individual pieces of furniture, you can paint it yourself.

It is in this way that the letters used at holidays are created. At anniversaries these can be numbers, at weddings – the names of the newlyweds or individual words “Love”, “Happiness”, etc.
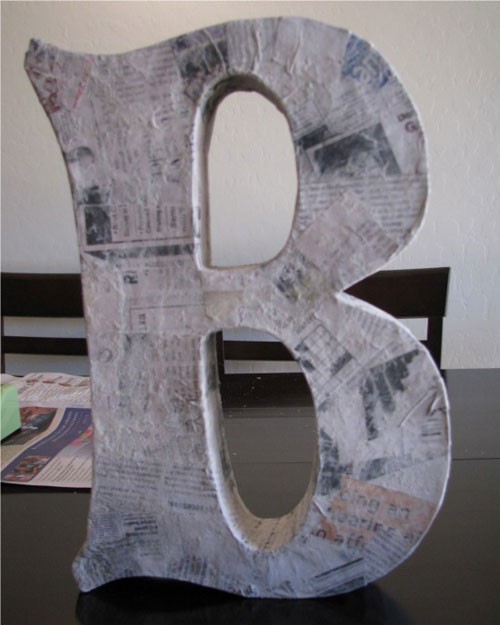
The third way to make any shapes using cardboard and paper, including letters or numbers, is the papier-mâché technique. To do this, you first need to draw a word or letter in two copies, and then fasten them together so that they are at an equal distance from each other. Some craftsmen fill this space with paper cups, gluing the top and bottom of each cup and thereby fastening the two parts together. You can use cardboards of the same length to glue the parts together. On top of this, the product is pasted over with cut pieces of paper or newspaper, as is usually done using the papier-mâché technique. The finished part can be decorated with painting, appliqué, or using the decoupage technique. These will look original unusual jewelry like pasta in the shape of shells or stars.
Tree
Another popular material for creating letters and inscriptions is wood. You can make your own wooden letters from blocks of wood or plywood, which is much easier. True, letters made of plywood will turn out to be flat, but with the help of decorations, for example, natural materials (cones, acorns, etc.), it is easy to give them additional volume.
To make wooden letters with your own hands, you also need a stencil. It is transferred to plywood and then cut out with a jigsaw. After the product is ready, it is worth treating it with sandpaper to avoid any unevenness or splinters. Such letters are usually first painted and then decorated with any materials. After finishing the work, it is better to coat the product with varnish so that the wood is protected from moisture.
Foam plastic
If you have enough material, you can make letters from foam plastic with your own hands. You can buy polystyrene foam in the store in sheets or find boxes from household appliances, where there is often quite a lot of it. The technology for making beech from it is the same as for wooden letters: first, using a stencil, the image is transferred to a sheet of foam plastic, then the product is sawed out using a jigsaw (you can use a construction knife), and then carefully processed with fine sandpaper so that there are no defects, and the surface became perfectly smooth.
When decorating foam letters with your own hands, you usually first apply two layers of paint to all surfaces of the product, and then use light decorations: lace, tulle trim, burlap, thread, etc. To decorate letters from foam plastic, you can make small flowers with your own hands, ladybugs, butterflies or other accessories, but do not glue them with glue. It can corrode foam. It is better to use rubber glue - it is safe for the product.

Wine corks
Another option for making a three-dimensional letter with your own hands is a product made from wine corks. IN modern world nothing is surprising anymore, but using so-called waste to create interesting things is a great idea. The plugs can be glued together with regular or super glue. You can change the direction of the plugs by gluing them first with edges and then directly. Such products are decorated with paints, appliqué, dried flowers and any other methods.

Gypsum
You can use plaster to create interior three-dimensional letters with your own hands. It is better to work with plaster while wearing gloves. To create letters from plaster, you need to prepare a mold into which the prepared solution will be poured. To do this, you need to draw the desired letters on cardboard, and then cut out long strips that are equal to the thickness of the product. These strips need to be glued to the cardboard along the contours of the letters to form a cavity into which the plaster will be poured. It is advisable to tape the inside of the mold - this will make it easier to remove the part after it hardens.
To prepare gypsum, strictly follow all recommendations on the packaging. It should generally have a yogurt-like consistency. First, the mold is half filled with solution. Then a layer of burlap is laid on top to strengthen the future product. Then the product is filled to the end, i.e. to the top of the form.
Typically, plaster hardens completely after 4-5 hours. After this, you need to use a knife to remove the product from the mold. Then the surface is sanded with sandpaper, the corners are cut off and irregularities are removed.
Usually such letters are not decorated, but left white. But it’s not necessary: they can be coated with paint or decorated with some cute little things. To prevent such decorations from getting dirty, they should be sprayed with acrylic spray.