New Year traditionally associated with the aroma of tangerine and, of course, the smell of spruce. For this holiday, kindergartens and schools make crafts, including artificial Christmas trees, which can also be made fragrant using a popular material with a strong smell - coffee. Coffee trees are beautiful and fragrant; such an addition to the main gift or token of attention is original and valuable. To decorate the interior of your home and give your home a festive atmosphere, you can also make Christmas trees from coffee with your own hands.
Scroll necessary materials and tools:
Coffee beans;
- leg-split;
- cardboard;
- glue;
- beads;
- sparkles;
- brush;
- scissors;
- pencil.

DIY coffee tree: step-by-step master class
We will make the Christmas tree cone-shaped. You can purchase a ready-made foam cone, which is sold in special stores for those who like to create with their own hands. You can make a cone yourself. There are several ways: from old newspapers, cut from a piece of polystyrene foam, roll a sheet of cardboard into a cone, securing the ends with glue or using a stapler. We cover a self-made or purchased cone with twine. It is not necessary to coat the entire twine with glue; it is enough to secure it in 2-4 places in one circle. The work will go faster with a glue gun, but you can use any instant glue (you need to take care to ventilate the room, since such products usually have a strong chemical smell) or PVA glue (if you use it, then you need to give time for the glue to dried out).

We take coffee beans and begin to create a pattern, for which we glue the very top of the cone around the perimeter, gluing the beans to each other in one row. Then above this row we glue several grains with their ends.

Then, stepping back a little, we glue one row of coffee beans, leaving a small distance between them. Then we step back further and glue one row, but the grains should be in contact with each other. We step back a little more and glue the beads different color. And again we retreat down and make another dense row of coffee beans.

Again we indent down and start gluing the flowers - the center is a bead, from which six petals made of coffee beans extend. Flowers are made around the perimeter. A coffee bean is glued between the flowers.

Again we indent down and glue a dense row of coffee. Then we start gluing the snowflake. The center of the snowflake is a coffee bean glued across. 6 rays extend from it, consisting of 2 grains. From each ray there are 3 more rays, consisting of one grain. After one snowflake is made, the number that can fit on the Christmas tree is determined. I only have two snowflakes, so I made them on opposite sides.

Between the snowflakes we glue a flower made of coffee beans and an arc under it. 
Add silver glitter to a small amount of PVA glue and stir. Using a brush, apply this mixture to the twine and to the top of the coffee.

Our fragrant coffee tree is ready! Creative success and Happy New Year! 

Irina Nagibina
Сhudesenka.ru
What kind of Christmas trees people make for the New Year: from cardboard, and from candies... In general, all you need is imagination, skillful hands and patience, and you can make any Christmas tree you want. Those who love coffee and the aroma of coffee beans will surely love the coffee tree. Such a Christmas tree will be beautiful, and most importantly incredibly fragrant. New Year's decoration or a gift.
Coffee tree - master class
So, before we move on to describing the process of making a Christmas tree from coffee, let’s figure out what materials you will need in
- work:
- coffee beans (the number of beans depends on the size of the Christmas tree you are going to make);
- cardboard (quite dense, but flexible);
- threads;
- double sided tape;
- hot glue (glue gun);
- scissors;
- trunk for a Christmas tree (this can be a branch, as in this master class, but you can also use bamboo sticks tied with ribbon and other options that you have enough imagination for);
- decorations for the Christmas tree (beads or large beads, sparkles, etc.)
Now, having decided on the materials, let’s move on directly to making a Christmas tree from coffee beans.
Step 1: First, roll a cone out of cardboard, securing it with double-sided tape. Trim its edges if necessary. Then, to further secure the cone, wrap it with thread.

Step 2: Now you need to be patient and cover the base of the tree with coffee beans. Glue the grains using a glue gun at an angle of approximately 70-80 degrees. You need to start gluing from the base of the tree, not from the top. After the tree is covered with its “clothes”, it needs to be decorated, because christmas tree made from coffee without decorations is uninteresting. Beautiful beads, bows, sparkles - whatever you can think of - are suitable for decoration.

Step 3: The last step will be to strengthen the tree. In this master class, both the base and the trunk are wooden. It looks very stylish, but if suddenly you don’t have a piece of wood on your farm for the base, then you can decorate a plastic cup and find a stick on the street for the trunk. You need to fix the trunk inside the tree using a glue gun.

Your Christmas tree made from coffee beans is ready. All that remains is to rejoice and inhale its wonderful aromas.
New Year is always a Christmas tree and gifts, Father Frost and Snow Maiden. But the tree does not always have to be green and fluffy. Now it has become very fashionable to make Christmas trees from different materials- paper, fabric, dried flowers, feathers, sweets and even coffee. This version of a winter beauty will not only create a festive atmosphere, but also fill the room with the pleasant aroma of coffee beans. Making such a miniature Christmas tree is not at all difficult, but it will take time to glue the grains and decorate. But at the end of the process you will receive not only beautiful thing for decorating the interior and creating a holiday atmosphere, but also as a gift option for friends and relatives.
The size of the tree may vary, but it is better to make small coffee trees that can be placed on a table or bedside table - this way they will be more noticeable. A cardboard cone is used as the base of the Christmas tree; you can make it yourself or use a festive head cap for these purposes, which is sold in any gift and holiday equipment store.
How to make a Christmas tree out of coffee
So, to make something like this unusual Christmas tree you will need: a cardboard cone, brown threads, two types of glue (transparent like “Crystal” and PVA), coffee beans, brushes, beads and bows for decoration (you can use other decor), thick cardboard for the trunk, a base (you can use a candlestick or glass), transparent varnish, semolina, golden spray paint.

Coffee tree - master class video
 Using the same principle, you can make Christmas trees from other materials, with or without coffee beans. For example, you can wrap a cardboard cone with burlap tape and glue coffee beans in a random order on top. You can use dried flowers, which should then be coated with golden or bronze colored spray paint. You can also twist small flowers from thin strips of paper and glue them tightly to each other on the surface of a cardboard cone. These Christmas trees can also be decorated in different ways. Decor options made in the same color scheme look stylish. For example, for a golden Christmas tree, you can choose a bow to decorate the base made of dark gold mesh or ribbon. You can use gold-painted nuts, pine cones and dried flowers.
Almost everyone wants to make something with their own hands for the holiday. And if you haven’t practiced making topiary yet, it’s time to start. The New Year tree is traditionally made in the form of a Christmas tree. But the master class (MK) will tell you what the Christmas tree itself will be made of.
Lovers of such aromatic drink as coffee will definitely like this gift. But just a coffee topiary is too banal, let it be a coffee... Christmas tree!

To make it yourself, you will need:
- Coffee beans (about 200 grams);
- Cardboard cone and cardboard circle;
- Stick (pencil or skewer);
- Glue moment;
- Double-sided tape;
- Gypsum;
- Plastic cup for stand;
- Jute twine;
- Sackcloth;
- Ribbons and beads.
The first thing you will do with your own hands according to this MK is prepare the barrel. Take either a pencil or a skewer and wrap it with twine. After this, you put the finished cardboard cone on this trunk. This master class also offers such a solution - you can weave braids from twine, tie a thread in the middle to the braid, thread it through the top into a cone and secure it on a skewer.

Then fill the inside of the cone with napkins so that it is not hollow. This master class suggests taking napkins as a simple option, but it can be anything - cotton wool, fabric, etc.
Tape the cardboard circle underneath with tape. The base for the coffee Christmas tree is ready. Make sure it is strong enough, because the next step is to form the crown.
Coffee Christmas tree topiary: decorating master class
Glue the grains one by one, tightly to each other.
The master class continues as follows:
- The first layer dries coffee beans about half an hour, and only after this time can the second one be glued on.
- The crown is ready, now it, or rather the tree, needs to be planted somewhere, in some kind of pot. You can also do it yourself. Take a simple plastic cup, pour plaster into it, and place the Christmas tree in it. Make sure it is firmly in the pot.
- Now, following MK, the pot needs to be decorated, it should also be in an elegant form. You can do this like this: wrap the glass in burlap, use twine to weave another braid with your own hands and wrap it around the pot.
- You can also easily make a bow from twine, in the middle of which you can decorate with a coffee bead. Such bows can also be at the ends of a braid that you pulled out through a cone, like a Christmas tree decoration.

The main part is ready, and now you can improve this universal master class. For example, put fir cones in the top layer of the pot to cover the plaster. Or paint the same coffee beans with gold acrylic paint. This Christmas tree in the shape of a coffee tree will definitely surprise your friends and family.
Coffee Christmas tree topiary (video master class)
Topiary Christmas tree made of threads: original DIY decor
A Christmas tree made of threads is also, in its own way, a classic of the genre. There are many MKs that describe the process of creating such a tree. This may not be the most traditional topiary, since there is no traditionally high trunk, the pot can simply serve as a stand, etc.

Master class - Christmas tree made of threads:
- Ideal if you have a foam cone. He will better basis, and you won't worry about whether the topiary is durable. But if there is no such blank, you can make something similar with your own hands.
- Make a simple cone from cardboard or any other dense material. A papier-mâché blank will also work, although you will have to tinker with these.
- Almost no MK “undertakes” to paint a foam plastic cone, but another cone, the same cardboard one, needs to be painted to match the color of the threads (so that everything is uniform).
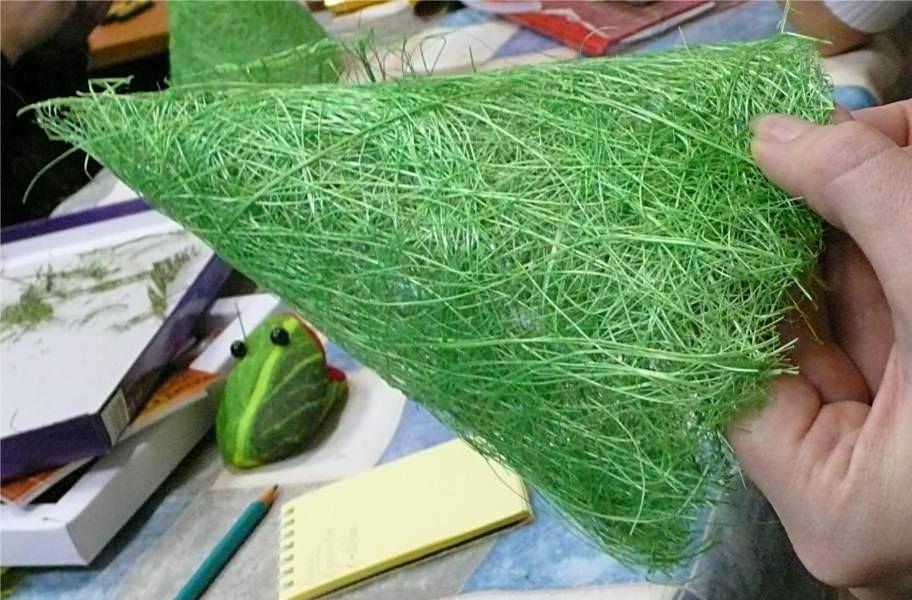
- The cone needs to be wrapped with thread. Which threads to take, decide for yourself - it’s better to be heterogeneous, for example, white-green, fluffy.
- Secure the ends of the threads with glue. To prevent them from “running away” during the work process, they can be secured to the base with pins. The winding goes in the “bottom-up” direction.
- When the entire cone is wrapped, secure the threads again with pins. To keep the spruce fluffy and nothing showing through from under the threads, wrap the threads in another layer.

Now the spruce topiary can be decorated. Decorative berries, beads, rhinestones, buttons - in the process of work it will become clear what will be useful.
Topiary Christmas tree made of threads (video master class)
DIY herringbone topiary: final design
It's time to make this New Year's tree look like a traditional topiary. This means it must have a trunk and a pot.
Use a wine cork as a stem. There are MKs that offer to simply paint the cork; you can wrap it with thread or twine. In a word, transform the cork with your own hands so that it looks like a trunk.
Next, the master class suggests gluing the stem plug to the cone. A heat gun will come in handy. Well, all that remains is to choose a pot. You can do this: wrap a regular plastic cup with sisal. Sisal has a pleasant texture, and you can choose any color. And then the master class is up to you: ribbons, lace, twine, mini-Christmas balls, tinsel... You can decorate the pot with your own hands in the way that suits your spruce, which should blend harmoniously into your interior.

Here are a few more ideas from different MKs:
- Such a spruce also requires gifts at its foot! Small case with elegant decoration- Here best master class giving gifts for the New Year.
- Some MKs suggest combining the same threads and candies, or threads and coins as the top layer of the pot, so that financial success we didn’t pass you by in the new year;
MK with spruce, the top of which is slightly twisted, is also popular; an aluminum cable will help create such a bend.
Decorating a Christmas tree topiary (video master class)
Such a tree will not only decorate your home. You can create something similar as a craft in kindergarten, the child will definitely be happy! And it will take only one evening to complete not the most difficult task.
Topiary Christmas tree for the New Year - design


Recently, they have become increasingly popular various types DIY crafts. A special trend is topiary, decorative trees made from coffee or other scrap materials. Today I want to show you how to make a herringbone coffee topiary. It's very easy, even easier than regular coffee topiary. And so, let's get to work, or rather, to prepare materials.
To create a coffee tree you will need:
coffee beans can be bought in packages or by weight,
hot glue,
a cup or glass for the base of the Christmas tree,
ribbon for decoration,
twine,
cardboard,
acrylic paint Brown.

First, we need to prepare the base for the Christmas tree - it will be a cone. The cone can be made from cardboard. Or make it out of plain paper and use the papier-mâché technique to seal the cone. It all depends on you, I have a papier-mâché cone. 
We paint the cone with brown paint, since the coffee beans are not ideal and do not have the same structure, the base of the cone may be slightly translucent, so we prime the surface with brown acrylic paint. We begin to glue the grains. I glued them starting from the bottom. The grains were glued with the flat side down. Since we will be gluing the coffee in two layers, we will be gluing the second layer with the flat side up. 
And so, row by row, we get a cone blank covered with grains. 
We do not cover the top with grains, leaving room for decoration. This is the first layer of grains. 
We glue the second layer on top of the previous one, trying to fill all the empty spaces so that the base is not visible. 
Now let's make decorations for the Christmas tree. This will be a bow. I just beautifully folded the ribbon in the shape of a bow and secured it with special wire. 
We insert the decoration into the top. You can fix it with hot glue. The Christmas tree is already so beautiful. You can make a base and leave it that way, but it won’t be topiary. And we will make a leg for the Christmas tree. 
Now we are preparing a pot for our tree. You can take any cup with a coffee theme, or take a paper glass, you can cover it with twine. We glue it with PVA glue, then your cup will look neat. 
You can use a tree branch or wooden skewers as a trunk for topiary.
The weighting agent in our cup will be pebbles from the sea, or you can simply fill everything with plaster, whichever is more convenient for you. Attach the base of the trunk using hot glue 

We seal our Christmas tree with paper. 

We cover the cardboard with coffee. 
Attach the Christmas tree to the base. 
Here our Christmas tree is ready. It turned out to be a beauty. 
You can attach coffee beans to the pebbles. 
This is how a miracle happened for me. Try it, I'm sure you will succeed too.
This tree will decorate your kitchen or living room.
Happy creativity! 
Posted by acja


