Applications made from colored paper have long been a traditional creative activity for children.
It allows you to develop skills in handling scissors, improve the work of children's hands and make the baby more careful. Every child will be able to make appliqués from colored paper with their own hands if they are given a feasible task.
So, the most affordable options for colored paper applique for children 4-5 years old can be:

Volumetric applications made of colored paper
Ladybugs. Cut out two red circles and a black semi-oval. Black dots are placed on the circles, after which one circle is glued exactly above the black semi-oval, and the second is bent in half and glued to the first circle. We complement the bug with toy eyes and antennae.
 Materials for the “Ladybug” applique
 We complement the bug with toy eyes and antennae.
 Application "Ladybug"
 Look at the video on how to make a ladybug applique using a different technique:
Application made from pieces of colored paper
Chanterelle. Cut out a triangle from a paper plate, and use a stapler to attach two triangles of orange cardboard to its round edge. Then cover the plate with pieces of orange thin colored paper.

Fill out the entire piece of paper.

Triangles are ears and circles are eyes
All that remains is to attach the round eyes - and the fox is ready!

Ice cream. We draw or cut out ice cream cups from colored paper in advance and glue round cupcake molds to them, like creme brulee balls. With these molds you can make other applications of dishes if you use them as plates.
 Application "Ice cream"
 Application made from colored paper using a template
Bunny. We cut out the ears, head and triangular nose of the bunny in advance according to the template, as well as a bush of grass behind which it will hide.

We assemble the picture on a sheet of white paper, glue all the details and animate the bunny with toy eyes.
 Application "Bunny"
 White bear. Using a template, we cut out a round body, a head with ears, a muzzle and paws of a bear from white paper.

Let's complete the necessary details. We cover a sheet of white cardboard with blue watercolor, creating a background.

Against this background, we assemble our bear and complement it with toy eyes.
 Application " Polar bear»
 Multilayer applications made of colored paper
As an applique made of colored paper for children 5-6 years old, you can use more complex, multi-layered paintings containing small details. Preschoolers are quite capable of creating characters such as:
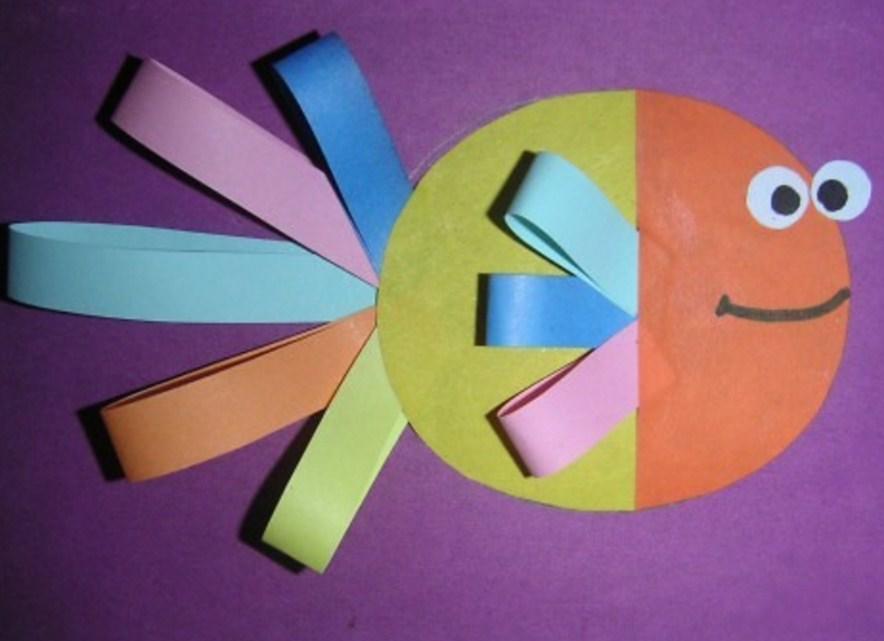
Fish. We cut out a triangular fragment from a disposable plate, cover the remaining part with “scales” - semi-oval pieces of colored paper different colors, which need to be superimposed, slightly overlapping each other. We attach the tail and fins with a stapler, and glue the eye. Ready!

Here is another fabulous fish with colored scales.

Dragonfly. From thin paper cut out the dragonfly's body with its head and eight multi-colored wings.

Glue it all to a white sheet, complement the image with mustaches and toy eyes.
 Application "Dragonfly"
 Application made of colored paper and disposable plate
Chicks in the nest. Glue half of a disposable paper plate to a sheet of cardboard. We cut out three oval figures of chicks from blue paper.

We cover the figures with lumps of crumpled thin blue paper, and the nest with decorative shavings.

All that remains is to glue the eyes and beaks of the chicks - and the applique is ready!
 Craft “Chicks in the nest”
 In the application " autumn tree» A disposable plate serves as a background.
 Application "autumn tree"
 Applications made of colored paper using a complex pattern
Girl in the rain. This applique is based on working with complex templates, according to which you need to cut out an umbrella, boots, head, dress, hair and hands of a girl.
 What needs to be cut out for the “Girl in the Rain” craft
 We assemble the picture on a sheet of blue cardboard, gluing the parts one by one.
 Application “Girl in the rain”
 Combined applique made of colored paper
Chicken with an umbrella. This application also involves working with templates, but if it is difficult for children to cope with such a task, teachers or parents can prepare templates in advance.
 Materials for crafts “Chicken”
 We decorate the umbrella with pieces of translucent colored paper, which will make the image more interesting.

All that remains is to collect the picture.
 Applique “Chicken with an umbrella”
 Volumetric applique made from pieces of colored paper
Flower. Cut out the outlines of a flower from a disposable plate or sheet of cardboard.

Cut small pieces of colored paper and roll them into lumps. One by one we glue the lumps onto the glue.

Carefully fill the entire space of the flower.
 Application made of colored paper “Flower”
 Another craft option is “sunflower”. Draw the outline of a sunflower on a piece of paper. Cut pieces of yellow and green paper.

Glue a black circle in the center. We begin to decorate the craft with pieces of paper. Before gluing the paper, crumple it a little - this will give the craft additional volume.

Sunflower applique made of colored paper.
 Sunflower applique made of colored paper
 Rainbow. It is made in much the same way as a flower: the child crumples colored paper and carefully places it in rows, observing the sequence of colors in the rainbow.
 Application "Rainbow"
 Using the 3D appliqué technique from colored paper, an autumn tree turns out to be very beautiful.

You can make a heart applique from pieces of red and pink paper. We use a heart made of cardboard as the basis.

We crumple the pieces a little and glue them to the base. The craft will look interesting if you alternate red and pink lumps.

Excellent appliques are obtained using the cutting technique. Small pieces of paper are glued tightly to one another using a thin stick.

This is the kind of airplane that can be folded from pieces of paper using the cutting technique.

Instead of glue, small pieces of paper can be fixed to a plasticine base.

Flat applications made from pieces of paper
The herringbone applique from colored paper is made using a very interesting technique. Pieces of thin tissue paper are glued onto triangular bases. In this case, the pieces can seal the edges of the Christmas trees and stick to one another. Only after this the triangular base is glued onto the pre-painted background.
 Christmas tree applique made of colored paper
 Straw man. The application is made using the mosaic technique. Glue the hat and head of the stuffed animal cut out according to the template to the sheet, and draw the contours of the body.
 Materials for the “Straw Scarecrow” craft
 The child’s task is to fill the body with pieces of colored paper, gluing them next to each other. We lay out the stuffed animal’s hair and beard using the same yellow pieces.

Sunset. We lay out sand and purple sunset with pieces of yellow color.


A small palm tree will complement the landscape.
 Application "Sea" made of paper
 Applique with quilling elements “heart”
Applications with elements of quilling or paper rolling look very impressive. In order to make the application we need colored paper, pencil, scissors and glue.
Cutting paper curls
Glue paper curls onto a pre-prepared base - paper heart.

Decorate the curls with rolled green paper. The curls begin to resemble graceful roses framed by petals. We can do it interesting application using paper rolling technique.
Application “Vase with flowers”You can make a very impressive “Summer Meadow” applique postcard from colored corrugated paper and wire. The technique for making it is very unusual. We wrap corrugated paper several times around an easily bendable rod or wire. Fix the end of the paper with glue.

Squeeze the paper onto the wire. Cut off the excess wire and tuck the ends. We should get colored thick sausages.
 "Sausages" made of corrugated paper
 From these “sausages” we lay out an applique on paper.

You can make a very beautiful wall panel with yellow flowers from colored corrugated paper.
Applique on a paper plate “bed with carrots”
Very beautiful applications are obtained if they are based on a background painted in watercolors.
 Application and drawing “spring”
 Using different techniques, and by combining ideas in your own way, you can create unique paintings that will become a real manifestation of children's talent.
Applications for children 3-4 years old. Master classes with photos
Paper applique for 3-year-old children is not only a fun activity, but also useful, as it develops how fine motor skills, and creative abilities.
For three-year-old children, it is better to start getting acquainted with applique with the simplest works, gradually complicating them. At the same time, it is very important to interest the baby, then he himself will want to do something interesting. And so that interest in this kind of crafts does not disappear over time, come up with new interesting stories, try new techniques and be sure to praise the baby.
How to make an applique for children 3 years old
If your child has never done such crafts before, it is better to start with various geometric shapes. During these classes of making appliqués from shapes, you will not only teach your little one to work with paper, scissors and glue, but also consolidate knowledge of basic geometric shapes. In addition, the baby will be able to learn new colors and also learn to combine them with each other.
After geometric shapes, you can move on to familiar objects, fruits, vegetables, flowers or animals. In addition to the fact that such activities will have a positive effect on memory development, they will also improve imaginative thinking and imagination. While working on a craft, you can study simple words in English or another language. For children 3 years old, applications made from colored paper are a favorite activity also because they like not only bright colors, but also the opportunity to cut out various objects and shapes, and then create them themselves beautiful crafts. Of course, at first you will need to help the baby work with scissors, but then he can do it on his own (provided that the baby uses special children's scissors). First, you can simply cut out various shapes and stick them in random order on the sheet. By the way, in this case you can make an unusual mosaic application. After this, you can move on to the cut-off appliqué technique, for which the sheet is cut or torn into small pieces, which are then glued onto the whole sheet. In this case, you can first draw some design on a sheet of paper, and then fill it with pieces of paper.
Today in stores you can purchase ready-made applique templates for children 3 years old. Such templates will save you the time you need to spend on drawing, and thanks to the fact that there are templates with drawings on any topic, you can easily select those that will be interesting to your child. For example, for 3-year-old children, flower applique will be very interesting and educational.
It is advisable to start with simple crafts, for example, with a bell.
Volumetric applications for children 3 years old can be made in various ways.
For example, you can simply cut out several shapes for each of the elements and stick them on top of each other. This method is called overlay applique. By the way, what a simple way to make a 3D fabric applique for 3 year old children.
No less interesting crafts are obtained if you use not ordinary white or multi-colored paper for them, but soft plain napkins.
For example, you can make an unusual three-dimensional sheep together with your baby.
This craft is quite simple, and children will certainly enjoy working with soft napkins. So, first you need to prepare all the materials that you will need for the work, namely: a sheet of cardboard (you can use ordinary white or colored), white napkins, scissors, a little PVA glue and a glue brush. In addition, you will need a simple pencil and a felt-tip pen or dark gray marker.
If you are not using a ready-made template with a picture of a sheep, you first need to draw with a simple pencil sheep, and then cut out the design and transfer it to a sheet of cardboard. Next, draw a muzzle and hooves for the sheep with a marker or felt-tip pen. If you want, ears and hooves can be cut out of colored paper and then glued to the drawing. If you cut out the ears, when you glue them to the sheep, apply glue only to the base of the ears. This is necessary so that your sheep turns out voluminous.
After this, you can begin the most interesting work for the baby - tear the napkin into pieces and then roll them into balls. Of course, the napkin can be cut into pieces with scissors, but in this case the paper balls will not be so voluminous and fluffy. If you don’t have napkins on hand, you can easily replace them with cotton wool. When the required number of balls is ready (about two napkins are needed for a medium-sized sheep), you can apply glue to them and attach them to the sheep. The glue can be applied with a brush or you can first pour it into a small bowl and dip the ball on one side into the glue. When the sheep becomes fluffy and beautiful, you can put it aside for a while so that the glue dries completely.
Palm applique will be very interesting for kids. Its meaning is that first the baby’s palms are outlined on colored paper, and then they are cut out and glued to the base in the form of some kind of composition. For example, this is how you can make a beautiful three-dimensional Christmas tree, rays of sun and similar Day of Frost in the New Year.
Arts and crafts for children and adults.
Author: Natalya Nikolaevna Kopylova, educational psychologist, MKOU orphanage"Swallow's Nest", village. NovovostochnyDescription: the material describes one type of arts and crafts - appliqué.
Target: introduce the application.
Tasks:
- give an idea of the types of applications, methods of creation;
- develop memory, imagination, thinking, fine motor skills;
- instill interest in the art of appliqué.
Application for children 5-7 years old
Application- This is an accessible and very understandable type of creativity. It is important to introduce a child to the world of beauty through visual activities (appliqué, modeling, drawing), this is useful for him harmonious development.In such classes, children learn different types art, they perceive everything very quickly. Their activities are becoming increasingly voluntary; previously acquired visual knowledge, skills and abilities are being consolidated.
Application classes implement a large number of tasks:
- develop hand motor skills, thinking, imagination, aesthetic taste, artistic imagination;
- they learn to work with scissors, glue, paper, cut out objects of symmetrical shapes from paper folded in half, and identical parts from paper folded like an accordion;
- consolidate techniques for cutting parts;
- children learn to complement the image with the necessary details, create compositions (subject, plot), plan and coordinate their actions ( teamwork).
Application classes for children aged 5-7 years can be held approximately once every two weeks. But this is all individual.
It is very important and necessary to make a preliminary preparatory work before such an activity. For example, looking at paintings, drawings, getting to know surrounding phenomena, reading fairy tales, and the like.
You can even highlight a certain algorithm for constructing an application lesson.
1. Create an atmosphere of positive emotional mood and interest. It can be different interesting points, poems, games and so on.
2. Getting started with getting to know, looking at and feeling the depicted object, as well as the teacher’s (educator’s) advice and children’s suggestions for implementation.
3. After this, you can ask the children to start cutting out the parts, laying out everything they cut out, covering it with glue and, in fact, gluing it on. At the same time, naturally, the teacher (educator) provides assistance if children have difficulties in the process of work. After that, be sure to invite the children to circle the resulting work with a felt-tip pen.
4. Result – examination of finished works. At the same time, give positive ratings. It is important for a child to be happy with the result obtained and learn to evaluate himself and other children.
In classes on visual arts with children 5-7 years old you can use the following types of application:
Subject(image of individual objects that do not participate in any events).
Objects are depicted with a distinct simple shape, clear proportions, and color.
Plot-thematic(depiction of a composition based on the events of fairy tales, short stories, poems, etc., or independent invention).
Decorative(patterns of geometric shapes on a strip, square, circle).
There are also application methods, used in working with children 5-7 years old.
Collage(combination of various materials).

Application from cut out parts of an object(an object is created from parts and glued to paper).

Volumetric crafts made from thick colored paper, who can stand.

Fresco(glue is evenly applied to the surface and covered with sand, pencil shavings, and cereal).

Application from cut out silhouettes of objects(a composition is created from one or several objects and pasted onto a sheet of paper).

Ikebana(drawing up simple bouquet compositions).

Applique from floss threads(threads are laid out on velvet paper and glued).

Rolling napkins(the napkin is torn into small pieces, each piece is wrinkled and rolled into a lump).


Decorative applique from cut strips and geometric shapes.

Cotton wool applique(cotton wool is laid out in a thin layer on velvet paper and glued).

Cutting along the contour(colored paper is torn along the intended contour to convey the shape).

Overlay applique(parts of the same shape, but different in size, are glued to each other, starting from the largest to the smallest).

Breaking-mosaic(small cut out geometric shapes or torn pieces of colored paper are pasted onto inner side contour).

Application of dried leaves(the intended object is made from leaves and glued onto a sheet of paper)

We list the main material that can be used in appliqué classes:
- Colored paper, colored double-sided, magazine, corrugated, velvet paper, colored cardboard, sheets of landscape paper.
- Colored napkins, fabrics, braid.
- Floss threads, wool threads.
- Candy wrappers, foil, cotton wool.
- Cereals, sand, small pebbles, dried leaves.
- Felt pens, scissors with blunt ends, paper glue, PVA.
- Oilcloth lining, cloth, brush.
Expected results.
Child:
* knows how to create subject and subject compositions, simple ikebana, collages, frescoes, is familiar with the technique of their implementation, appliqué from natural and other materials, three-dimensional appliqués;
* he has developed an interest in the art of appliqué;
* knows how to cut round, oval and other shapes, identical parts folded like an accordion, symmetrical shapes folded in half;
* converts some geometric shapes into others.
Nowadays in all schools, during labor lessons and extracurricular activities, such creativity as creating appliqués from colored paper is very popular. This is mainly done by children elementary school, they make a variety of crafts from paper and cardboard, make pictures and three-dimensional toys for the Christmas tree.
Applique is a painstaking work that develops thinking, perseverance and instills in children a love for all kinds of crafts. While working on the applique, the child learns to use scissors, glue paper and study geometric shapes.
A 3-year-old child can do the simplest crafts together with his parents. For the little ones, the cut-off appliqué technique is used. It can be created without the help of scissors. The child tears off small pieces of paper, spreads it with glue and sticks it on a thick sheet of cardboard, creating a specific picture.
The older the child gets, the more developed his spatial thinking is and he can be taught to perform volumetric crafts. To do this, the paper is folded like an accordion, secured with glue, and then a specific object is formed and glued to a sheet of cardboard.
A more complex type of paper craft is quilling, which involves rolling thin strips of paper. To create a picture, rolled rolls are glued to cardboard or connected to each other.
Easy and interesting application from toilet paper your baby will like it preschool age. To create it you need a template diagram, toilet paper or white paper napkins, glue and a bright sheet of cardboard.
Toilet paper elephant step by step:
- On cardboard, draw the body of an elephant using a pencil according to the finished template.
- Tear off a small piece of paper, roll it into a ball, spread it with glue and glue it onto the elephant’s body. So fill the entire drawing.
- Cut out a trunk, head and legs from white paper. Glue them in place.
- Eyes can be drawn, or made from pieces of black paper.
The result is an original three-dimensional picture, which can be supplemented at your discretion - with wood or grass.
Simple cardboard applications for children 3-5 years old
If you have nothing to do on a rainy day, try instilling in your child a love of crafts. Start with the simplest applications, for example, such as a kitten. But be prepared that you will have to cut out all the details and let your baby glue them.

One of simple applications A cut-out postcard is considered to be made from cardboard. You can make a greeting card for March 8 or New Year. Moms and dads will remember the labor lesson at school, and the kids will be interested in working together with their parents.
The technology for working on a postcard is very simple:
- You will need a sheet of cardboard and a set of colored paper.
- Bend the cardboard in half.
- Having decided on the design, cut out the necessary parts. For example, for a snowman - white or blue circles, for a flower - oval petals.
- The parents show, and the child uses glue to apply the blanks to the postcard.
In addition to the usual applications, you can make various funny figures from cardboard
How to keep your child busy: paper applique for 1st grade with templates
When teaching their child before school, parents should teach their child how to handle paper. Children in kindergarten trying to make simple crafts. Preschoolers work with more complex applications - they are able to make a small picture.
In modern stores you can find self-adhesive applications that can be glued to a notebook or to decorate a locker at school.
In the 1st grade, children in the labor lesson use the simplest geometric shapes to create applications - square, circle, oval, triangle. If the child does not know how to work with a ruler, you can use stencils. Children cut out figures according to the template and glue them onto cardboard.

First-graders can make easy applications:
- Animals – dog, kitten, squirrel, zebra and mouse;
- Birds – owl, swallow, chicken;
- Fairy tale - bun, mermaid, hut;
- Nature – sun, cloud, tree.
All these applications will consist of the simplest elements, the head is a circle, the ears are a triangle. Using regular PVA glue, they are attached to the base and you get a simple animal or bird face.
How to make a black and yellow bee:
- Cut out 2 circles with a diameter of 4 cm from yellow and black paper.
- Cut out two identical heart-shaped wings from red paper, and two slightly smaller wings from yellow paper.
- Use black paper to make antennae-stripes.
- Place black-yellow-black-yellow circles alternately on blue cardboard.
- From the last yellow one, lay out the bee's antennae.
- Place larger wings on the sides, then glue smaller wings on them.
- Eyes can be drawn or cut out of green paper.
- Glue all the parts to the cardboard - the bee is ready!
Developing thinking: paper application for grade 2 with templates
Having learned how to make basic crafts from paper and cardboard, and become familiar with the technique of creating simple applications, children begin to study a new creativity - three-dimensional applications. Having mastered the skills, children will be able to do beautiful cards for mothers and grandmothers on March 8, for dad - a craft for February 23 or his birthday.

To create the application “Flowers in a Vase” you will need:
- Sheet of cardboard;
- Colored paper – white, yellow, green, blue;
- Glue stick;
- Pencil;
- Scissors.
Having prepared the materials and tools, you can begin needlework.
- Make blanks for the applique - two squares of white paper 5x5 cm, a yellow circle with a diameter of 4 cm. For a bouquet of 5 daffodils, you need to cut out 10 squares and 5 circles according to the template.
- Using a simple pencil, draw stripes dividing the square in half - horizontally and vertically.
- On each side of the square, make cuts along the lines, not reaching the middle by about 0.5 cm. You should get a square divided into 4 quadrangles.
- Each square needs to be twisted - place a pencil diagonally across the square and fold the corners onto it.
- Make all 10 large squares in a similar manner.
- Make 5 yellow circles according to the template - the basis for the center of the flower. Screw the folded circle onto the handle, remove it and secure it with glue.
- To make a flower, you need to fold two blanks of petals together and insert a yellow core. If everything is done correctly, you will get a beautiful 8-petal daffodil.
- Cut thin strips from green paper - the future leaves of the flower. We bend it a little lengthwise and give it a shape.
- You need to cut out a vase using a pre-prepared template. It can be made blue. You can decorate the vase with any ornament cut from paper of a lighter color.
- First glue the vase onto an A4 cardboard sheet so that its bottom coincides with the bottom of the paper. The application is placed vertically.
- Then stick the daffodil leaves in a chaotic order, after which you can begin to form the bouquet. Glue the flowers so that they are in the center of the entire application.
All parts must be glued well so that after drying they hold firmly. The finished picture can be decorated with an edging of small figures or beads.
Volumetric application for 3rd grade with templates
Third grade students can make more complex and time-consuming work using the quilling technique or interesting three-dimensional crafts. Teachers often wonder what kind of paper work to create for children to make it interesting for them.

In 3rd grade, girls are still playing with dolls, so it will be interesting for them to make three-dimensional furniture for a dollhouse. Boys can make an airplane, a racing car. On the website Country of Masters you can find a sample of three-dimensional paper crafts for every taste - templates for origami, quilling patterns. You can print out the diagrams and templates and do them with your children in class or give them homework.
If you run out of ideas, you can always ask the guys what they would like to do in class.
Children's applications using the quilling technique are very popular among schoolchildren. This is not only a unique gift, but also a beautiful decor.
How to make paper appliques for children (video)
Paper applications are a great way to keep children occupied for a certain amount of time. Even the youngest children - from 3 years old and schoolchildren - can engage in this type of creativity. primary classes. Armed with imagination and a craft kit, children can create incredible pictures and impress their families with their achievements.
The most common material for creating simple crafts is colored paper. Indeed, working with paper is not only easy, but also fun. Working with paper is also an excellent exercise for little ones' fingers. Considering all these advantages of paper, we decided to offer you crafts made from colored paper for kids. Here you can see the brightest ideas and try to have fun with your child.
Craft ideas made from colored paper
Chamomile.
Today there are a huge number of paper crafts for children. But we hasten to offer you only the most best ideas. For example, all children love the daisy flower. Therefore, they will be happy to do it. To create a flower you will need:

- multi-colored paper and a sheet of cardboard,
- PVA glue and scissors.
Work progress:
- From sheets of paper white long strips are cut. To ensure that the stripes are even, lines are first drawn on a sheet of paper with a pencil and a ruler.
- After that, circles are cut out of yellow paper, which will be the middle of the chamomile.
- It is also worth cutting out 3 long strips of green paper and several leaves.
- You need to make petals from white stripes. White strips are glued together on both sides to create loops.
- Then all the elements are glued to the cardboard. (Please note the photo).

Paper goldfish.
All crafts made from colored paper that we list in this article are suitable for children 4-5 years old. To make a fish you should take:
- a sheet of thick cardboard and a round plate,
- ruler and scissors,
- colored paper and PVA glue,
- a simple pencil and elements for decorating the fish.
Work progress:
- First we cut out the fish figurine. To do this, take a plastic plate, place it on cardboard and the child traces its contours. After which the resulting circle is cut out.
- Using a pencil, draw straight lines to the edges of the plate. In this case, you need to use a ruler so that a triangle is formed. Now the baby must cut out this triangle.
- The piece that was recently cut will be the tail of the fish. It is glued to the back of the cardboard circle.
- Now you need to draw an eye or cut it out of colored paper.
- That's it, the simple craft is ready. You can simply admire it or use it in children's games.

Original butterfly made from children's hands.
Very entertaining applications can be made from the contours of children's palms. In addition, such an activity can please your child and give him a lot of positive emotions.
Note! Save this craft so that you can remember the size of your child’s hands in the future.
To make a craft, take:
- Colored paper and scissors,
- White sheets and glue stick,
- Elements for decoration.
Work progress:
- The baby must first place his left palm and then his right palm on the sheets of paper. Using a pencil, an adult traces the contours of the palm. As a result, it is worth making 4 palms of different colors. They will be the wings of a butterfly.
- The palms are now glued onto a sheet of white cardboard. (Please note the photo).
- After which an oval is drawn on a colored sheet. It must become the body of a butterfly. The child must glue it between the wings and palms.
- Now you need to draw eyes and a smile with felt-tip pens.
- You can use completely different elements to decorate the wings. It could be sparkles or sequins. You can also apply ready-made stickers.

Beautiful paper applique.
In this article you will find complex crafts for kids made of colored paper. These items will be fun and easy to make. Invite your child to make an applique from colored paper. Surely he will enjoy this activity. To create an application you will need to prepare:
- a sheet of thick cardboard and a simple pencil,
- scissors and glue, colored paper.
Work progress:

Heart "With love".
Crafts made from colored paper for kids must be bright. In this case, the process of creating them will definitely interest the child. To make the following craft you need to take:
- Thick sheet of cardboard and PVA glue,
- Corrugated paper of different colors and scissors.
Work progress:
- Draw an even heart on a piece of cardboard. It should have a size of 20x20 cm. Cut out this heart.
- Colored corrugated paper cut into squares 2x2 cm.
- These squares are glued as follows. Coated with glue small area heart, a square is glued to it. Using a toothpick, the edges of this square are raised.
- This way you need to fill the entire space of the heart.

Cute caterpillar.
To make it fun and interesting for children to make crafts of various kinds, be sure to offer them only bright colored paper to work with.
To make a caterpillar, take: colored paper and glue.
Making a caterpillar is incredibly easy. The base cardboard is being prepared. Circles are cut from sheets of colored paper. Moreover, the circles should be of different sizes. The largest circle is the head. The circle of smaller diameter is the tail. Glue all the parts onto cardboard.
On a large circle, use a black felt-tip pen to draw facial features and make hairs with horns from black paper. 
Ladybug.
Here we offer you simple crafts made from colored paper. Do ladybug very simple. Take cardboard and glue for this.
Work progress:
- A circle is cut out of red cardboard. Circles and stripes are glued onto it.
- The legs and head are cut out separately from black cardboard. All these elements are glued to the red circle on the inside.
- Now all that remains is to glue on the eyes and antennae, which can also be made from colored cardboard.

Volume cat.
Making a voluminous cat is simple and very quick. To make a cat, take:

Work progress:
- In order to make a cat you will need a template. It is downloaded and cut out.
- Make 4 cuts in the template. They are made along marked, solid lines.
- The neck bends like an accordion and the tail curls.
- The paws along the line also need to be bent and glued to a piece of cardboard.

In conclusion
Now you know what crafts to make with preschoolers from colored paper. We hope that the above ideas are wonderful for you and that you will be able to get creative with your child in the very near future.


